
If you’re planning to work abroad, you must first register with the Philippine Overseas Employment Administration (POEA), which is the agency responsible for monitoring the recruitment and employment of Filipino workers abroad. To accommodate the growing number of overseas Filipino workers (OFW), the agency established the POEA e-Registration System to facilitate the online registration of applicants for overseas jobs.
Millions of Filipinos dream of working abroad, believing that landing a highly paid job in other countries is their ticket to a better life. Overseas employment, however, is fraught with risks, including the possibility of getting scammed by illegal recruitment agencies. Registering with the POEA ensures that you are well documented and that your rights as an OFW are protected.
In the past, registering with the POEA requires going to a POEA regional or satellite office, but with the government’s push to modernize its services in the digital age, job applicants can now do it online. You no longer have to visit the POEA office and submit your documents since online registration can be done using your computer or mobile device. This saves you time, effort and money which would otherwise be spent in processing your job applications with your recruitment agency.
We know that not everyone is adept or savvy with computers and the Internet, so we took the time to write this tutorial on how to register with the POEA online. We hope that you’ll find this guide useful in your journey as a future OFW.
What is the POEA e-Registration System?
The POEA e-Registration System is the manpower registry of the Philippine Overseas Employment Administration. Registering with the online registration system is the first step in getting a job abroad and is a requirement for all aspiring OFWs. After registration, applicants will be issued a unique e-Registration Number.
Through the POEA e-Registration System, you can:
- Register for overseas employment
- Access information about job vacancies abroad
- Apply for job vacancies with POEA-licensed recruitment agencies
- Get notifications on the status of your job applications
- Verify the status of transactions
- File requests for the registration of principals or employers
- Pay your processing fees
- Apply for your Overseas Employment Certificate (OEC)
- View employment contracts
The POEA officially launched Version 2 of the POEA e-Registration System on November 2019. Users of the old system (Version 1) can still log in to their accounts but will need to activate their accounts and log in using a temporary password.
Since the system is newly developed, don’t be surprised if you encounter errors and if you see that some features are not yet available. If you are experiencing slowness, try refreshing the browser or trying again at a later time. It’s possible that many users are using the system at the same time and thus overloaded the server.
How to Register with the POEA e-Registration System
Before you start with the registration, you’ll need the following things:
- A desktop computer or laptop
- A stable Internet connection
- Scanned or digital copy of your 2″ x 2″ passport-sized photo
- Photo or scanned copy of the first page of your Philippine passport
We don’t recommend using a smartphone for the registration because the POEA e-Registration website is not mobile-friendly. But if you have no other choice, you can still use a smartphone or tablet. Just be aware that the texts and fields are really small on mobile, so you’ll have to do a lot of zooming and scrolling.
Step 1: Sign Up and Activate Your Account
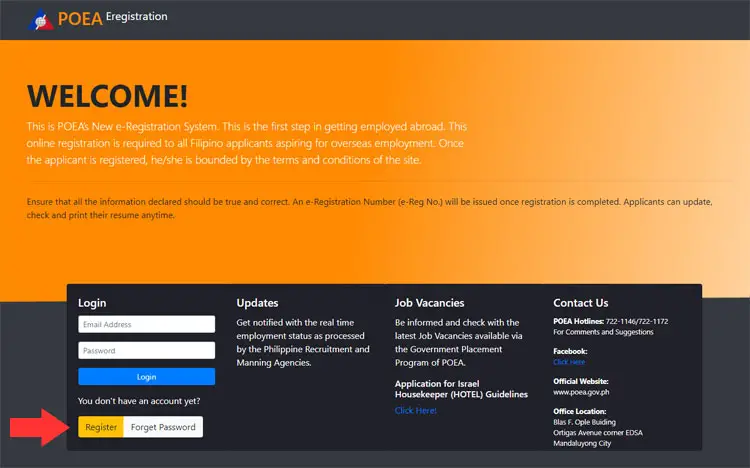
Using your web browser, go to the POEA e-Registration website. Close all popups.
Click the Register button at the bottom, as shown by the red arrow in the screenshot.
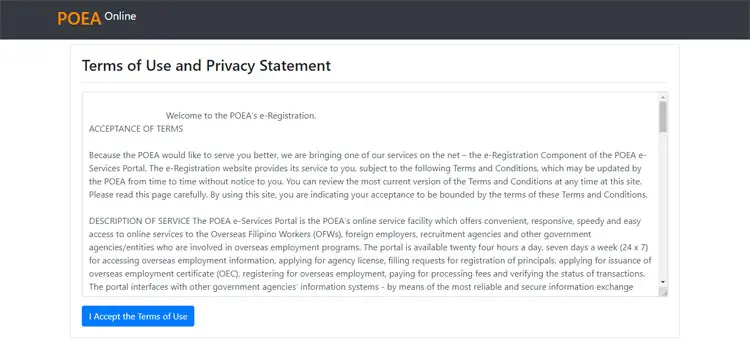
Read the terms of use and privacy statement. Click “I Accept the Terms of Use.”
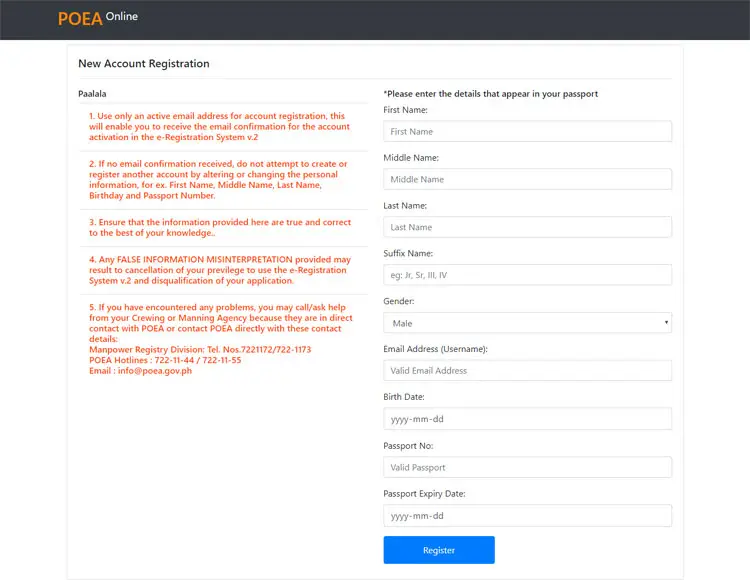
Enter your personal information including your first name, last name, gender, email address, birthdate, passport number and passport expiry date. All fields except the suffix name are required.
Remember to read the reminders and warnings on the left side of the page.
Click “Register” when you’re done.
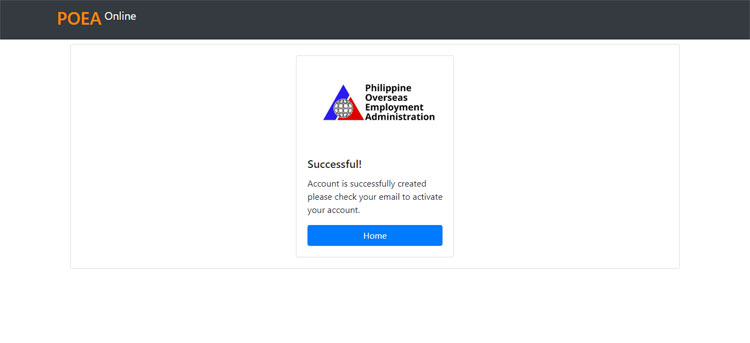
Your POEA e-Registration System account has been created. Check your email for the temporary password.
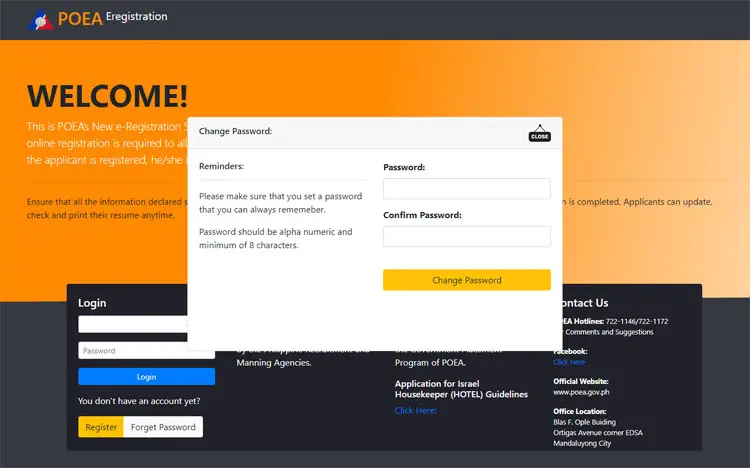
Click the link inside the email or return to the POEA e-Registration website and login using your email address and temporary password.
You will be asked to create a new password. Enter it twice and click “Change Password.”
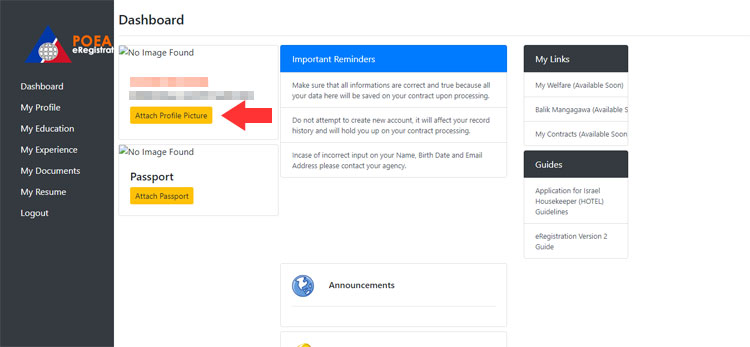
Step 2: Upload Photo and Passport
You’re now logged in to your account. The first thing you have to do is to upload your profile picture. Click “Attach Profile Picture.”
Click “Choose File” and select a digital or scanned copy of your passport-sized photo. It must be in JPEG format and less than 2MB in size. Click “Upload.”

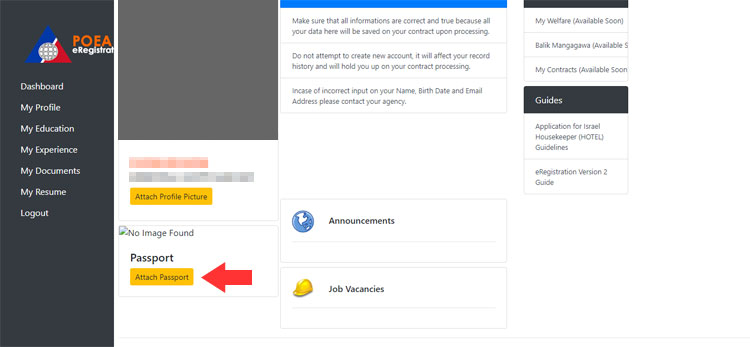
Next is to attach a photo of the first page of your passport. Click “Attach Passport.”
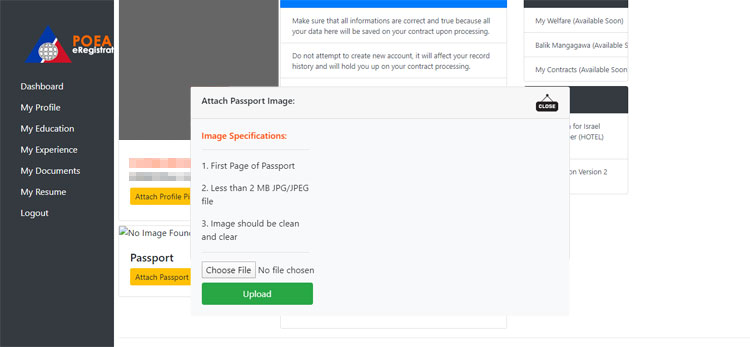
Click “Choose File” and upload a digital or scanned copy of the first page of your passport. It must be in JPEG format and less than 2MB in size. Click “Upload.”
Step 3: Update Your Profile
Next is to update your profile. Click “My Profile” on the menu on the left.
Enter or select the following missing information:
- Mobile number
- Contact number (if any)
- Weight (kilograms) – convert pounds to kilograms here
- Height (meters) – convert feet and inches to meters here
- Civil status
- Religion – the default is Aglipayan so change this
- House address (street, barangay, city/municipality and province)
- Birthplace
- Mother’s maiden name
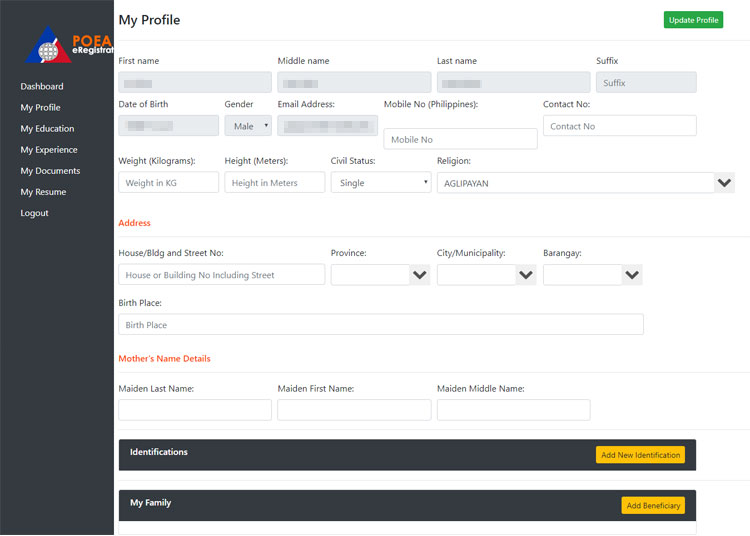
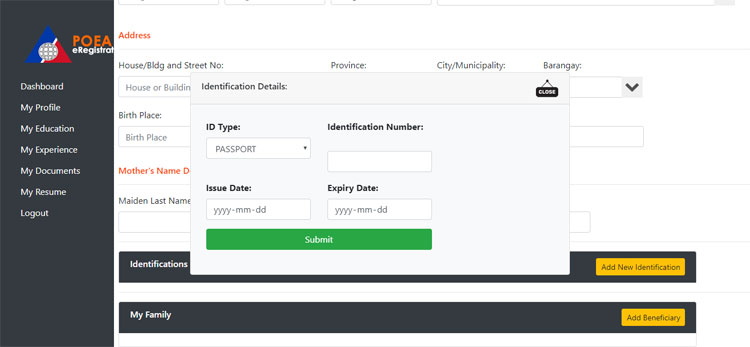
Click “Add New Identification” to provide your IDs. Valid IDs are:
- Passport
- SSS ID
- OWWA ID or OFW e-Card
- TESDA ID
- Seaman’s Book (SIRB)
- PhilHealth ID
- Pag-IBIG
- UMID
Select the ID type and enter the ID number, date of issuance, and expiry date. Click “Submit.”
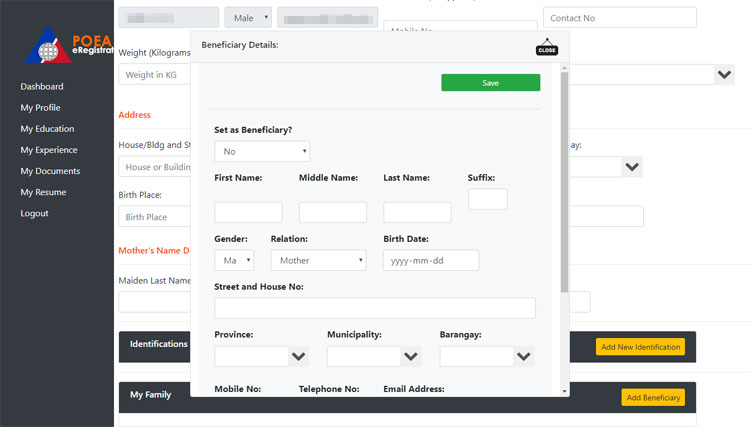
You can also set your beneficiaries. Click “Add Beneficiary” and enter the corresponding information such as names, gender, relation, birth date, address, mobile number, and email address. Click “Save” when you’re done.
Click “Update Profile” when you’re finished completing your profile and adding your IDs and beneficiaries.
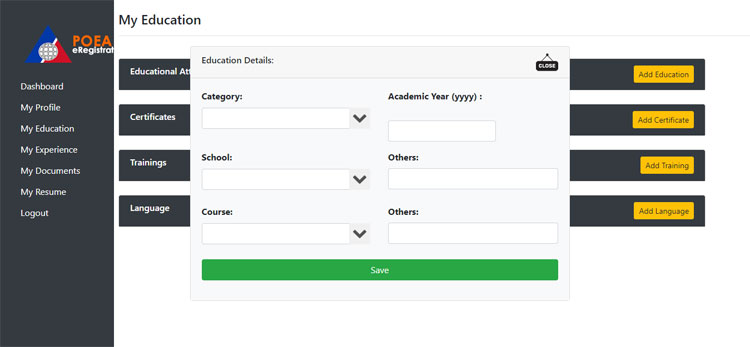
Step 4: Update Your Education
Click “My Education” on the left side of the page. This is where you’ll provide information about your educational attainment, certificates, training and language.
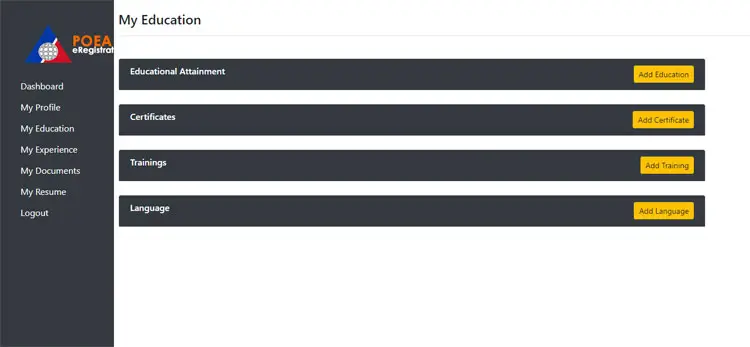
First, click “Add Education.”
Select the category (elementary, high school, college, vocational, doctorate, etc.). Enter the academic year.
Choose your school from the dropdown box or start typing the name of your school to select it. If your school is not on the list, enter its name into the “Others” field.
Do the same for your course. Select your course from the dropdown box or start typing the name of the course to narrow down your choices. Enter the course into the “Others” field if you can’t find it on the dropdown field.
Click “Save” when you’re done. You can add as many educational attainments as possible.
Click “Add Certificates” to provide your certificates from TESDA and other educational institutions. Enter the title, certificate number, issuing agency or institution, number of hours, date of issuance, and expiration date. Click “Save” to add your certificate.

If you attended or completed training, add it by clicking “Add Training.” Provide the name of the training, certificate number, duration, skills acquired, and the name of the training institution. Click “Save” to add the training.

The last step in this section is to list down all languages that you’re fluent or proficient in. Click “Add Language” and choose the language from the dropdown list. Rate your speaking and writing skills in that language, with 0 as the lowest and 10 as the highest. Click “Save” to add the language.

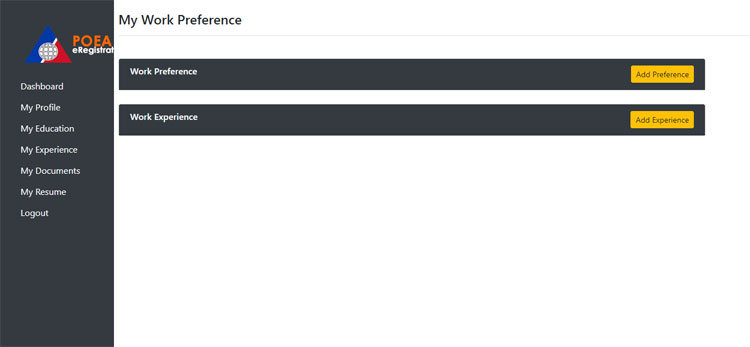
Step 5: Update Your Work Experience
Click “My Experience” on the left window.
Click “Add Preference.” Select the class, either landbased or seabased.
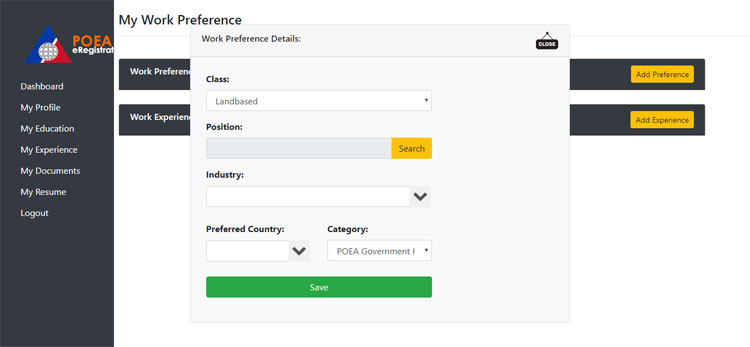
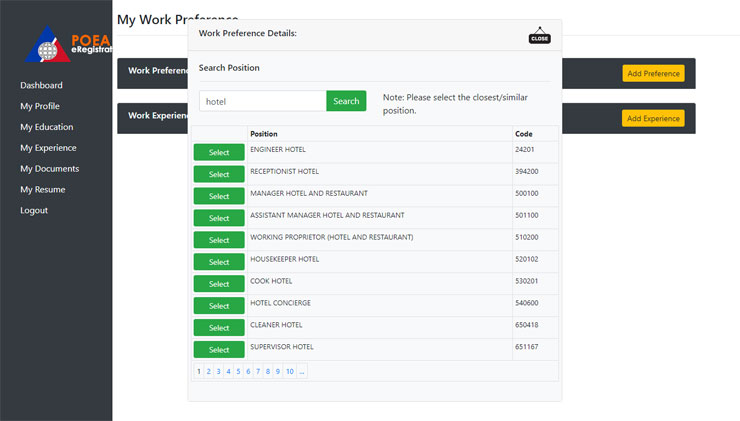
To choose the position, click “Search.” Enter the keyword (e.g. hotel) and click “Search” again. You will be shown a list of positions related to the keyword. Click “Select” to choose the position.
Choose the industry, your preferred country, and category (i.e. POEA government hiring, agency hire, direct hire, etc.). Click “Save” to add your preference.
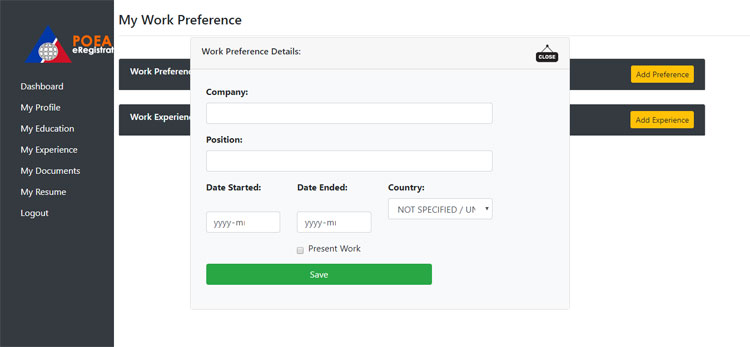
Click “Add Experience” to add your work experience and details. Enter the name of the company, your position, dates of employment, and country. Check “Present Work” if you’re currently working in that company. Click “Save.”
Step 6: Add Your Documents
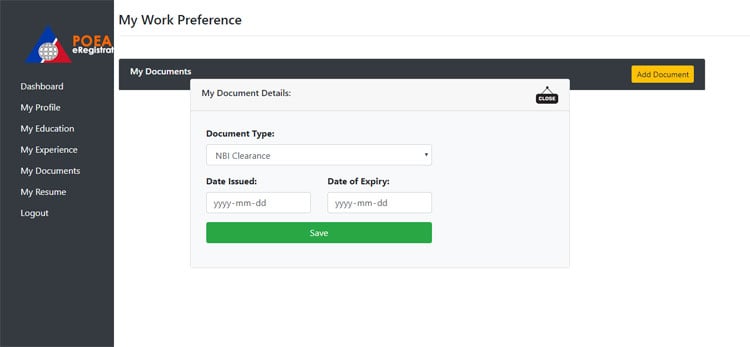
Click the “My Documents” link on the sidebar menu on the left.
Click “Add Document” to add your pertinent documents like NBI clearance, police clearance and medical certificate. Choose the document type and enter the date issued and date of expiry. Click “Save” to add the document.
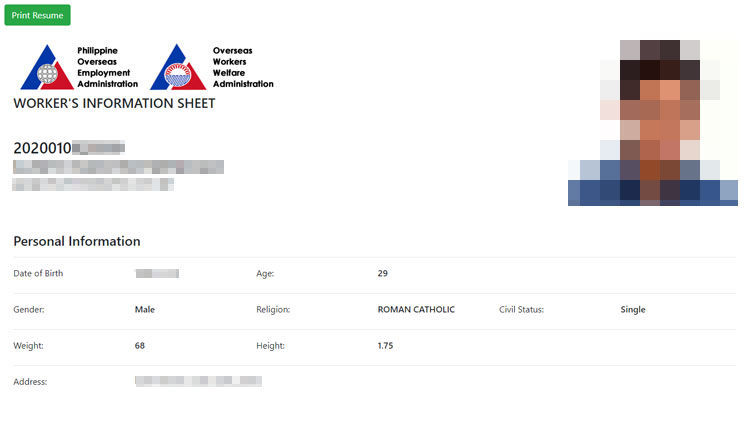
Step 7: View Your Resume
You can now view and print your resume. Just click “My Resume” to generate your worker’s information sheet. Click the green “Print Resume” button to print the document.
If you’re using a public computer, don’t forget to log out by clicking “Logout.”
POEA e-Registration Assistance
There you have it. You have just registered for the POEA e-Registration System. In case of technical problems and other related concerns, call the hotline numbers 722-11-44 and 722-11-55 or email info@poea.gov.ph. Good luck in your journey as an OFW!


