

Decent shelter is one of the necessities of life. That is why the Home Development Mutual Fund (HDMF) or the Pag-IBIG Fund was established to assist Filipinos in getting decent shelter and affordable housing. If you’re not a member of the Pag-IBIG Fund yet, you can still follow our Pag-IBIG online registration tutorial to become a bonafide member of Pag-IBIG.
When you’re a Pag-IBIG member, you can avail of several benefits such as the Pag-IBIG housing loan, short-term loans, and provident savings. Employees are required by law to be a member of the HDMF or Pag-IBIG Fund, so if you’re employed in the past, chances are, you are already a member.
Who Can Be a Member of Pag-IBIG?
Any Filipino citizen can be a member of HDMF, including but not limited to:
- A private employee, whether permanent, temporary, or provisional who is not over 60 years old;
- A household helper earning at least P1,000 per month;
- A Filipino seafarer upon the signing of the standard contract of employment between the seafarer and the manning agency, which together with the foreign ship owner, acts as the employer;
- A self-employed person regardless of trade, business or occupation, with an income of at least P1,000 per month and not over 60 years old;
- All employees who are subject to mandatory coverage by the Government Service Insurance System (GSIS);
- Uniformed members of the Armed Forces of the Philippines, the Bureau of Fire Protection, the Bureau of Jail Management and Penology, and the Philippine National Police;
- Filipinos employed by foreign-based employers, whether they are deployed locally or abroad or a combination thereof.
If you don’t have a Pag-IBIG MID number, you can register for it online at the Pag-IBIG website. In this tutorial, we will walk you through the Pag-IBIG online registration process so that you will have your own Pag-IBIG number.
Pag-IBIG Online Registration Step-by-Step Process
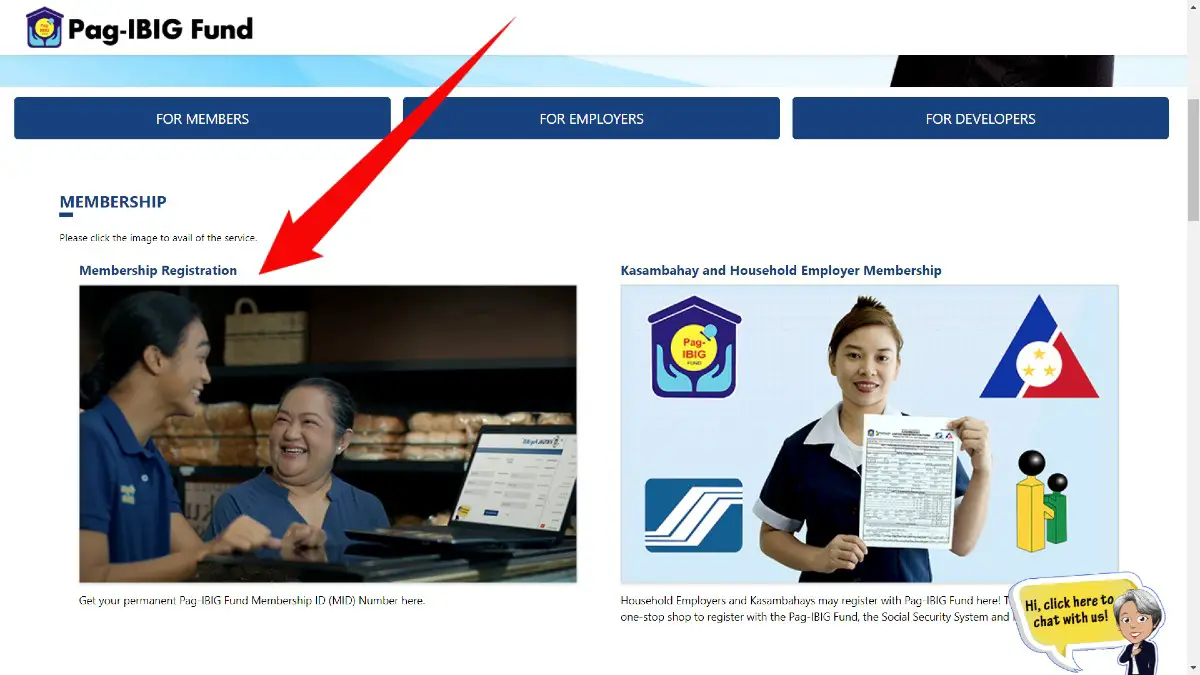
Step 1: Open the Pag-IBIG Online Services website at https://www.pagibigfundservices.com. Click the Membership Registration section as shown on the screenshot image below.
Alternatively, you may click this link to go straight to the Pag-IBIG online membership registration page.
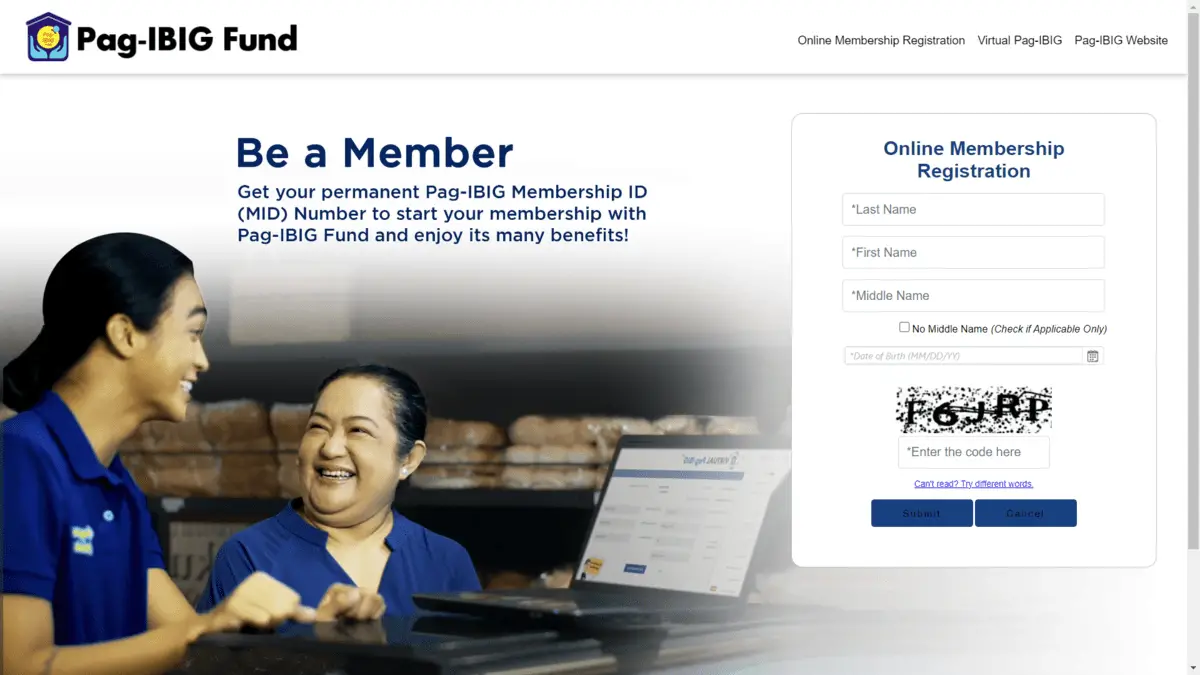
Step 2: Enter the following required information:
- Last Name – Enter your family name or surname.
- First Name – Enter your first name or given name.
- Middle Name – If you don’t have a middle name, check “No Middle Name.”
- Date of Birth – Provide your birthdate in MM/DD/YYYY format. For example, if your date of birth is September 15, 1990, then type 09/15/1990. You can click the calendar icon to use the date picker.
Input the captcha code and then click Submit.
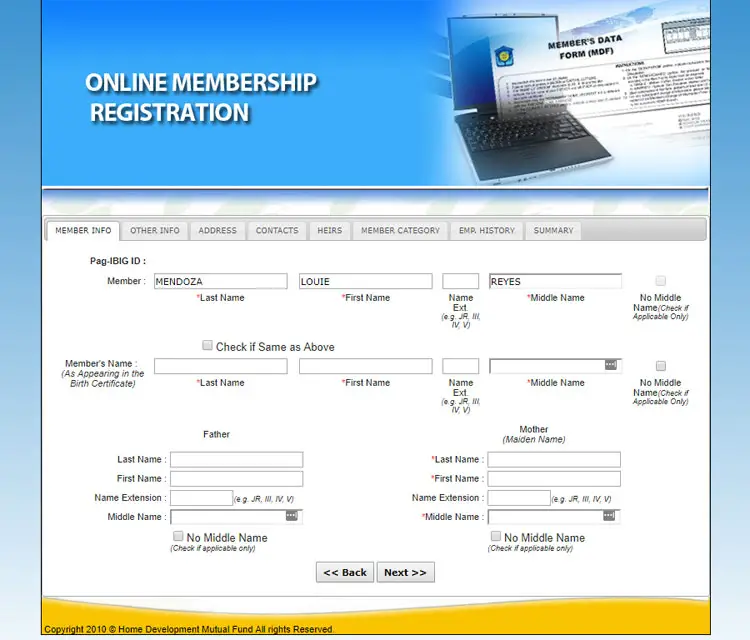
Step 3: Next, enter your member information including your father’s name and mother’s maiden name.
- Member’s Name – If the name in your birth certificate is the same as the name you previously entered, tick the box for “Check if Same as Above.”
- Last Name – Enter your family name or surname.
- First Name – Enter your first name or given name.
- Name Extension – If your name has a suffix such as Sr., Jr., III, type it here.
- Middle Name – If you don’t have a middle name, check “No Middle Name.”
- Father – Your father’s name is optional.
- Mother – Indicate your mother’s maiden name. If she doesn’t have a middle name, check “No Middle Name.”
Click Next to continue.
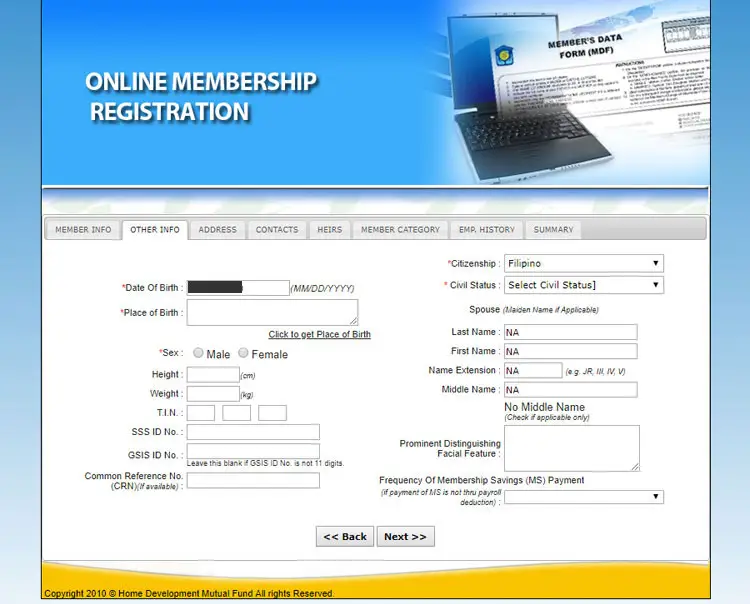
Step 4: In the Other Info section, enter your place of birth, sex, citizenship, and civil status. You can also enter your spouse’s name, height, weight, TIN, and other information.
- Date of Birth – This entry was filled out in Step 2.
- Place of Birth – Click the link “Click to get Place of Birth” and then select your region, province and city/municipality.
- Sex – Choose either male or female.
- Height (optional) – Enter your height in centimeters (cm). Use this calculator to convert feet and inches to centimeters.
- Weight (optional) – Enter your weight in kilograms (kg). Use this calculator to convert pounds to kilograms.
- T.I.N. (optional) – If you have a tax identification number (TIN) from the BIR, enter it here.
- SSS ID No. (optional) – If you have an SSS ID, provide the ID number here.
- GSIS ID No. (optional) – If you have a GSIS ID, provide the ID number here.
- Common Reference No. (CRN) (optional) – If you know your SSS CRN, enter it here.
- Citizenship – The default is “Filipino.”
- Civil Status – Choose whether you’re single, married, legally separated, annulled, or widow/er.
- Spouse – Indicate your spouse’s (wife or husband) name, if married. For wife, provide her maiden name.
- Prominent Distinguishing Facial Feature (optional) – If you have a facial feature such as a birthmark, describe it here.
- Frequency of Membership Savings (optional) – If payment of membership savings is not through payroll deduction, click the dropdown box and select the frequency of payment: monthly, quarterly (every 3 months), semi-annually (every 6 months), or annually (every year).
Click Next to proceed to the next section.
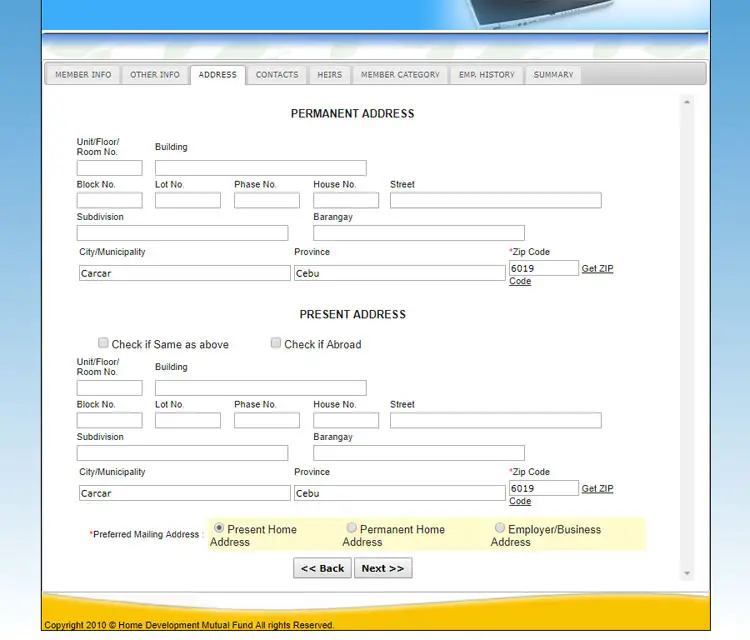
Step 5: In the Address section, provide your permanent and present addresses.
- Permanent Address – All address fields are optional except for city/municipality, province and ZIP code. To input your ZIP code, click “Get ZIP code” and select your region, province and city/municipality.
- Present Address – If your present address is the same as your permanent address, tick the “Check if Same as Above” checkbox. Otherwise, fill out the address fields.
- Preferred Mailing Address – This is where any mail from the Pag-IBIG Fund will be sent. Choose from your present, permanent or employer/business address.
Click Next to go to the next section.
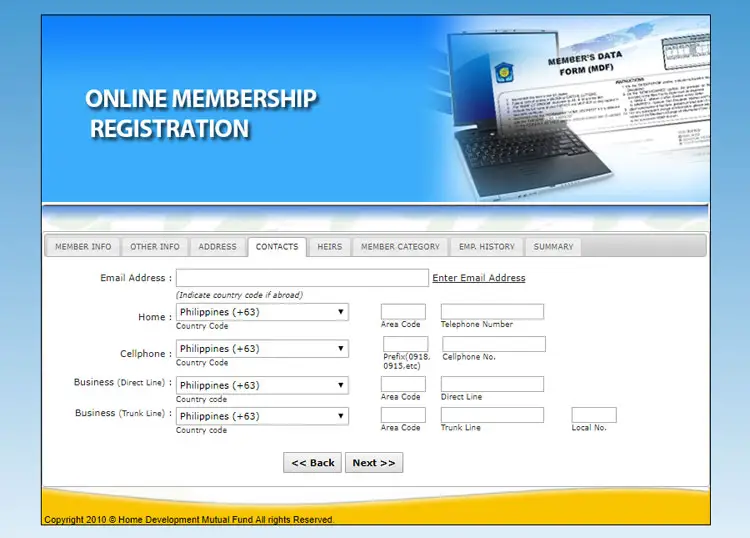
Step 6: In the Contacts section, provide your email address, telephone number (if any), and cellphone number. This section is completely optional.
- Email Address (optional) – To enter your email address, click “Enter Email Address” and input it twice.
- Home (optional) – Provide your home telephone number including the area code.
- Cellphone (optional) – Enter your mobile number including prefix.
- Business (Direct Line) (optional) – If you have a business telephone, indicate its number including area code.
- Business (Trunk Line) (optional) – If your business has a trunk line, indicate its number including area code and local number.
Click Next to continue.
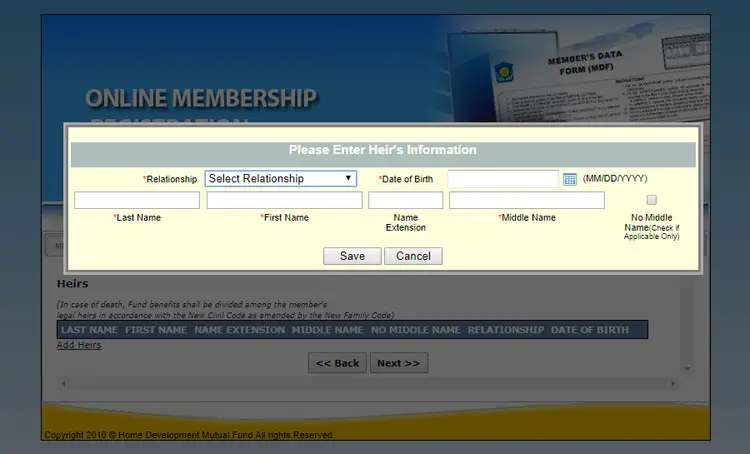
Step 7: In the Heirs section, add your legal heirs, which could be your relative or your spouse. Your fund benefits will be divided among your heirs in case of death.
This section is completely optional. Click “Add Heirs” to start inputting information.
- Relationship – Select your relationship with your preferred heir. For example, if the heir is your son, select “Son” on the dropdown field.
- Date of Birth – Enter your heir’s birthdate in MM/DD/YYYY format. For example, if his/her date of birth is September 15, 1990, type 09/15/1990. You may click the calendar icon to use the date picker.
- Last Name – Provide your heir’s surname or family name.
- First Name – Enter your heir’s first name or given name.
- Name Extension (optional) – If your heir has a name suffix such as Sr., Jr., III, type it here.
- Middle Name – If your heir doesn’t have a middle name, check the box on the right.
Click Save to add your heir’s details. You can add more than one heir.
When you’re done, click Next to continue.
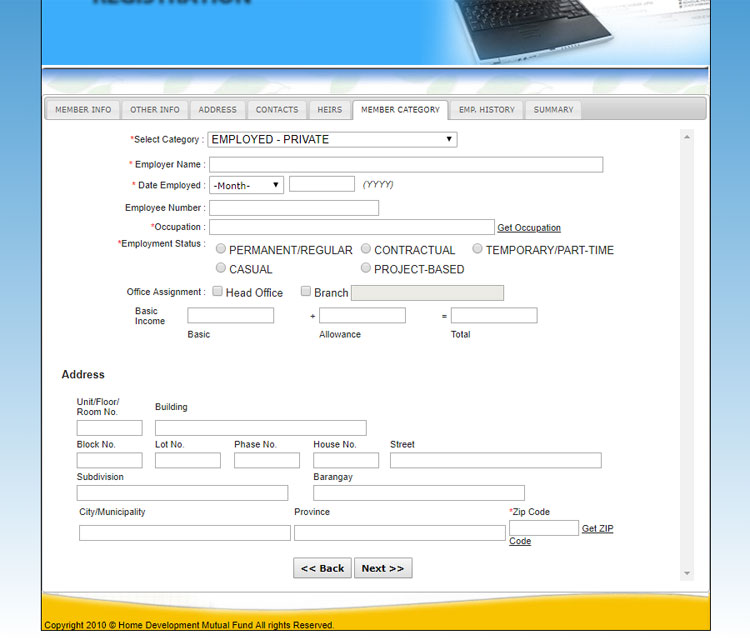
Step 8: In the Member Category section, select your appropriate membership category on the dropdown field. For example, if you’re employed in a private company, select “Employed – Private.”
- Employer Name – Write the name of your employer or company.
- Date Employed – Indicate the month and year when you started working for your employer.
- Employee Number (optional)
- Occupation – Click “Get Occupation” and select your job or occupation.
- Employment Status – Choose your job status, whether regular, contractual, temporary, casual, or project-based.
- Office Assignment (optional) – Choose whether you’re assigned at the head office or at the branch. If the latter, provide the name of the branch.
- Basic Income (optional) – Indicate your monthly income or salary including allowances.
- Address – Provide your work address. All address fields are optional except for city/municipality, province and ZIP code. Click “Get ZIP Code” and choose your region, province and city/municipality.
Click Next to proceed.
Step 9: In the Employment History section, click Add Employment Detail to add your previous and present jobs. This section is completely optional.
- Company Name – Enter the name of your company or employer.
- Office Assignment – Choose whether you’re assigned at the head office or at the branch. If the latter, provide the name of the branch.
- Employed From and To – Indicate your employment start and end date. If you’re currently employed at this job, check “Present.”
- Address – Provide your work address.
Click Next to continue.

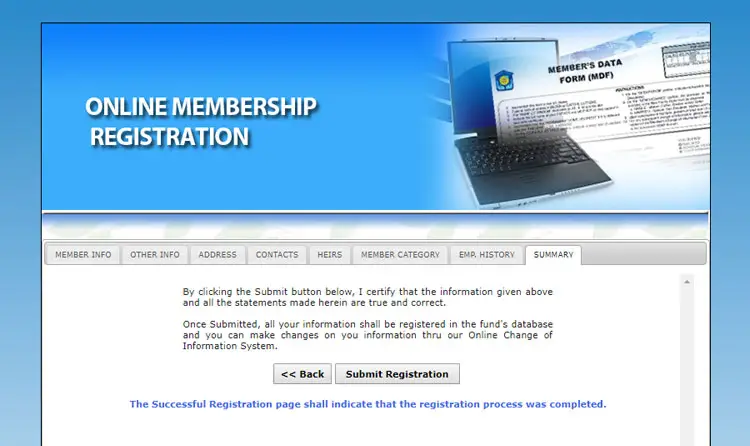
Step 10: Finally, in the Summary section, click the Submit Registration button to complete your registration. Make sure that all the information you entered are complete and accurate to the best of your knowledge.
Step 11: You will then be redirected to the Successful Registration page. Print the Member’s Data Form (MDF) by clicking the PRINT MDF button.
If you don’t have a printer, you can save the Pag-IBIG form as an HTML file by pressing Ctrl + S.
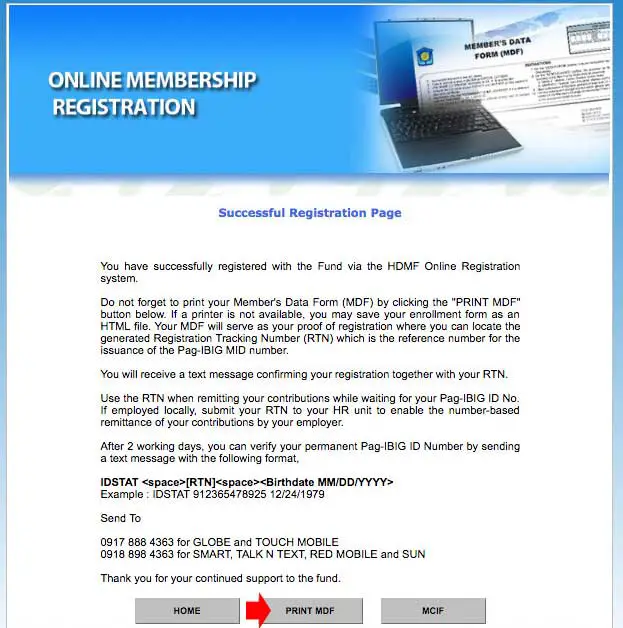
The Pag-IBIG Registration Tracking Number (RTN) found in your MDF will serve as your reference number for the issuance of the Pag-IBIG MID number. Use the RTN to remit your contributions while waiting for your Pag-IBIG ID number.
Pag-IBIG Online Verification
After two working days, you can verify your permanent Pag-IBIG number by sending a text message in this format:
IDSTAT<space>[RTN]<space><Birthdate MM/DD/YYYY>
Example: IDSTAT 123456789 12/30/1990
Send to 09178884363 for Globe and Touch Mobile subscribers and 09188984363 for Smart and Talk N Text subscribers.
Wrapping Up
That’s it! You are now a member of HDMF or the Pag-IBIG Fund. We hope that you find this Pag-IBIG online registration tutorial useful and please share it with your friends who might need it.
If you have any questions or concerns, call the Pag-IBIG hotline number 8-724-4244 or email [email protected].


