


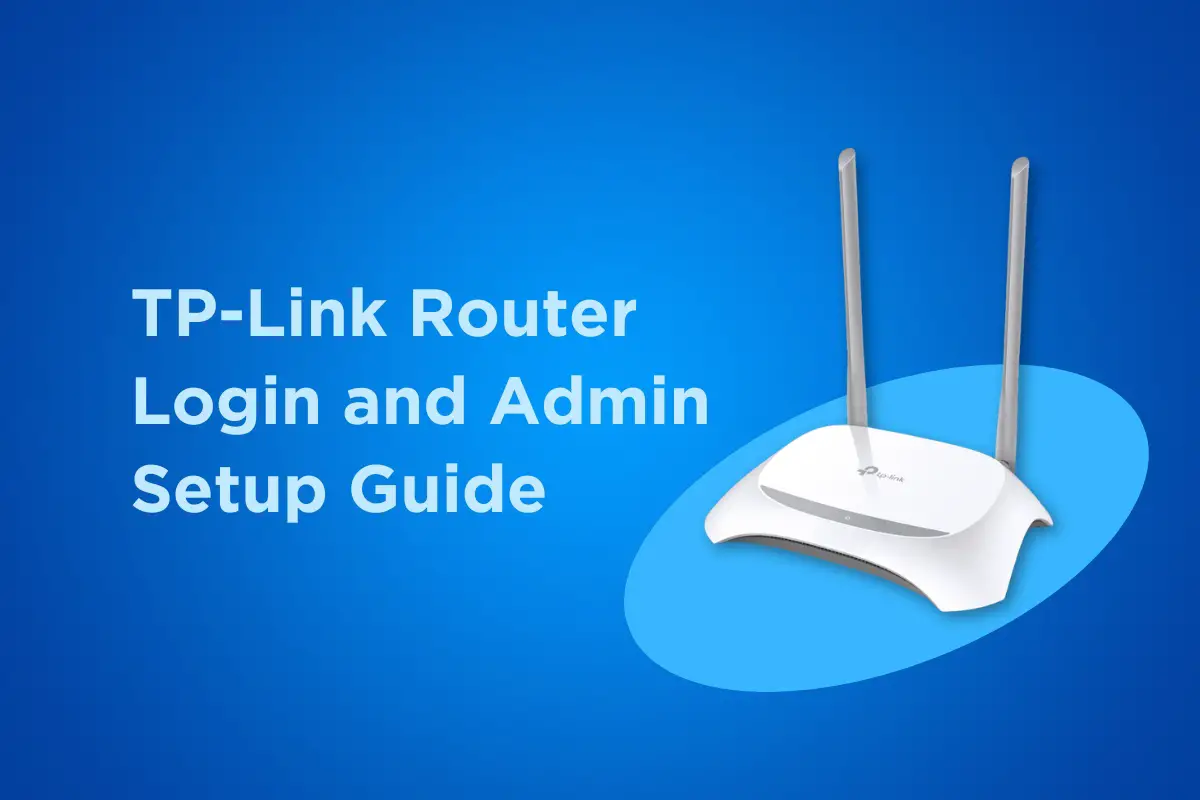
If you recently bought a TP-Link router, perhaps you already know that you can manage your home network to improve the Internet speed and enhance its security. Don’t worry if you’re not a computer whiz because you can easily login to your TP-Link router’s admin panel and configure its settings.
Your Internet service provider (ISP) may have already provided you with a router during installation. In most cases, that router is sufficient for your Internet browsing needs, but if you want better control over your Wi-Fi or Ethernet network, then it’s recommended to install another router such as the TP-Link WR840N.
By installing another router on your home network, you’ll be able to bypass some restrictions or limitations imposed by your ISP, such as the ability to block users or create a guest network for visitors. You can also turn the router into a Wi-Fi extender or repeater to extend the range and coverage of your wireless network.
In this tutorial, we’ll teach you how to connect your TP-Link router to your existing home network, login to the admin panel, and configure your network settings for a faster, more efficient and more secure Internet connection.
TP-Link Router Login
Type 192.168.0.1 in your browser’s address bar or click the button below. Make sure that you’re already connected to the TP-Link wireless network (the default Wi-Fi password is printed at the bottom of the router).
How to Install the TP-Link Router
The first thing you need to do is to install the TP-Link router by connecting it to your modem or an Ethernet outlet. Your TP-Link router usually comes with a quick installation guide, but if you don’t have it, just follow these steps:
- Turn off and unplug the modem.
- Connect the modem to the TP-Link router’s WAN port using the white Ethernet cable.
- Turn on the modem and wait for at least two (2) minutes.
- Connect the power adapter to the TP-Link router and plug the adapter to an electrical outlet.
- Wait for the router’s LED light to turn solid.
How to Login to the TP-Link Router Admin Panel
So now that you’ve already connected your TP-Link router to your modem, it’s time to login to the admin dashboard to set up your network and configure its settings.
Step 1: Connect to the TP-Link wireless network
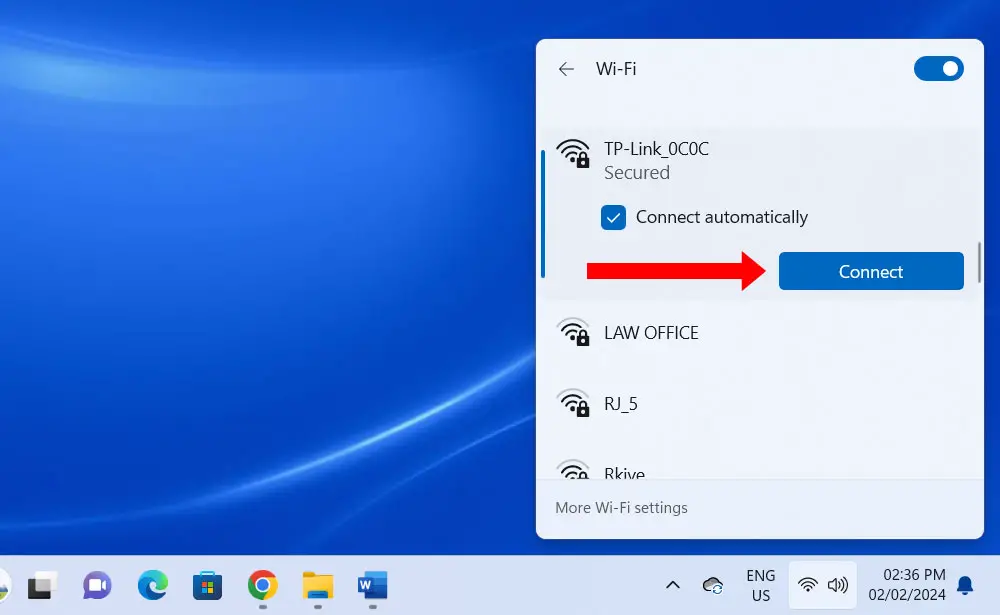
On your computer, click the Wi-Fi icon on the bottom-right side of the Windows taskbar. Select the Wi-Fi network with a network name or SSID starting with “TP-Link_” (the SSID is printed at the bottom of the TP-Link router).
After selecting the network, click the “Connect” button.
Step 2: Enter the Wi-Fi password
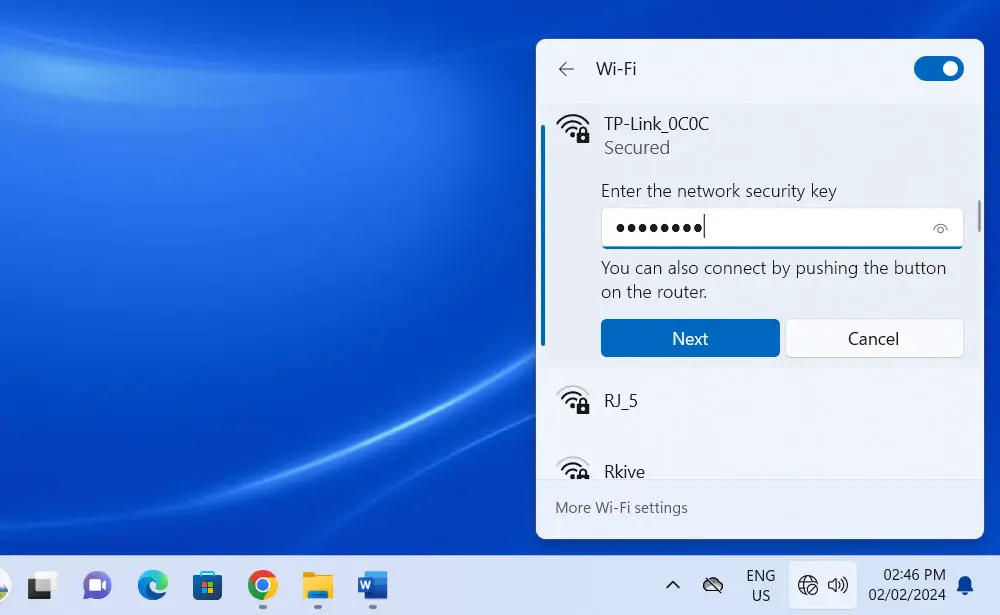
Just like the SSID, the network security key or Wi-Fi password is also printed at the bottom of the TP-Link router.
Type the default Wi-Fi password and click “Next.”
Step 3: Type 192.168.0.1 on your browser
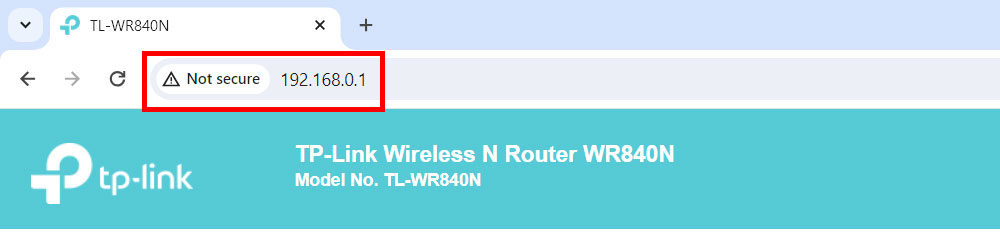
After you’ve successfully connected to the network, open your browser (e.g. Google Chrome) and type 192.168.0.1 in the address bar. You can also type tplinkwifi.net.
Step 4: Create your TP-Link router login password
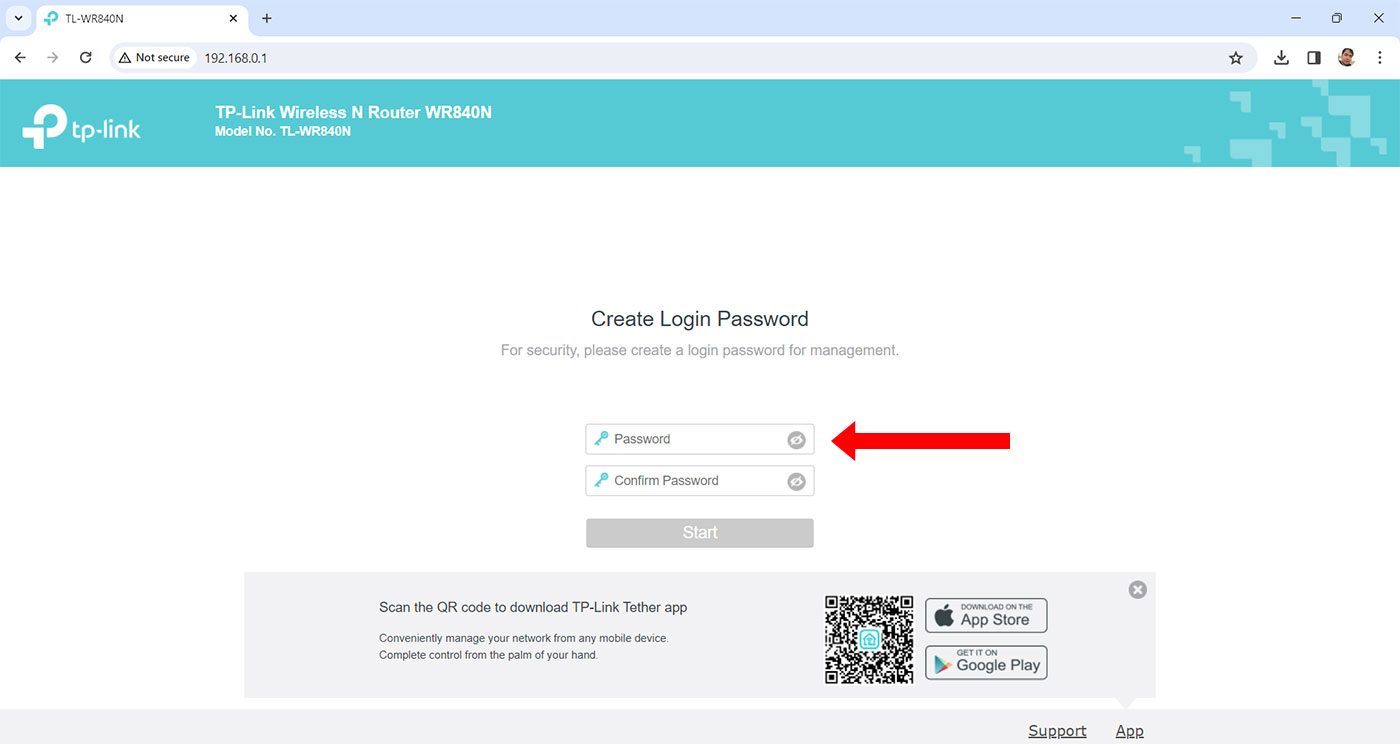
You will be asked to create a login password for the TP-Link admin dashboard. Enter the password twice and click “Start.”
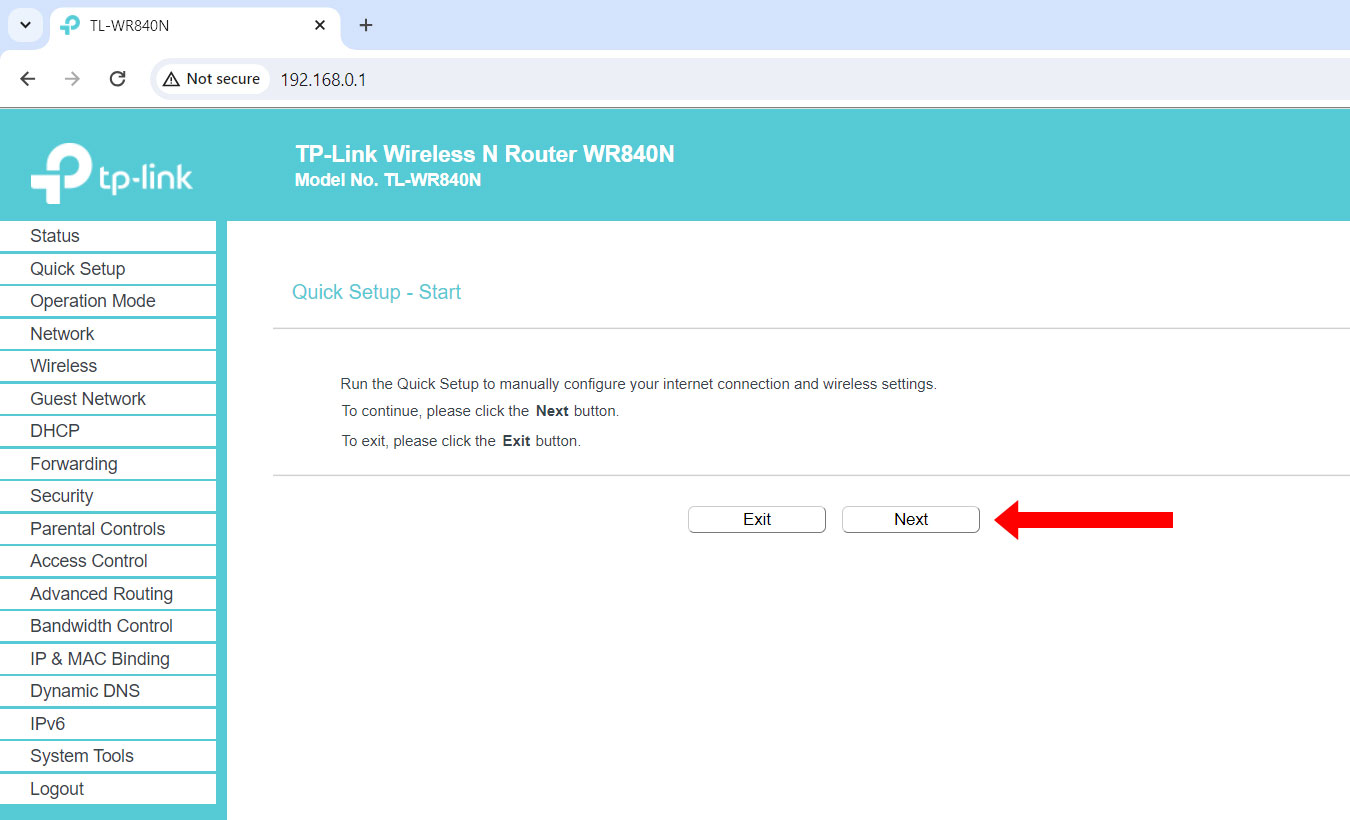
You have successfully logged in to the TP-Link admin panel. The various settings can be accessed by clicking the corresponding links on the left navigation menu.
How to Configure Your TP-Link Router Settings
It’s highly recommended to run the quick setup process to manually configure your Internet connection and wireless settings.
If you’re an expert or advanced user, you may click “Exit” to skip the quick setup process and configure the individual settings yourself.
Click “Next” to start the quick setup procedure.
Step 1: Choose the operation mode
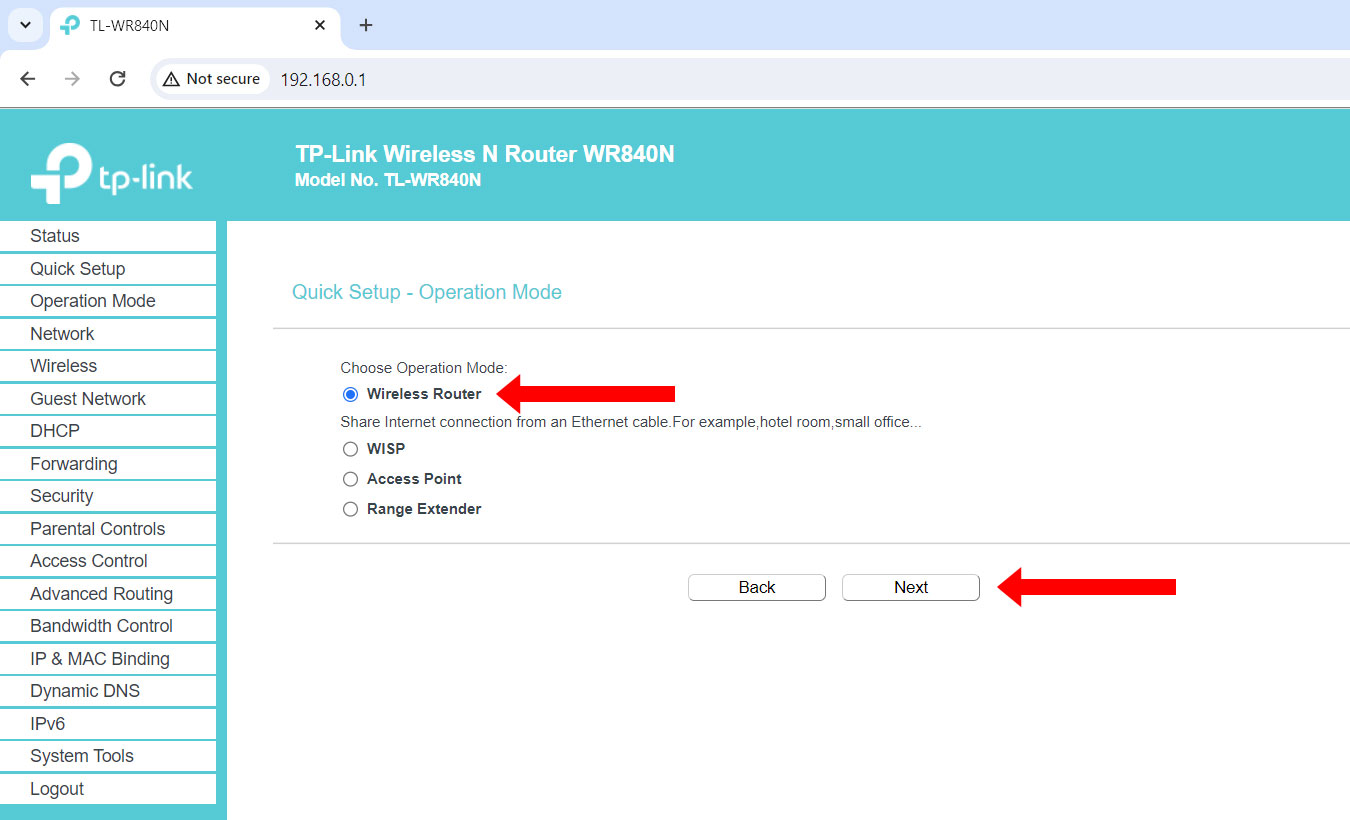
For the operation mode, choose “Wireless Router.” If you want to use your TP-Link router as an access point or range extender, then select the corresponding setting.
Click “Next” to continue.
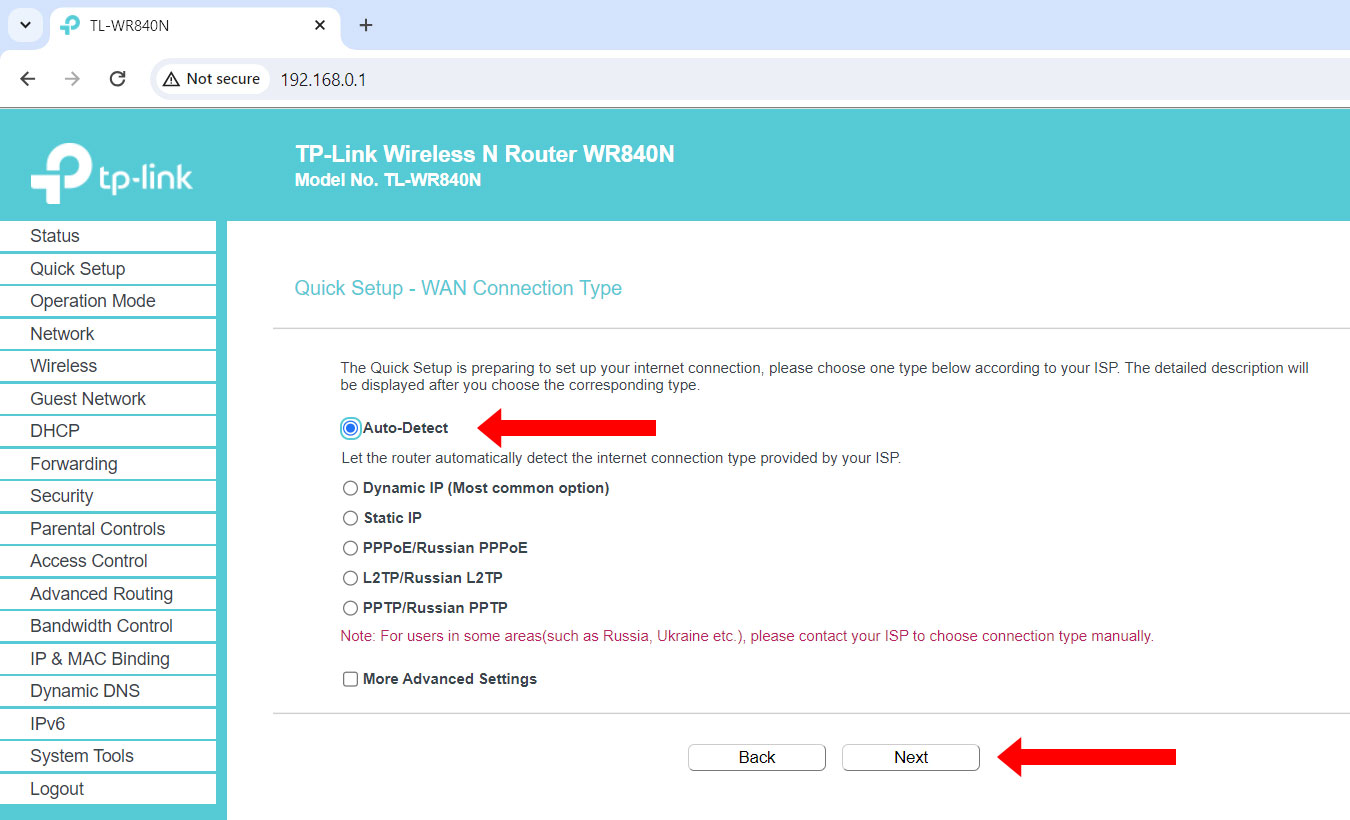
Step 2: Select the WAN connection type
Select “Auto-Detect” to allow the router to automatically detect the connection type provided by your Internet service provider (ISP). If you already know the Internet connection type, select either “Dynamic IP” or “Static IP.”
Click “Next” to continue.
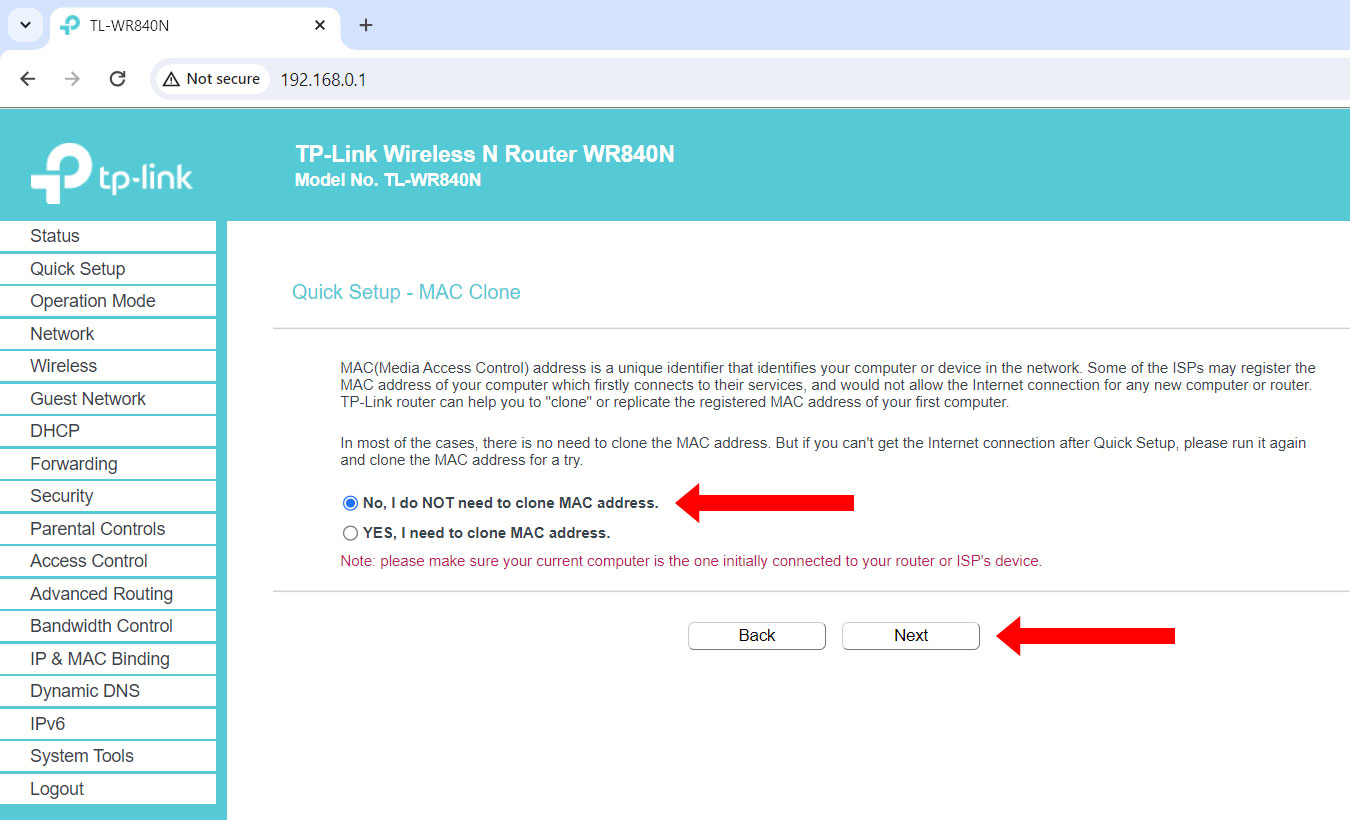
Step 3: Choose whether to clone the MAC address
For this step, select “No, I do NOT need to clone MAC address.”
You only need to clone or replicate the MAC address if you can’t connect to the network after the quick setup process. This occurs when the ISP fails to recognize the MAC address of the router and doesn’t allow it to connect.
Click “Next” to continue.
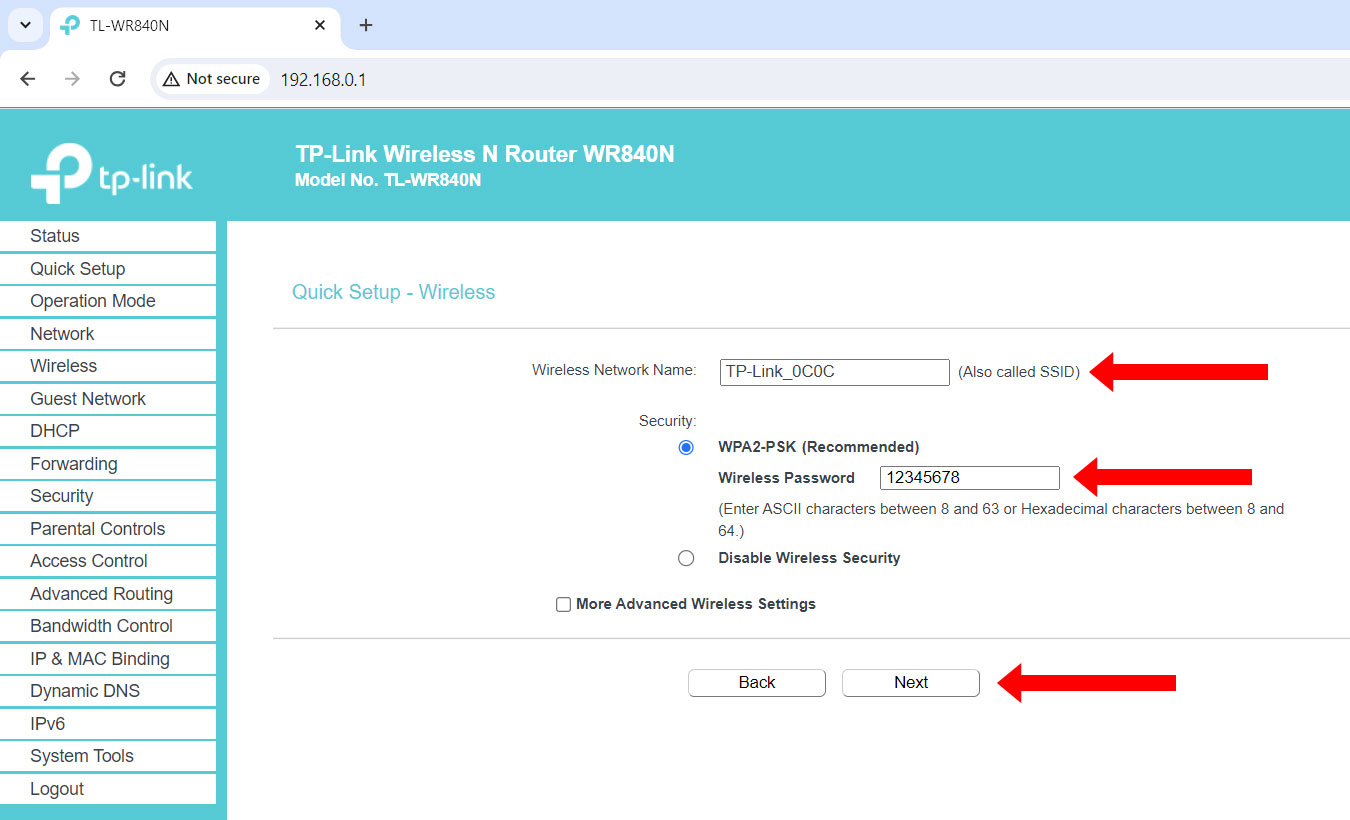
Step 4: Change the network name and/or Wi-Fi password
You have the option to change the wireless network name (SSID) and the default Wi-Fi password. It’s recommended to change the wireless password for security reasons.
For the network name or SSID, enter a name with up to 32 characters. For the wireless password, enter a password with 8 to 63 characters. Both values are case sensitive.
You can also check “More Advanced Wireless Settings” to modify the wireless mode, channel and channel width, but this is completely optional.
Click “Next” to proceed.
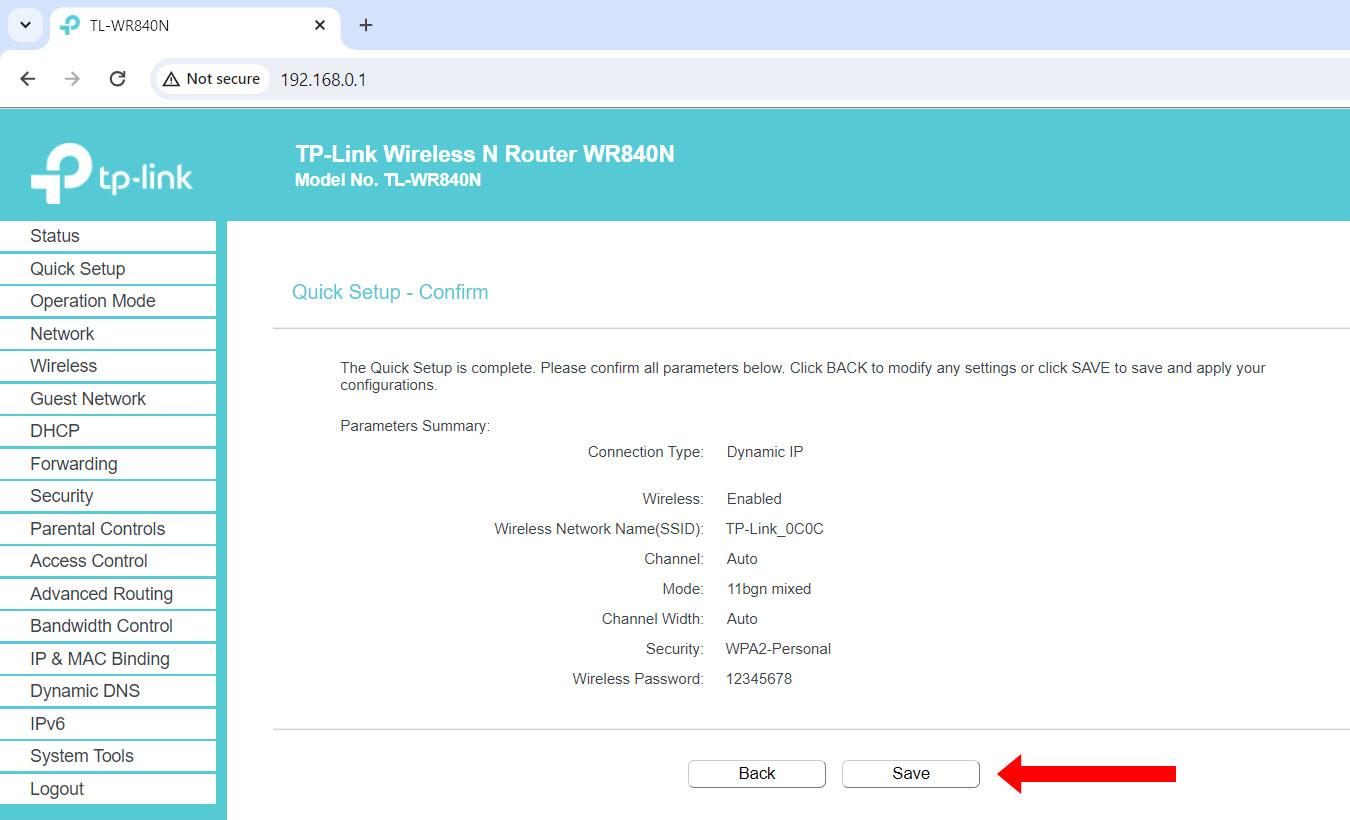
Step 5: Confirm and save your settings
Review your quick setup configuration and then click “Save.”
Step 6: Reconnect to TP-Link router using the new Wi-Fi password
If you changed the Wi-Fi password, you will be automatically disconnected from the network. Reconnect by selecting the wireless network and entering the new password.
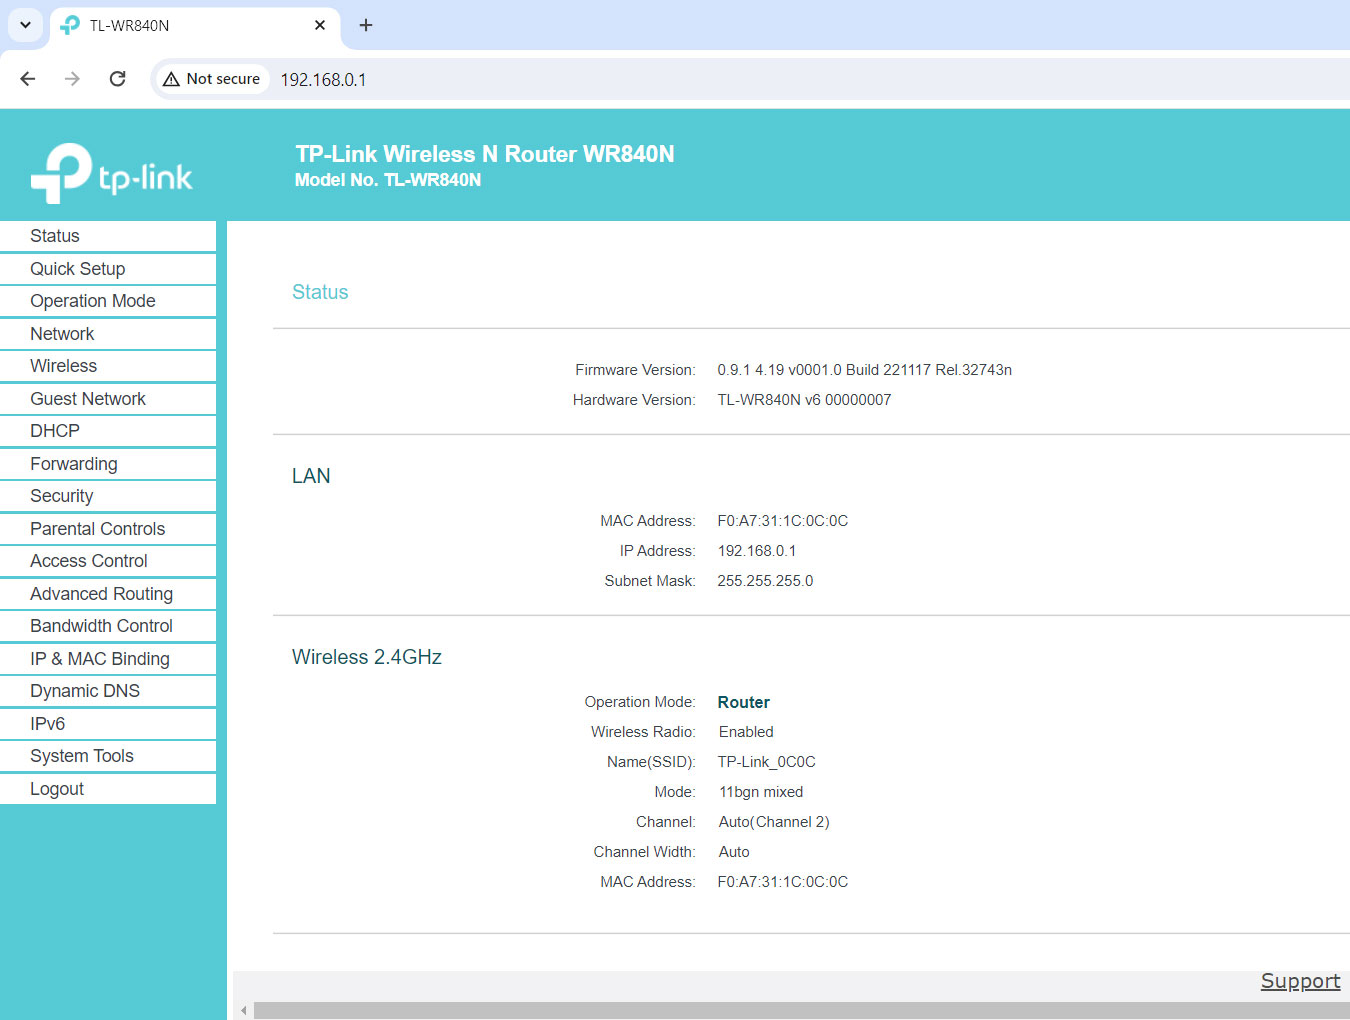
Congratulations! You’ve successfully set up your TP-Link router. Remember that you can login anytime to the TP-Link router admin panel at 192.168.0.1 or tplinkwifi.net to manage your wireless network.
Basic TP-Link Router Management Settings to Configure
As a network administrator, it’s your responsibility to keep your Internet connection in optimal condition. To do that, you’ll have to regularly login to the TP-Link admin panel at 192.168.0.1 and tweak the network settings.
Here are some basic router management settings that you can configure to enhance your Internet browsing experience.
Change the Wi-Fi Network Name or SSID
Do you want to change the Wi-Fi name to something clever or funny?
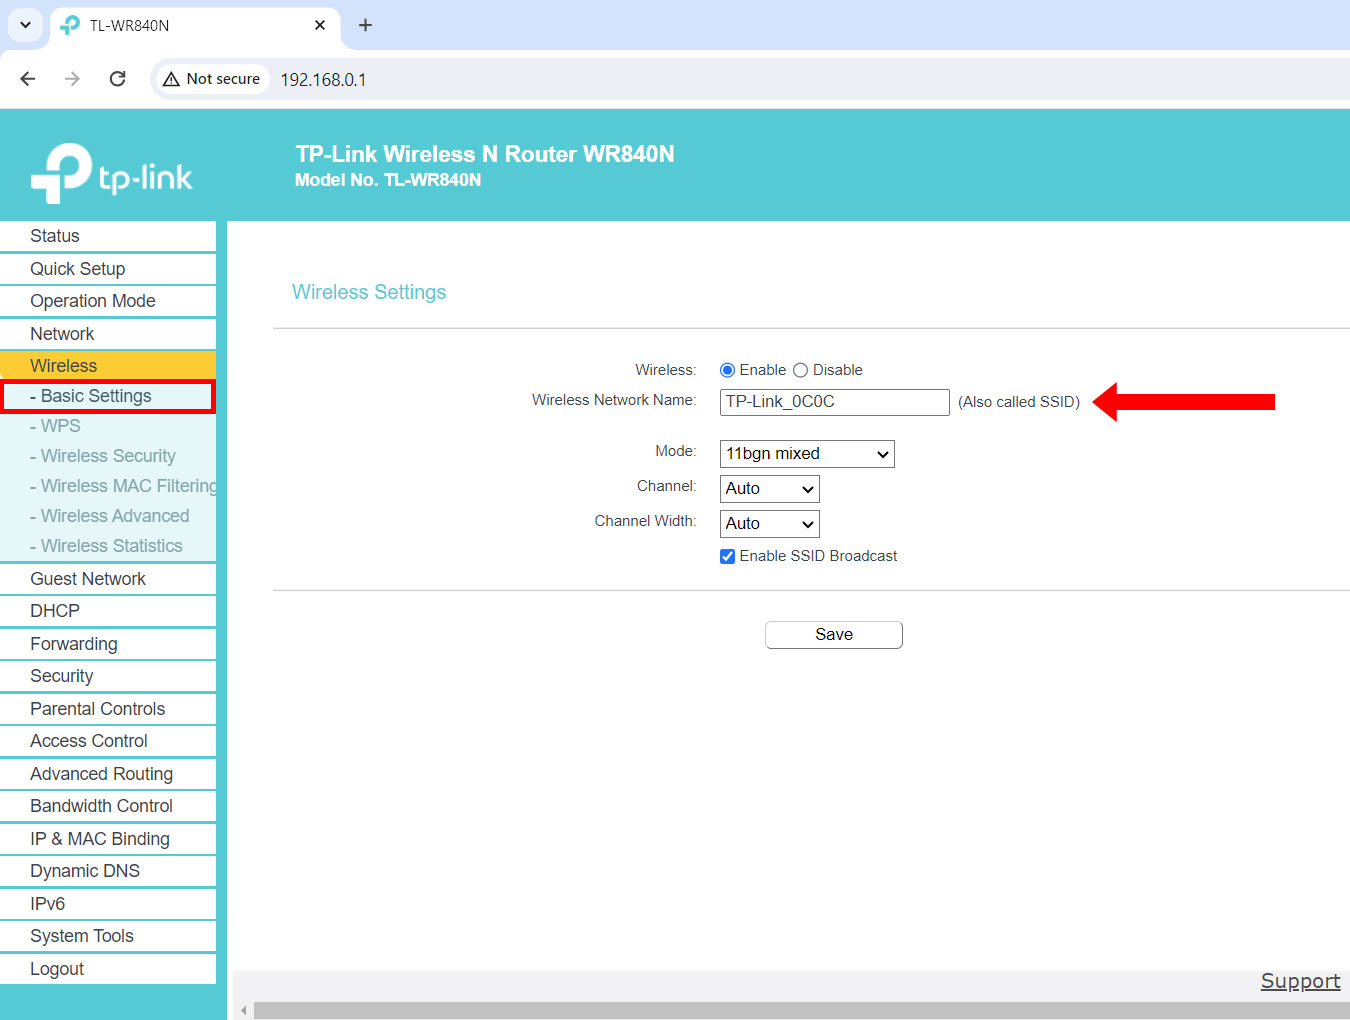
Just login to the TP-Link admin panel at 192.168.0.1 and click Wireless > Basic Settings on the left navigation menu. Enter the new wireless network name (also called SSID) and click “Save.”
Change the Wi-Fi Password
Each TP-Link router comes with a unique Wi-Fi password that’s printed at the bottom of the device, so there’s no real need to change it. However, if you want to change the password to something that’s easier to remember (yet harder to guess), you can do so by logging in to the admin panel.
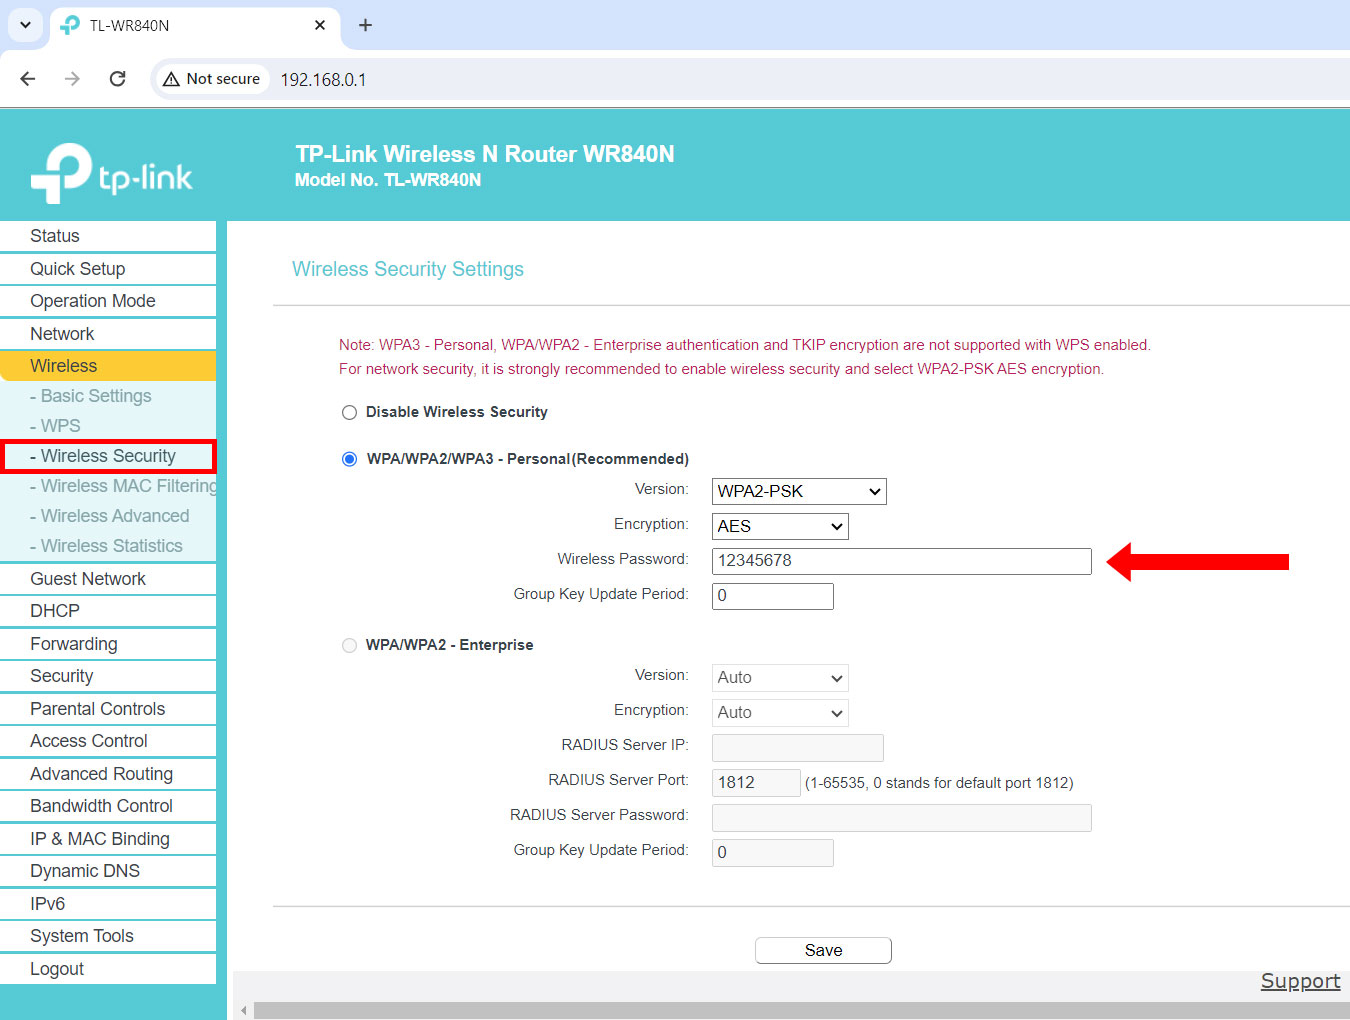
To change the Wi-Fi password, select Wireless > Wireless Security on the left sidebar menu, and then type the new password in the “Wireless Password” field. Click “Save” to apply your changes.
Block Unwanted or Unknown Users
If you suspect that your neighbors are accessing your Wi-Fi without your permission, you can check the list of connected devices and their respective MAC addresses by going to DHCP > DHCP Clients List.
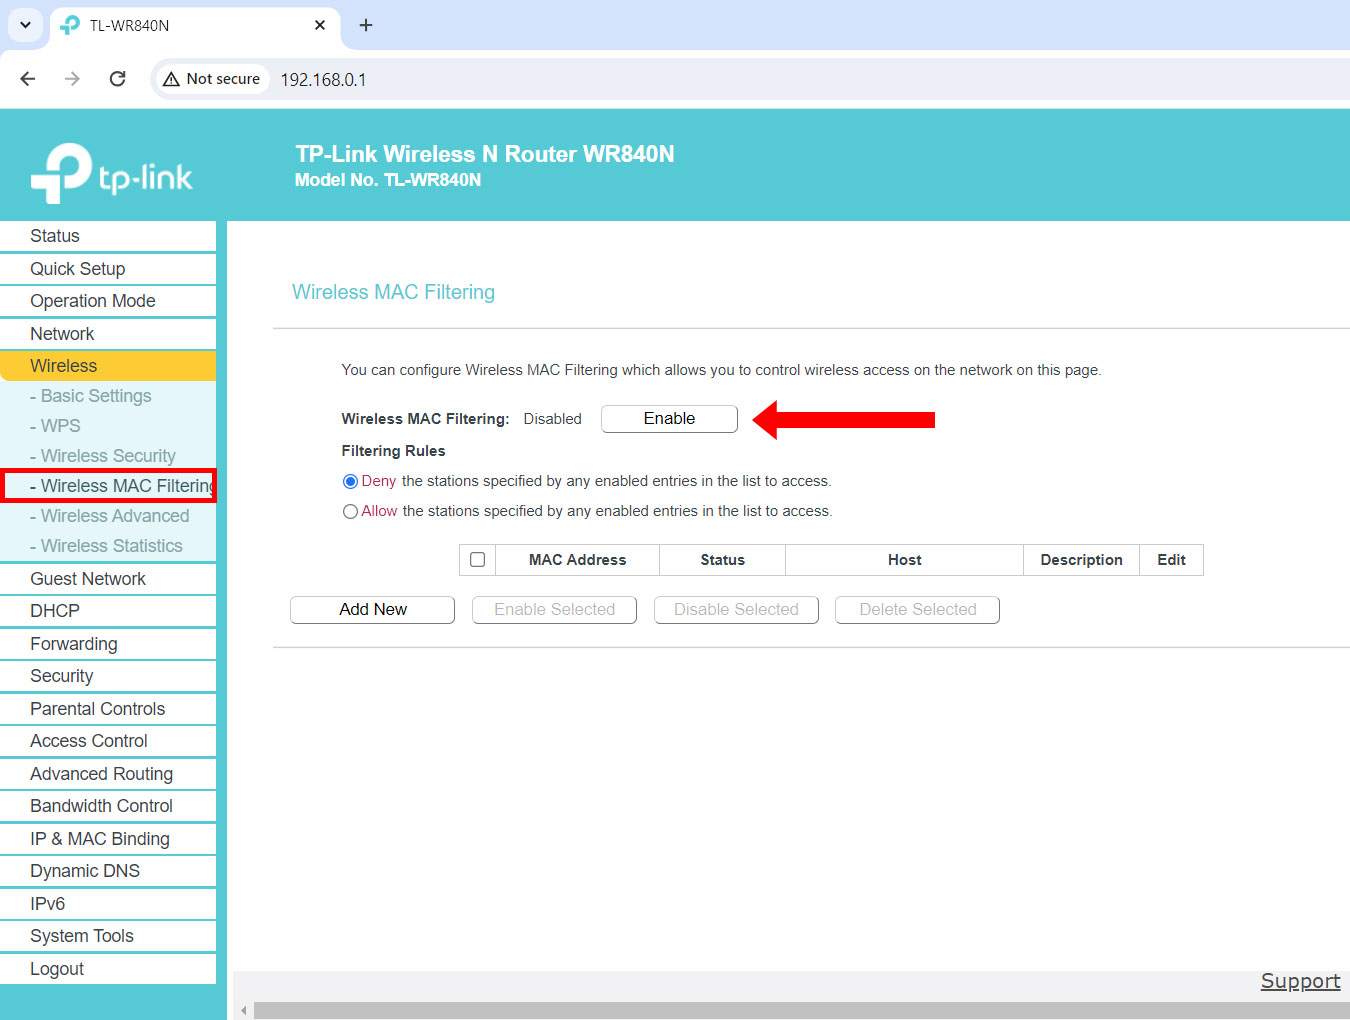
If and when you see unknown devices connected to your network, you can block them by navigating to Wireless > Wireless Mac Filtering on the left sidebar menu. Enable the “Wireless Mac Filtering” option and click “Add New.” Enter the MAC address of the device that you want to block and then click “Save.”
Create a Guest Network
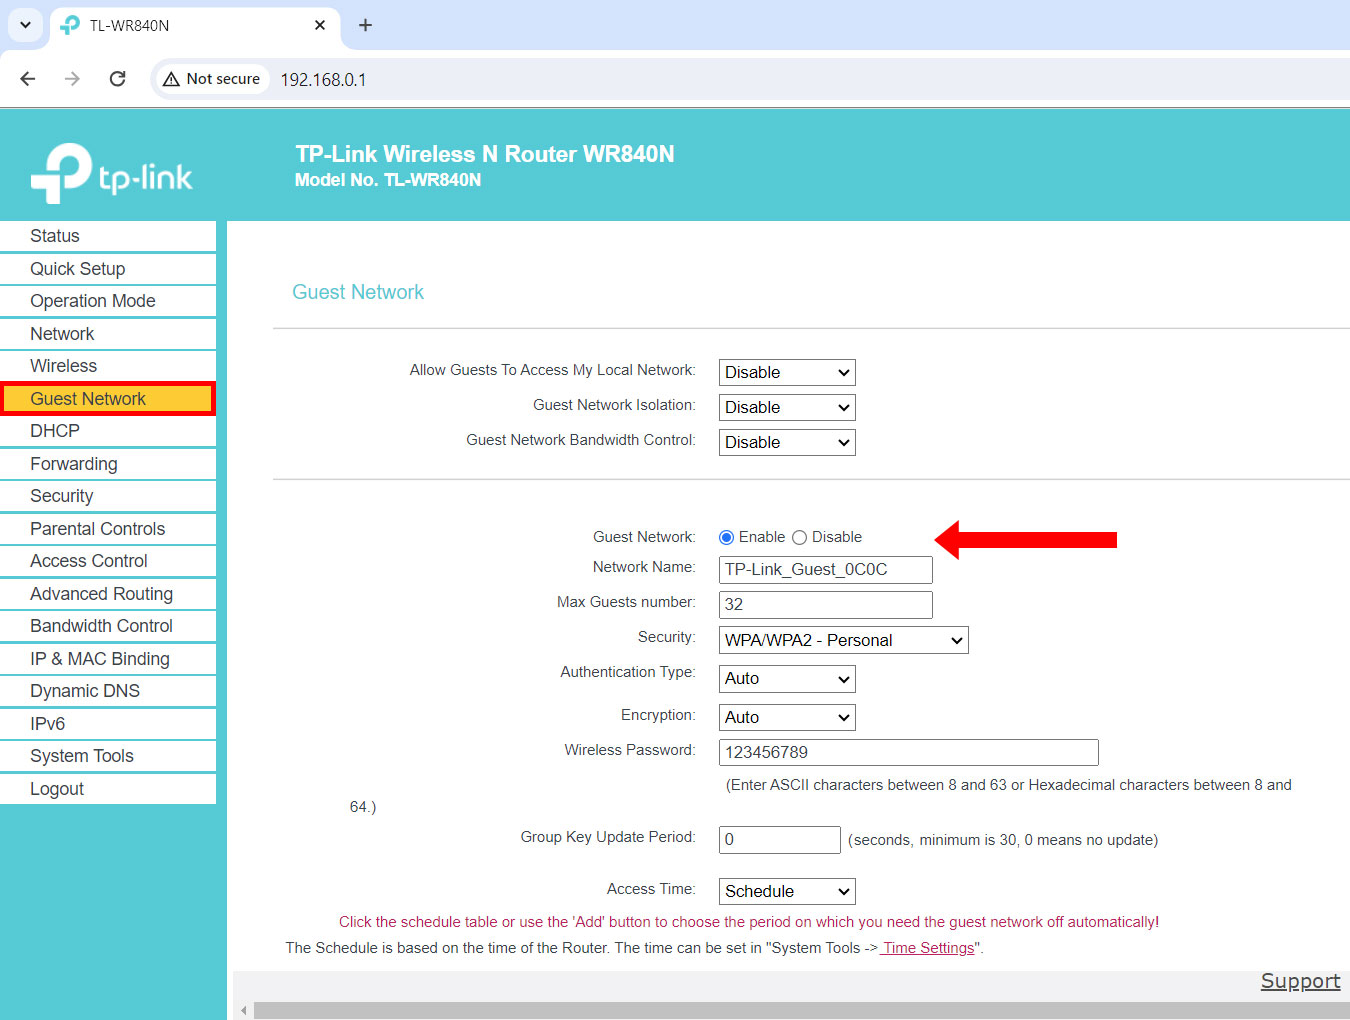
A guest network is a separate Wi-Fi network for friends and relatives to use when they visit your home. To create a guest network, click “Guest Network” and select “Enable.”
By default, the guest network doesn’t have a Wi-Fi password so anyone can access it. Set a Wi-Fi password by clicking the “Security” field and selecting “WPA/WPA2 – Personal” or “WPA2/WPA3 – Personal.” Enter the password in the “Wireless Password” field and then click “Save.”
Restrict Access with Parental Controls
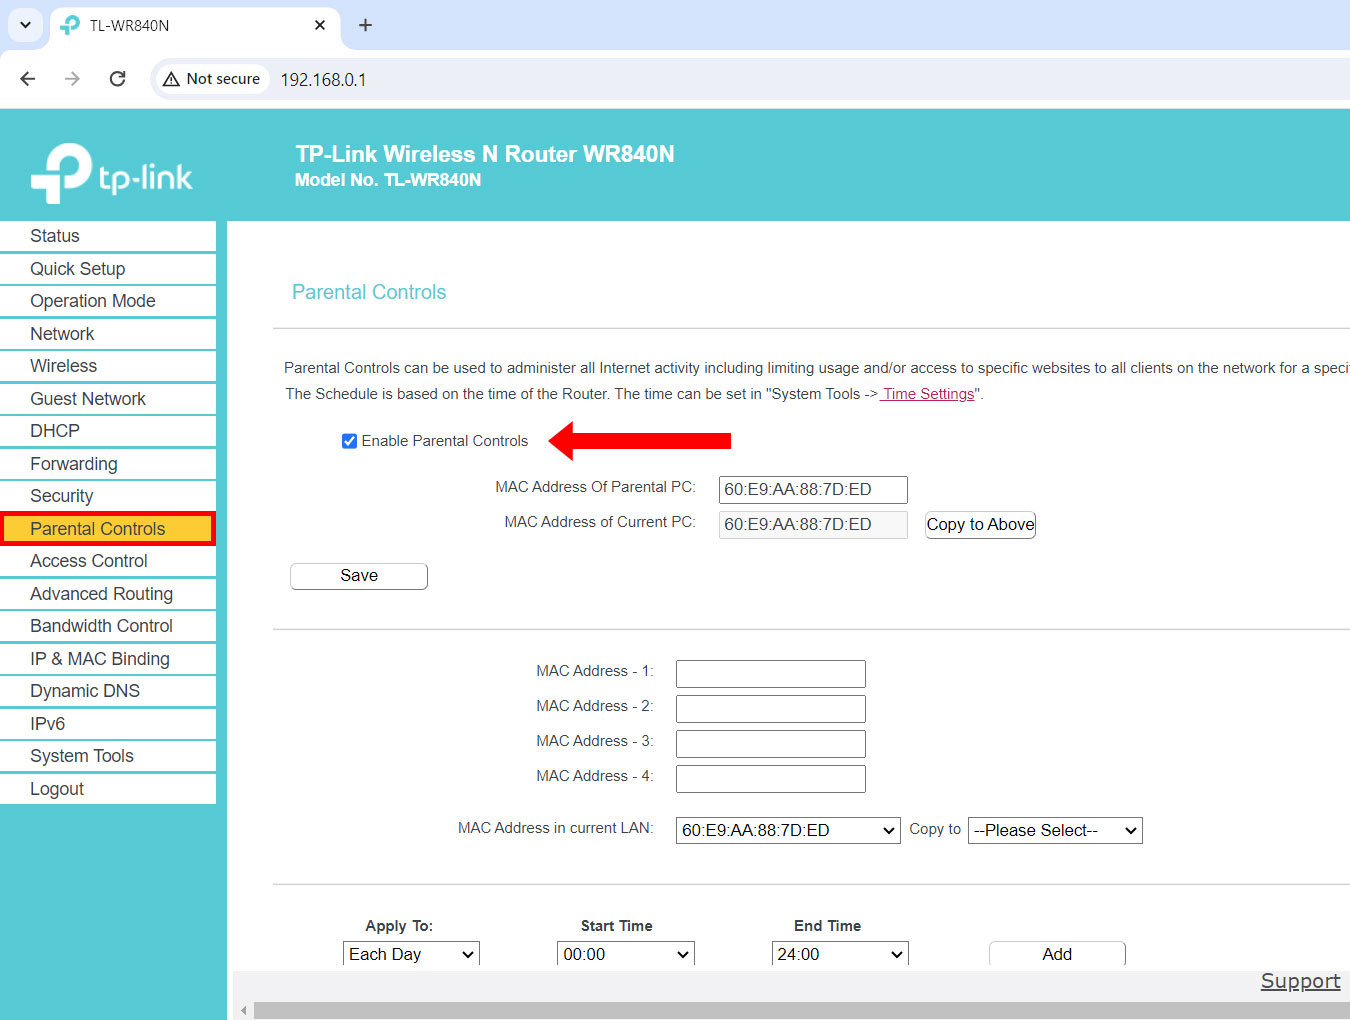
If you have children, you can control their Internet activities through the Parental Controls function. You can schedule the days and hours when they’re allowed to use the Internet, as well as limit their access to certain websites.
Start by clicking “Parental Controls” on the left sidebar menu and check the “Enable Parental Controls” box. Enter the MAC address of the parental/controlling PC (or click “Copy to Above”) and click “Save.”
Enter the MAC addresses of the devices that your children are using (or use the “Copy” function), and then select the days and hours that they are allowed to access the Internet.
To allow your children to access certain websites that you approve, enter the website’s URL (e.g. www.google.com) in the “Add URL” field and click “Add.” They will not be able to visit other websites except the ones that you added.
After setting up everything, click “Save” to apply your changes.
Limit Bandwidth Usage
Perhaps there are certain devices in your network that are consuming a lot of bandwidth, especially those using torrent programs and other P2P software. What you can do is to limit their upload and download speeds to maintain the integrity and performance of the entire network.
Just login to the TP-Link admin panel and click “Bandwidth Control” on the left navigation menu. Check the “Enable Bandwidth Control” box and enter the egress bandwidth (upload speed) and ingress bandwidth (download speed) values. Click “Save.”
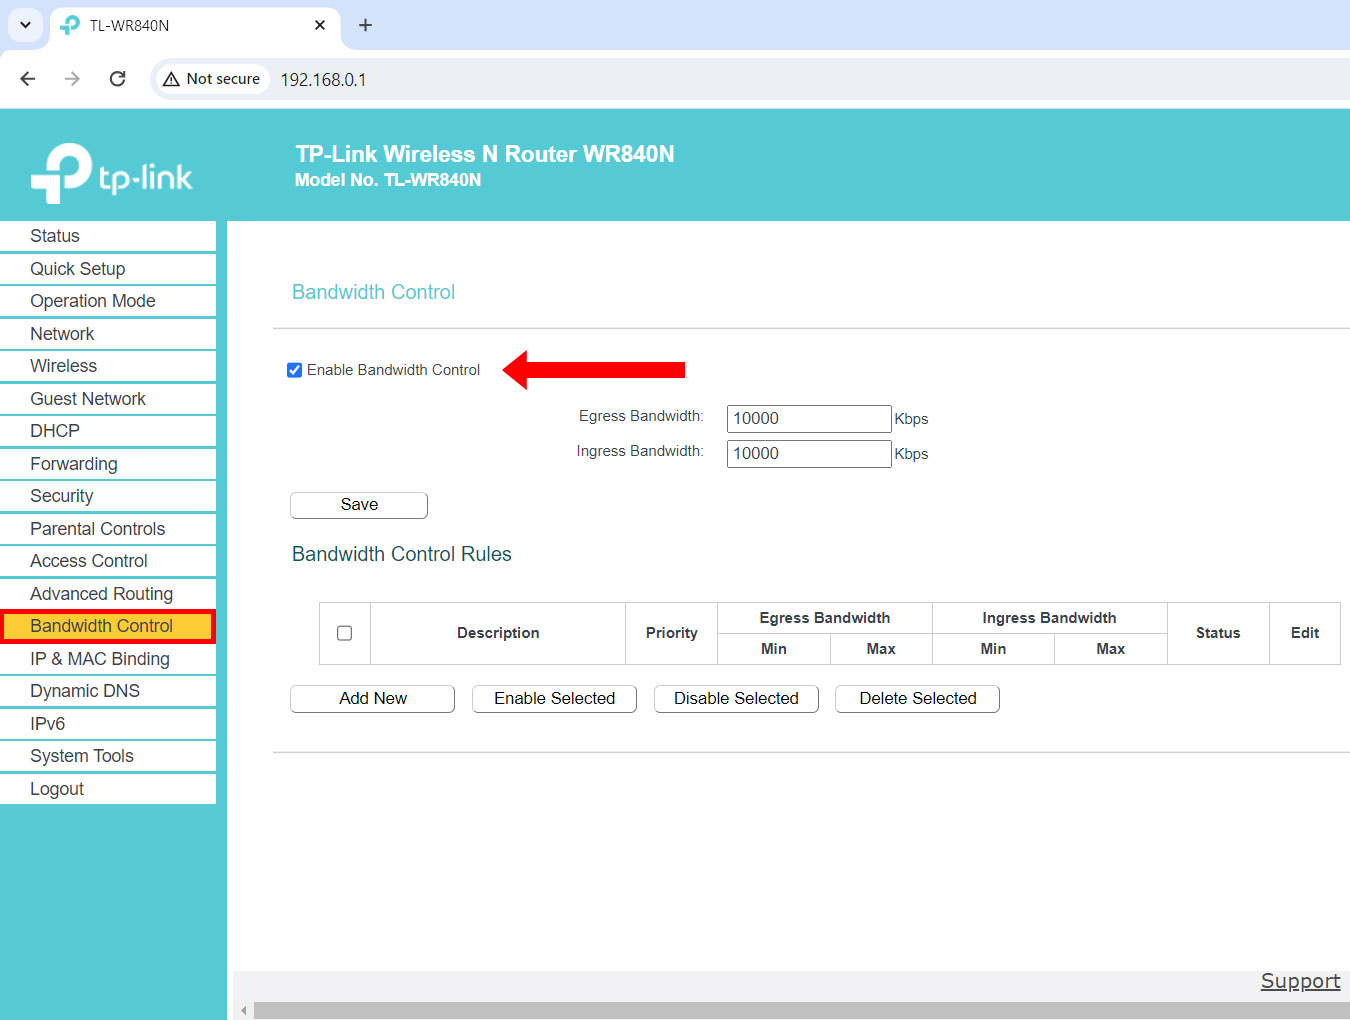
To add a bandwidth control rule, click the “Add New” button and enter the IP range, port range, protocol, priority, egress bandwidth, and ingress bandwidth. Click “Save” to apply the new rule.
Frequently Asked Questions
I forgot the Wi-Fi password. How do I reset it?
The default Wi-Fi password is printed at the bottom of the TP-Link router. However, if you have already changed the Wi-Fi password but have forgotten it, you can use an Ethernet or LAN cable to connect your computer to the router.
Login to the admin panel at 192.168.0.1 or tplinkwifi.net and proceed to Wireless > Wireless Security. Enter your new Wi-Fi password and click “Save” to apply your changes.
I forgot the TP-Link login password. How do I reset it?
If you have forgotten the TP-Link admin login password, the only way to reset it is to restore the router to its default factory settings (this will also reset all your custom settings).
To restore your TP-Link router to its factory settings, press the WPS/RESET button at the back of the router for more than five seconds until the LED light blinks. Wait for the router to reboot before accessing the admin panel at 192.168.0.1 and setting a new password.
What can I do if the TP-Link router login page doesn’t appear?
If the TP-Link login page doesn’t appear after typing 192.168.0.1 on your browser, you can try entering http://192.168.0.1 or http://tplinkwifi.net. Alternatively, you can type 192.168.1.1.
You can also try rebooting your router or clearing the browser cache before typing 192.168.0.1.
How do I use the TP-Link router as a Wi-Fi extender?
If you want to use your TP-Link router as a Wi-Fi extender or repeater, just follow these steps:
- Place your TP-Link router next to the host router or modem.
- Connect the router to your computer via Ethernet cable or to your mobile device using the network name (SSID) and wireless password printed at the bottom of the router.
- Open your browser and type 192.168.0.1 or tplinkwifi.net in the address bar.
- Create a password and login to the admin panel.
- Run the quick setup process and select “Range Extender” as the operation mode.
- Relocate your router halfway between the host router and the Wi-Fi dead zone.
For best results, you can use the TP-Link Wi-Fi extender instead to extend the range and coverage of your network.
Is there a mobile app I can use to manage my Wi-Fi network?
Yes, you may use the TP-Link Tether app to set up and manage your Wi-Fi network. Download the app from Google Play (for Android users) or the App Store (for iOS users).
Key Takeaways
Even if you already have a router provided by your ISP, it’s still a good idea to buy another router as a way to gain more control over your Wi-Fi network. Your ISP-provided router may be quite limited in its capabilities and the TP-Link WR840N router could be the key to unlocking the full power of your Internet.
Always remember that you can access the TP-Link login page anytime at 192.168.0.1 or tplinkwifi.net. If you have any issues or problems with your Internet connection, you may contact your ISP.