You know how annoying it is to watch a Netflix movie that starts buffering due to a slow Internet connection. Before you blame your Internet service provider, have you ever considered the possibility that you might be in a Wi-Fi dead spot? If so, you might want to use a device like the TP-Link Wi-Fi range extender and repeater to expand your wireless network and to eliminate any dead spots in your house.
The TP-Link Wi-Fi range extender and repeater is a small and portable device that extends the range and coverage of your Wi-Fi network. Since your Wi-Fi router has a limited range of only a few meters, it can’t reach distant and remote areas of your house, such as the bathroom or the second floor.
To solve this problem, you can install a Wi-Fi extender or repeater. With several such devices in your house, a single Wi-Fi network can cover an entire residence, no matter how big or small it is.
A Wi-Fi repeater like the TP-Link Wi-Fi extender is an easy and convenient solution to Internet connection issues within your house. But do take note that it’s not a “plug and play” device. You will have to perform a one-time setup procedure to connect it to your network. Once the setup and configuration is completed, you’re free to transfer the extender without having to set it up again.
The TP-Link Wi-Fi range extender comes with a quick installation guide that contains instructions on how to set up and connect the device to your wireless network. The guide, however, only touches on the basics of installation and setup, and doesn’t include the complete step-by-step instructions on how to connect the extender to your network.
With that in mind, we’ve come up with this tutorial to help you set up your TP-Link Wi-Fi range extender from start to finish. We’ll also talk about the common problems you might encounter when setting up your extender, as well as how to troubleshoot these issues.
TP-Link Wi-Fi Range Extender Step-by-Step Setup Guide
There are three different ways to install and set up your TP-Link Wi-Fi range extender and these are:
- Using the TP-Link Tether app
- Logging in to your web browser
- Pressing the WPS button
We recommend using the TP-Link Tether app as it provides quick and easy access to all the TP-Link routers and range extenders in your home. But if you don’t want to install another app on your phone, you can still set up your extender using a web browser like Google Chrome.
How to Set Up TP-Link Wi-Fi Range Extender via the Tether Mobile App
Follow these steps to set up and install the TP-Link Wi-Fi range extender and repeater using the Tether mobile app:
Step 1: Plug the extender into a power outlet
The first thing you need to do is to plug the extender into a power outlet near your router, preferably within 16 feet (1.8 meters) and away from large electrical appliances. The Power LED light will blink as the system is starting up, and will turn solid blue after a few seconds.
Step 2: Download the Tether app
The TP-Link Tether mobile app offers an easy way to access and manage your TP-Link Wi-Fi devices using your mobile phone. It allows you to view the status of your devices, set passwords, block unauthorized users, manage permissions of client devices, find the best locations for your devices, and more.
You can download the Tether app on Google Play (for Android users) or the App Store (for iOS users).
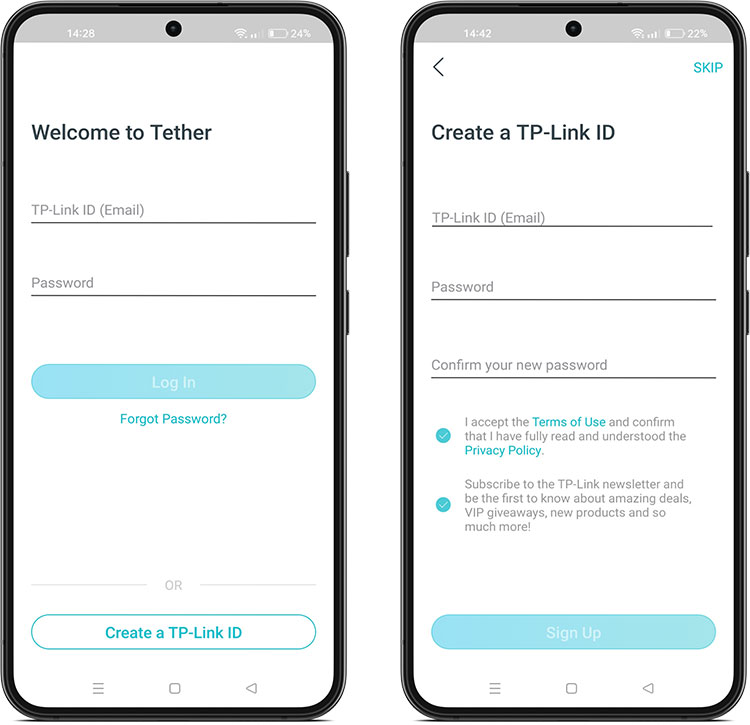
Step 3: Login or sign up for a TP-Link account
Open the Tether app and login with your TP-Link ID. Don’t have an account yet? Tap the “Create a TP-Link ID” button to sign up for a free account. Provide your email address and preferred password, and then tap “Sign Up.”
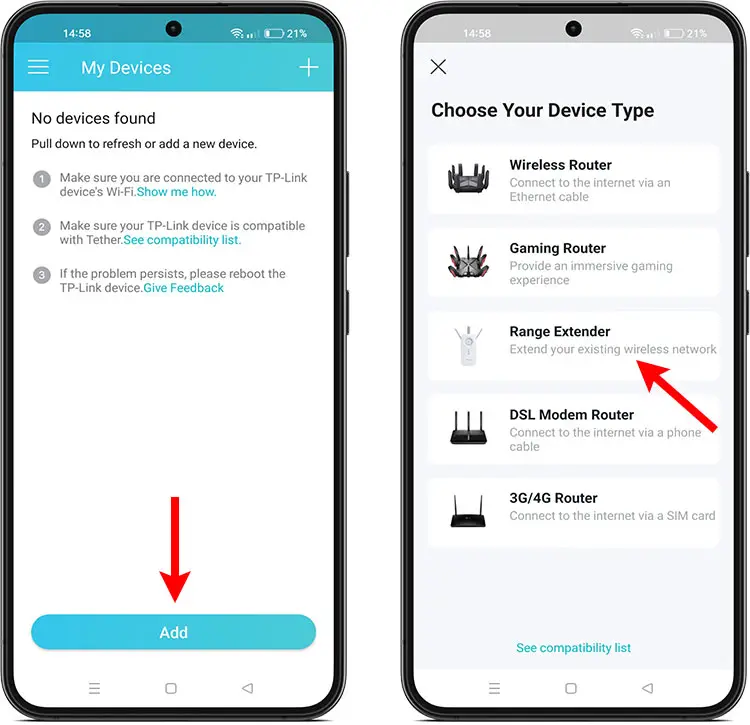
Step 4: Add your TP-Link Wi-Fi range extender
After logging in to Tether, you’ll automatically be taken to the My Devices screen. This will be empty if you haven’t added a device before. Press the “Add” button to start adding your TP-Link Wi-Fi range extender.
Now choose your device type. You must select “Range Extender.”
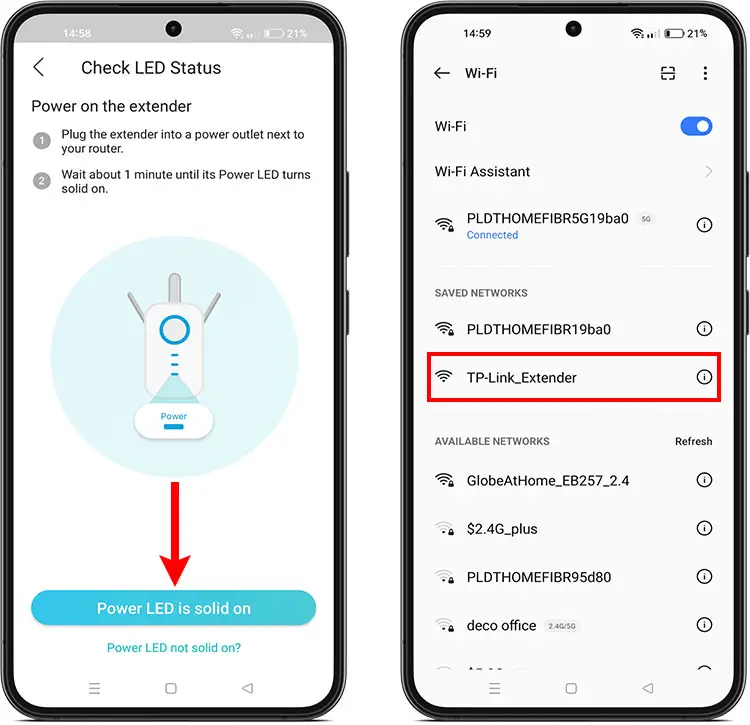
Plug the extender into a power outlet next to your router, if you haven’t done so already. Wait for about a minute or until the Power LED light turns solid blue or is no longer blinking. Tap “Power LED is solid on” to continue.
Next, connect your phone to the extender’s network TP-Link_Extender. If you can’t see this network, you can toggle off the Wi-Fi switch and turn it back on again.
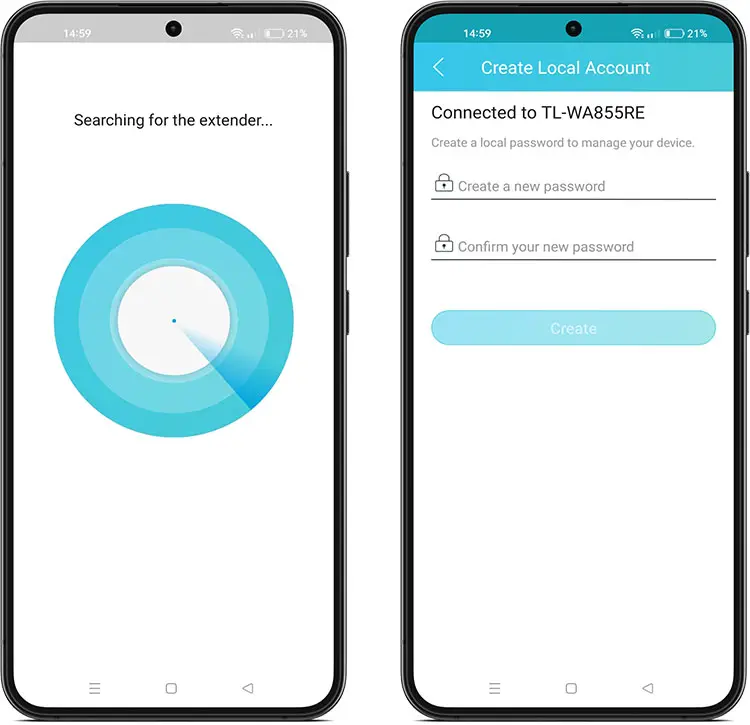
The Tether app will now start searching for your TP-Link Wi-Fi range extender. This should take only a few seconds.
If you have connected to the extender’s network but still can’t find your device, try turning off your cellular data.
Once the Tether app has located your device, create a local password to manage it. Tap “Create” after inputting your password. Take note that is not the same as your Wi-Fi password.
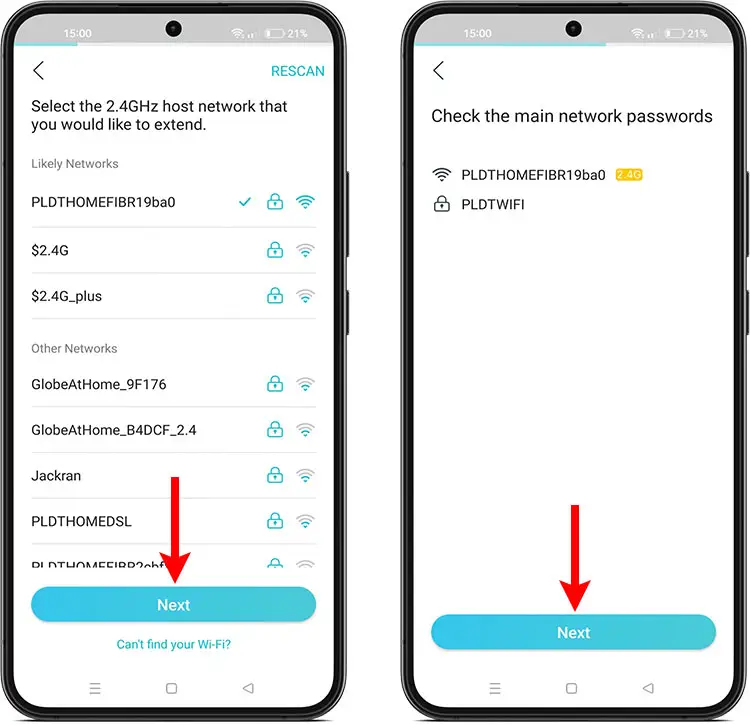
Step 5: Choose the host network and enter the Wi-Fi password
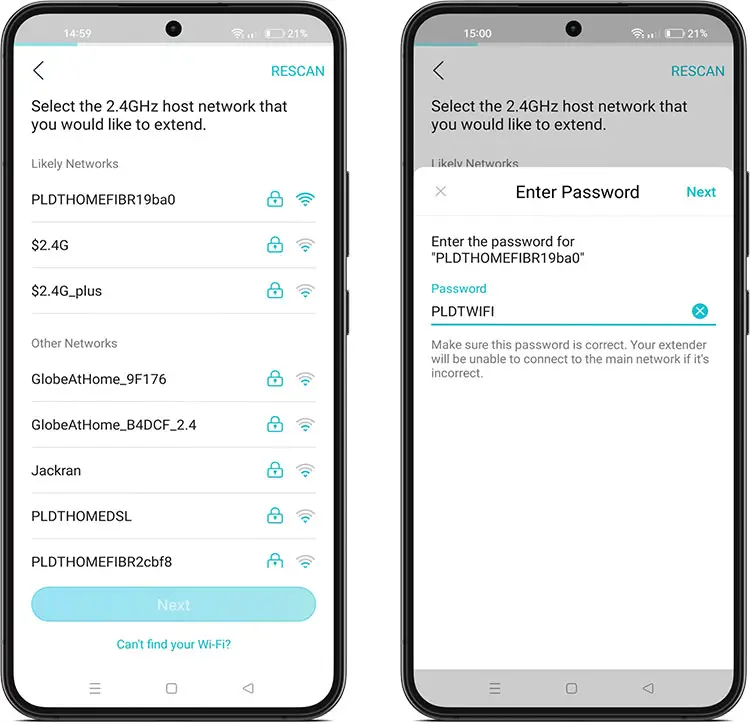
Select the 2.4GHz host network that you want to extend.
Enter the Wi-Fi password for the host or main network. Make sure that the password is correct. Otherwise, the extender will be unable to connect to the main network.
After typing the password, tap “Next.”
After selecting the host network and inputting its password, press “Next.”
Review that the main network and its password are correct, and then tap “Next.”
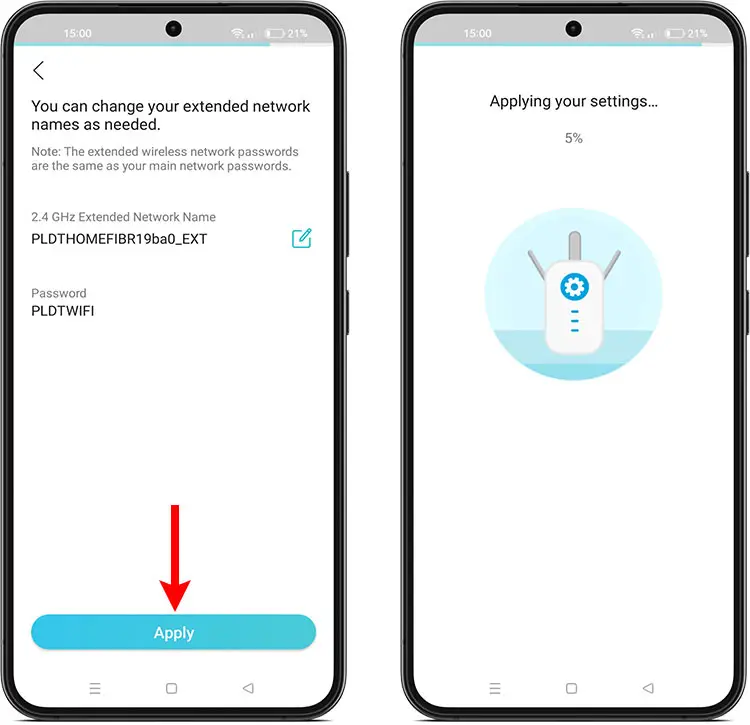
You have the option to change the name of your extended network by clicking the pencil icon next to it. Click “Apply” to apply your settings.
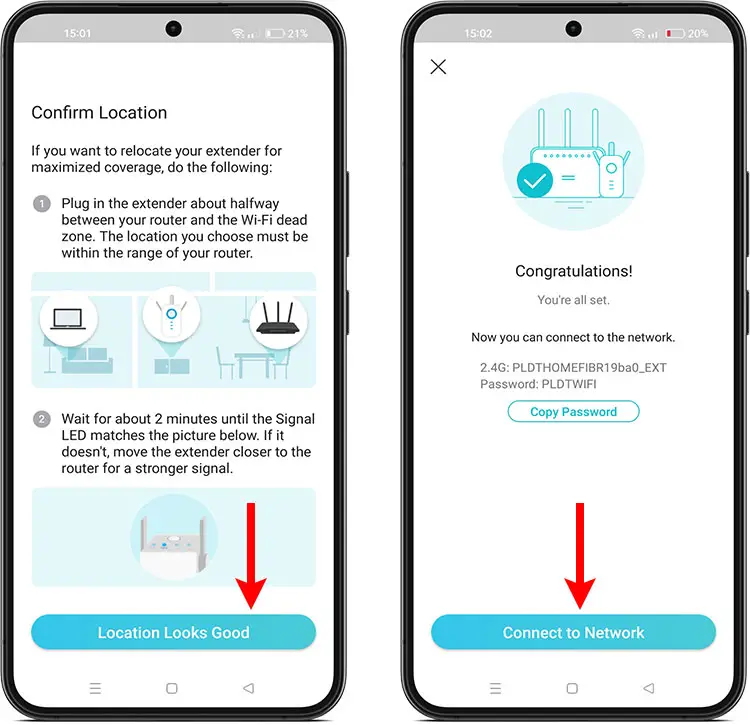
Step 6: Relocate your extender
The final step is to transfer your TP-Link Wi-Fi range extender to a location halfway between your router and the Wi-Fi dead zone. The location must be within the range of your router.
After plugging the extender into the power outlet, wait for a minute or two until the Signal LED light turns solid blue. If the LED light is red, that means it’s too far from the router and you will have move it closer.
Tap “Location Looks Good” to proceed.
Congratulations! You have successfully set up your TP-Link Wi-Fi range extender and repeater. Take note that the password of the extended network is the same as that of your main network.
Tap “Connect to Network” to connect to the extended wireless network.
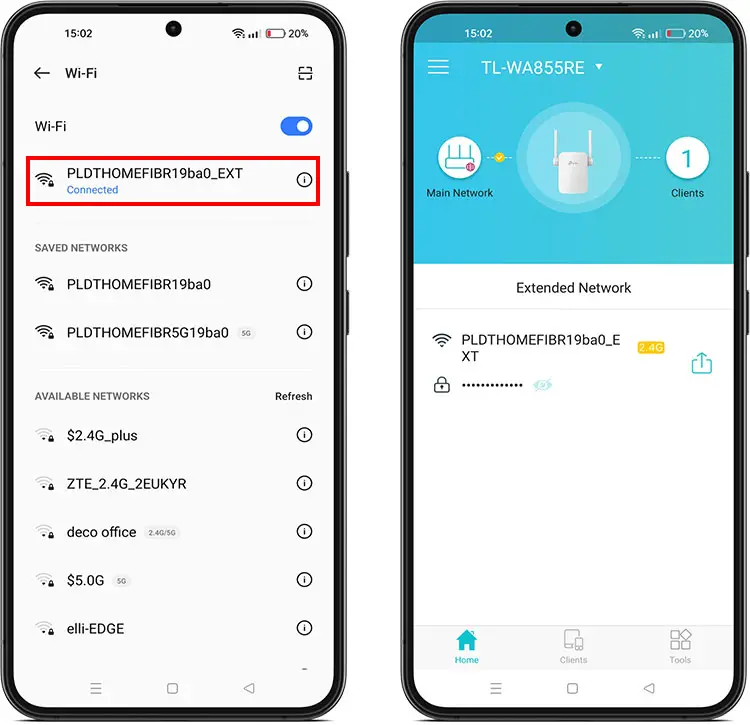
Select the extended network with “_EXT” at the end. Go back to the Tether app and you can now see the status of your extended network as well as your TP-Link Wi-Fi range extender.
Remember that you can use the Tether app to monitor and manage your extended Wi-Fi network. You can check its connection status, view connected devices, block users, change the network name, and more.
How to Set Up TP-Link Wi-Fi Range Extender via Web Browser
Another way to install and set up your TP-Link Wi-Fi range extender is to use a web browser. It’s an alternative for those who don’t want to install yet another app on their phone. You can also manage your extender and access its settings through your web browser.
First, plug your TP-Link Wi-Fi range extender into a power outlet near your router and wait for the Power LED light to turn solid blue.
Connect your computer or mobile phone to the extender’s network TP-Link_Extender. If you can’t find this network, you can try restarting the extender or resetting it by inserting a pin into the reset slot.
Open your web or mobile browser (e.g. Google Chrome, Safari) and type http://tplinkrepeater.net or http://192.168.0.254 in the address bar.
Create a password and then click “LOG IN.” This will be the password you will use to sign in and manage your extended network.
Select the 2.4GHz host network that you want to extend.
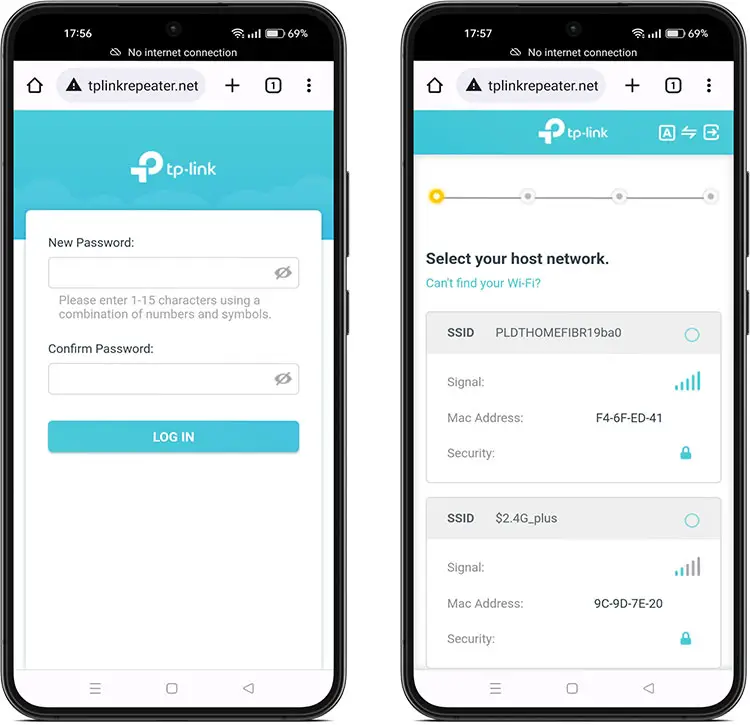
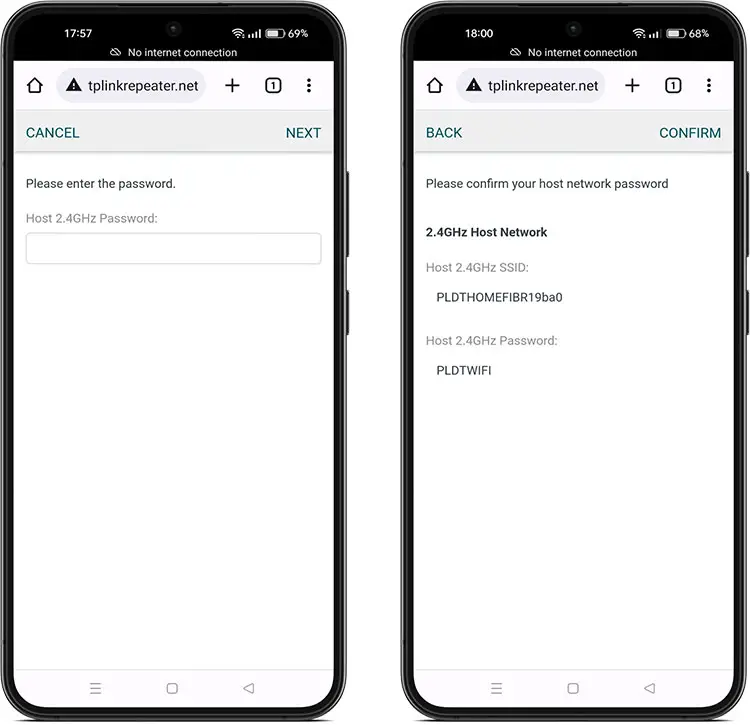
Enter your host network’s Wi-Fi password. Click “NEXT.”
Review that the host network password is correct and then click “CONFIRM.”
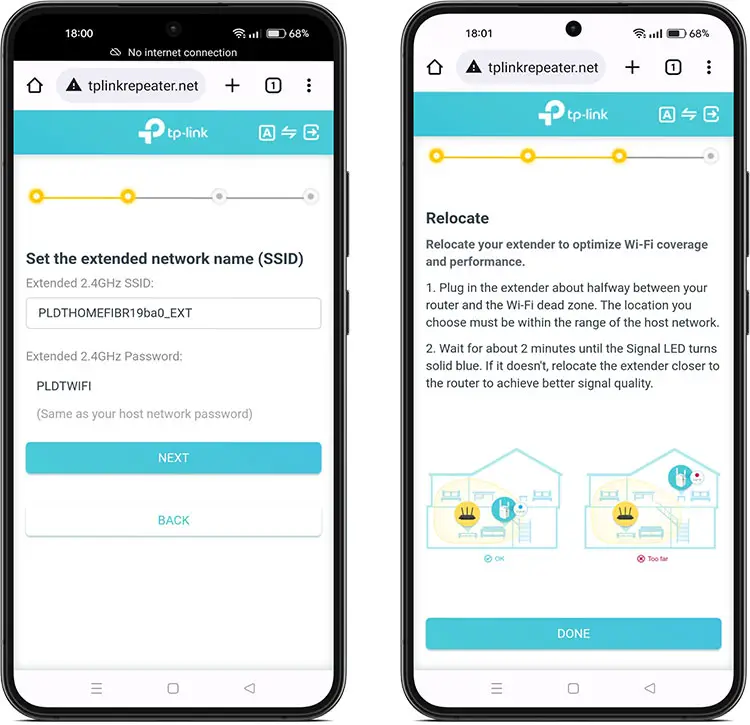
If you want, you can set a custom name for the extended network. Click “NEXT” to proceed.
Transfer or relocate your TP-Link Wi-Fi range extender to a location about halfway between your router and the Wi-Fi dead zone. The location must be within the range of the host network.
After plugging the extender into a power outlet, wait for a minute or two for the Signal LED light to turn solid blue. If the LED light turns red, move the extender closer to the router.
Click “DONE” to continue.
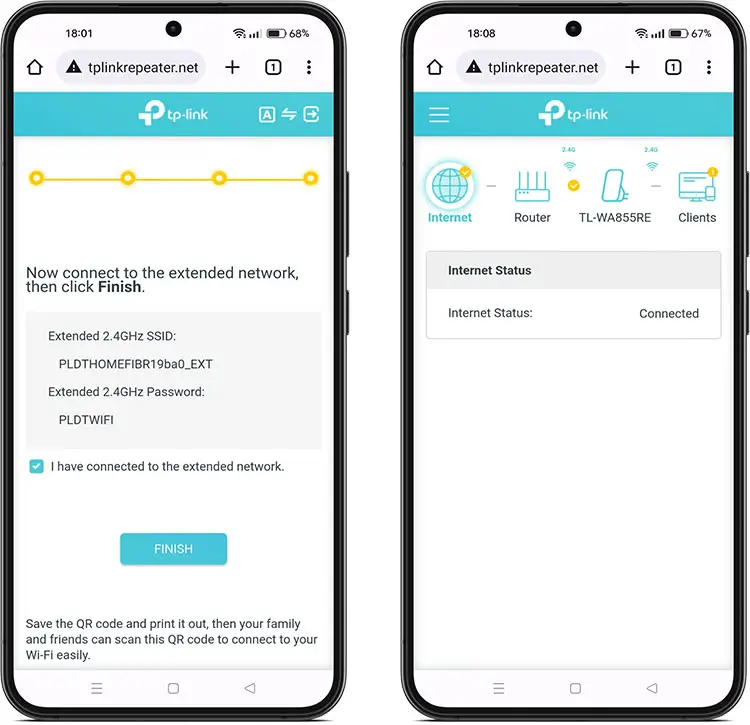
Open your Wi-Fi settings and connect the extended network with “_EXT” at the end.
Check the “I have connected to the extended network” box and then click “FINISH.”
Congratulations! You have successfully set up your TP-Link Wi-Fi range extender and repeater. To manage your extended network and configure its settings, just visit http://tplinkrepeater.net on your browser and login using the password you set previously.
Frequently Asked Questions
What should I do if the Tether app cannot find my extender during setup?
If the Tether app cannot locate your extender during the setup process, you can try connecting to the extender network TP-Link_Extender, and then opening the app and selecting your extender. Follow the app’s instructions to complete the setup. You can also restart or reset the extender.
How do I reset the extender?
You can reset the TP-Link Wi-Fi range extender by inserting a pin into the Reset button until the Power LED light turns red and starts blinking.
What should I do if the Signal LED turns red after setup?
A red Signal LED means that the extender is receiving a weak signal from the router. Try relocating the extender nearer to the router. You can also check if you entered the correct Wi-Fi password by launching the Tether app or by going to http://tplinkrepeater.net.
What should I do if I cannot connect to the extended network?
If you cannot connect to the extended network, it’s possible that you have entered the incorrect Wi-Fi password during setup. In that case, you can reset the extender and repeat the setup process.
Wrapping Up
Wi-Fi repeaters such as the TP-Link Wi-Fi range extender and the cheaper Xiaomi Wi-Fi repeater are definitely a must-have for every residence that needs a strong and stable Internet connection. But do keep in mind that Wi-Fi extenders or repeaters cannot boost or increase the speed of your Internet. They only extend the range and coverage of your network so don’t expect faster speeds than what you’re normally getting from your main router.
If you have any problems and issues with your TP-Link Wi-Fi range extender and repeater, contact TP-Link technical support on their website or call the numbers printed on the packaging box.