
Do you want to set up and manage a virtual private server (VPS) but don’t have the technical knowledge and skills to do it? Then don’t worry because there are services that allow you to run and manage a server without knowing Linux systems administration. One such service is Runcloud, which makes server management so easy and convenient with their web-based platform that is geared for both beginners and experts alike.
A virtual private server or VPS is a notch above shared hosting and offers plenty of advantages over the typical $4/month plan offered by web hosting companies like Hostgator or Bluehost. One advantage that a VPS has over shared hosting is the way that server resources are allocated. With shared hosting, you are sharing resources with other websites, so if someone else on the same server is using up most of the resources (e.g. free memory), then your website will be affected and it will become slow as molasses.
On a VPS, you are given a set amount of disk space, memory and bandwidth so you won’t have to worry if Joe Bloggs on the same server is running a memory-hogging script and using up all the server resources. In case you need more memory or bandwidth, then you can easily upgrade your server as most VPS providers allow you to increase server size with just a few clicks.
Shared hosting is good if you’re just starting out and your website is not getting much traffic. But once you get a few thousand visitors a day, do yourself a favor and move your website to a VPS. The difference in speed and performance is night and day. In fact, I have moved all my personal websites to a VPS and noticed that my WordPress-powered websites, both in the frontend and backend, are so much faster.
Most VPS providers don’t offer cPanel but you probably don’t need one. Server management platforms like Runcloud and ServerPilot give you the ability to change the settings and configurations, install scripts, backup your files, manage databases, and many more. You don’t need to be a Linux sysadmin to run and manage a VPS using Runcloud.
In this tutorial, I’ll guide you on how to set up and manage a DigitalOcean server using Runcloud. You can use any VPS from other providers like Vultr and Linode, but I chose DigitalOcean for this tutorial because I’m more familiar with it. You will learn that the steps are almost similar no matter what VPS you use.
Create a DigitalOcean Droplet
First you will need to sign up for DigitalOcean. You can get a $50 credit that you can use for 30 days when you sign up using this link.
After signing up and activating your account, click “Get Started with a Droplet” to create your DigitalOcean cloud VPS or “droplet.”
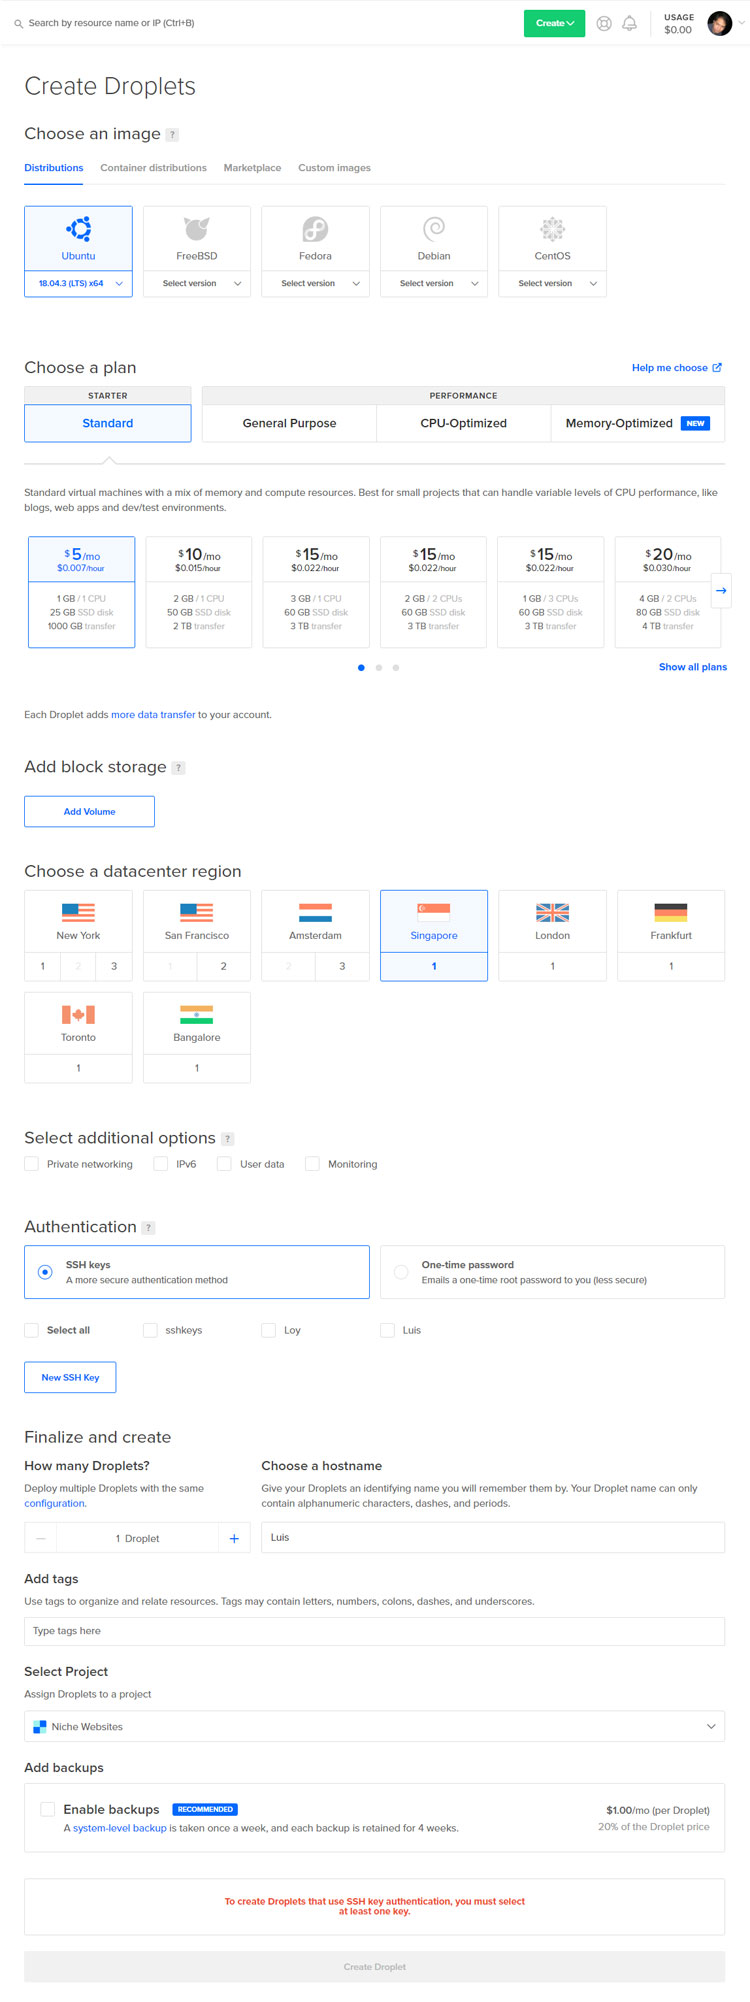
Choose the following options for your droplet:
- Image – Select Ubuntu (the default option is good enough).
- Plan – Choose Standard. I would start with the $5/month plan with 1 GB RAM and 25 GB of space, but you can go bigger depending on your needs or budget.
- Block storage – Ignore this unless you need more disk space.
- Datacenter region – Choose the city where the server is located. If you want to cater to American visitors, then choose either New York or San Francisco.
- Additional options – Includes private networking, IPV6, user data and monitoring. These are not really necessary but you can add them if you want.
- Authentication – For this, you can choose either SSH keys or one-time password. SSH keys are more secure so I’ll go with this one. I have included a short tutorial on how to create an SSH key below.
- Hostname – You can use the default hostname or change it to something else.
- Backups – Backups cost $1/month. I would skip this because Runcloud offers free backups up to 30 GB.
Click “Create Droplet” and wait a few seconds for your server to be provisioned.
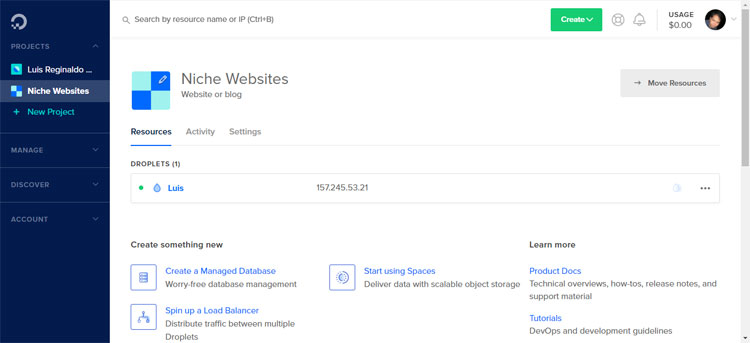
Now you can see your newly-created DigitalOcean droplet and its corresponding IP address. The IP will be used to connect your server with Runcloud.
How to Create an SSH Key (Optional)
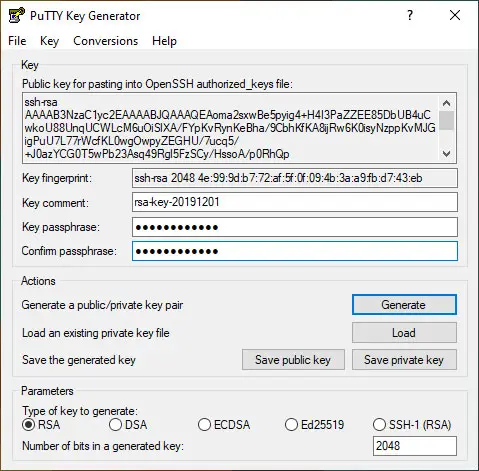
If you choose to create an SSH key, you’ll need the PuTTY key generator. You can generate SSH keys using the Windows command prompt but PuTTYgen is much easier.
Enter your key passphrase (password) and click “Generate” to generate the SSH keys. Make sure to save both public and private keys on your computer (you’ll need them later on).
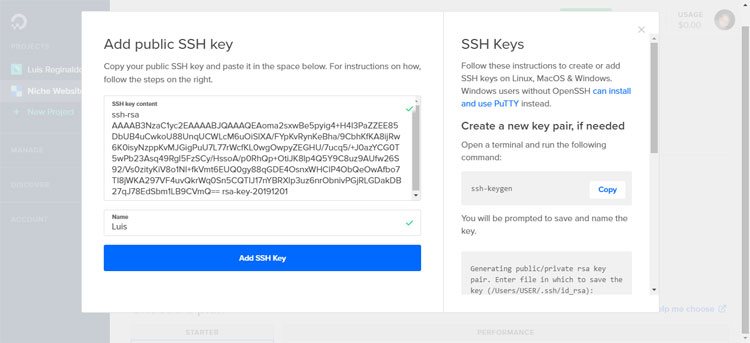
Go back to the “Create Droplets” page on DigitalOcean. Add the SSH key to your DigitalOcean droplet. Enter the name and click “Add SSH Key.”
Connect Your DigitalOcean Droplet to Runcloud
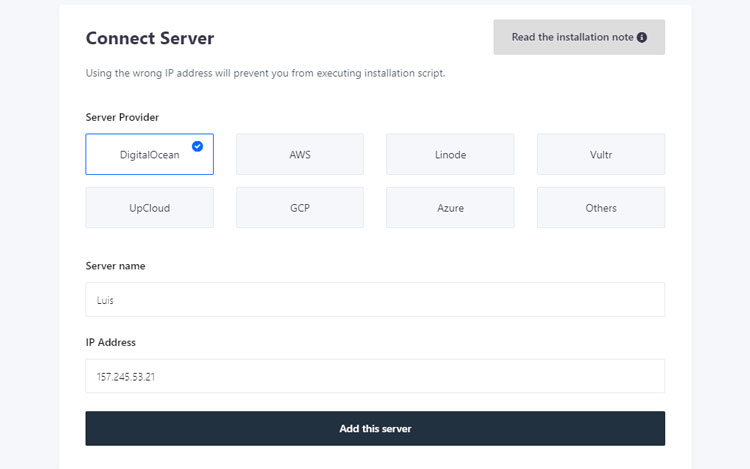
Sign up or login to Runcloud (you can avail of a free 5-day trial). Click “Let’s get started” to add your first server.
Choose the server provider (DigitalOcean in this case) and enter the server name and IP address. Click “Add this server.”
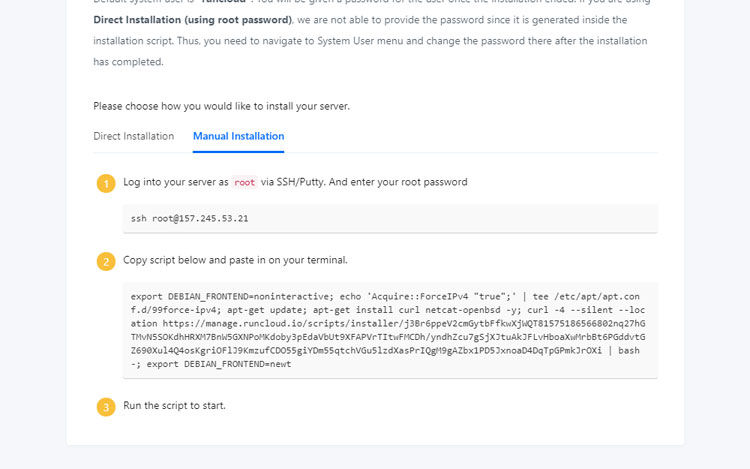
If you’re using an SSH key, choose “Manual Installation.” Choose “Direct Installation” if you chose a one-time password instead of an SSH key.
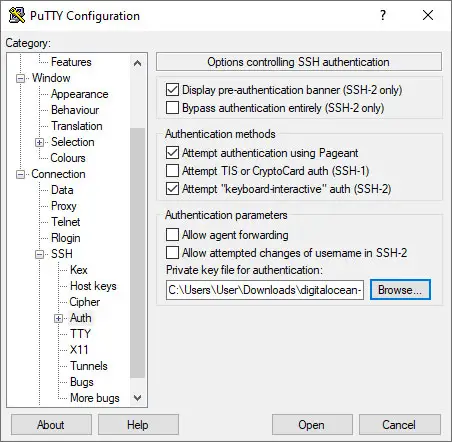
Launch the PuTTY application. Enter the IP address and port (should be 22).

Go over to Connection > SSH > Auth. Choose the private key file (.ppk) that you generated using PuTTYgen in the previous steps (“How to Create an SSH Key”).
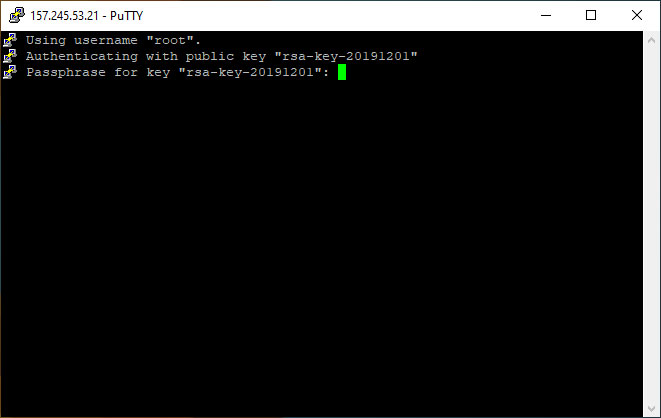
Go to Connection > Data and set the auto-login username to “root.”
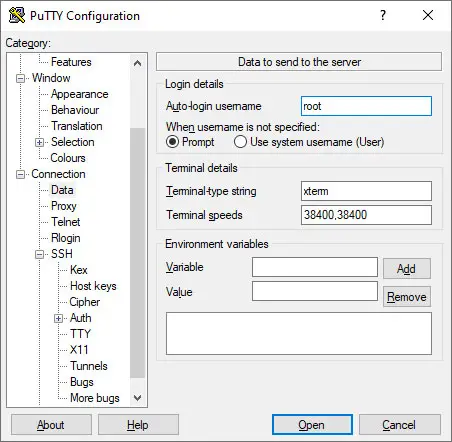
Go back to the first step in the PuTTY configuration and save your session. Click “Open” to connect to the server.
A security alert will appear. Click “Yes.”
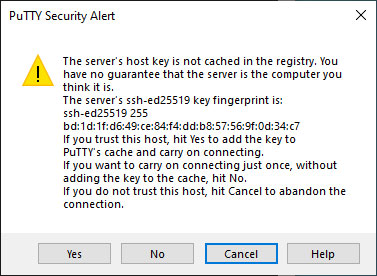
Enter the key passphrase for your SSH key. PuTTY will then start connecting to the server.
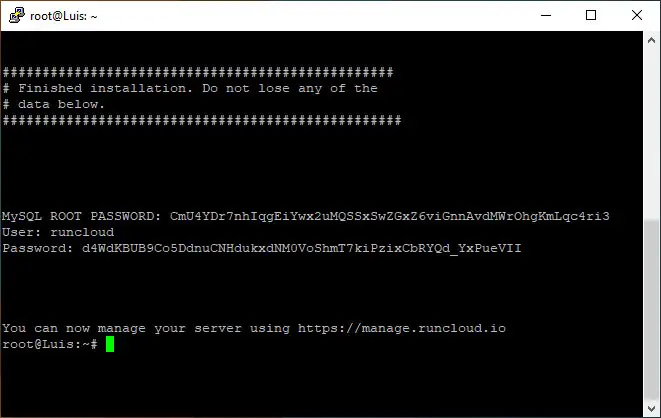
Copy the script from Runcloud in the Manual Installation step and paste it into the terminal.
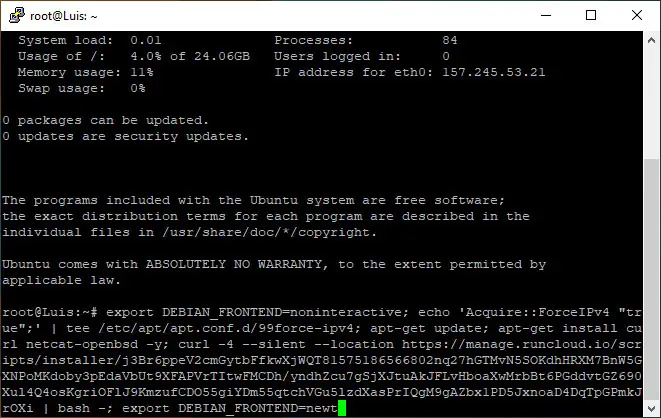
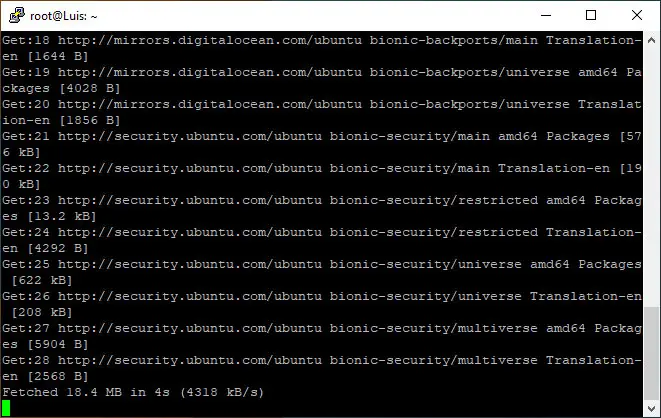
Runcloud will then start installing the required packages for your server. Wait for a few minutes for this process to complete.
When the installation is finished, copy and save the MySQL root password, user and password. You will need them for managing your server.
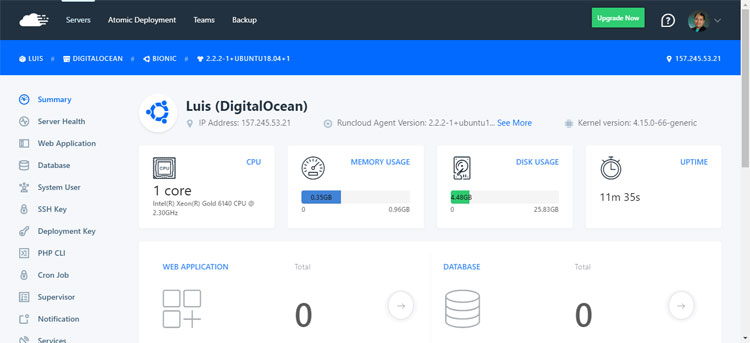
Congratulations! Your DigitalOcean VPS has been set up and configured. You can now view your server on Runcloud.
Create a Web Application and Install WordPress
The next step is to install WordPress on your DigitalOcean server. Runcloud allows you to install web applications such as WordPress with just a few clicks, so you don’t have to upload files and create a MySQL database manually.
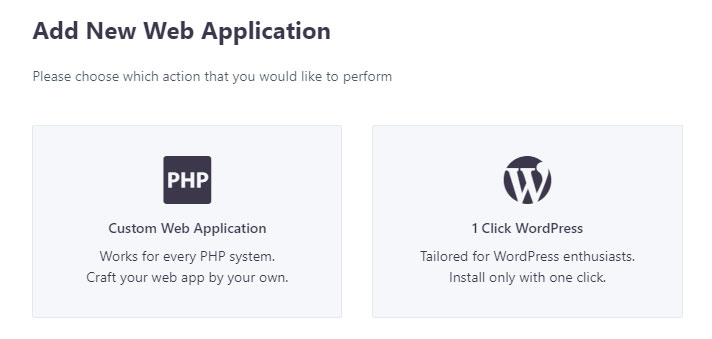
Click “Web Application” on the menu on the left, and then click “Create Web App.”
Choose “1 Click WordPress.”
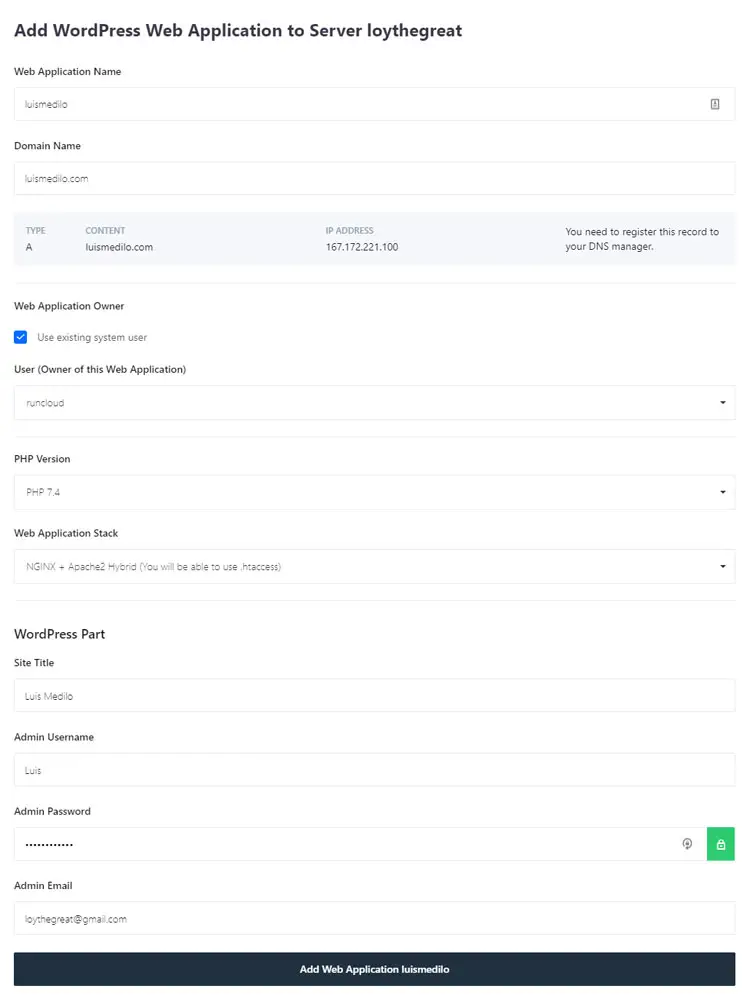
Choose or enter the following settings or information:
- Web Application Name – Can be anything.
- Domain Name – Enter the domain name (e.g. thebestwebsite.com).
- Web Application Owner – Check “Existing system user.”
- PHP Version – Default is PHP 7.4.
- Web Application Stack – Default is NGINX + Apache2 Hybrid.
- Site Title – The name of your website.
- Admin Username – Your preferred username in WordPress.
- Admin Password – Use this to log in to your WordPress admin.
- Admin Email – Enter your email address if it’s different from your Runcloud email.
Click the “Add Web Application” when you’re done.
That’s it! You have successfully installed WordPress on your DigitalOcean server. Don’t forget to point your domain name to your server by changing its DNS records. If you like, you can also install a free Let’s Encrypt SSL certificate to secure your website.
Runcloud offers free migration to transfer your website or application over to their platform. If you want to do it yourself, there are plugins like Duplicator that can help you migrate your WordPress website from your old host to your new DigitalOcean server.
As you can see, it’s fairly easy to set up and manage a VPS using a server management platform like Runcloud. With Runcloud, you don’t need to learn Linux and muck around the command line to host your website on a DigitalOcean or any VPS for that matter. This means that you can focus more on your business than maintaining the health and integrity of your web server.


