A passport is a document issued by the government that proves the passport holder’s identity and citizenship, and is required for travel abroad. Oftentimes, getting a passport can be quite a long and painstaking process.
Have no fear, however! We have come up with a complete and updated DFA passport appointment and application guide for 2025 that will hopefully answer all your questions about how to get a Philippine passport. We’ll discuss the passport application process, passport requirements, fees, personal appearance at the DFA, and many more.
Just like many government procedures and transactions, passport applications can already be done online. This eliminates the need for the manual filing and submission of passport application forms. It’s not yet 100% online, however, as you will still need to show up for a personal appearance at a DFA consular office.
Thanks to the wonders of technology, applying for a passport is no longer a difficult and time-consuming process. Whereas before, you had to fill up a form, bring your required documents and wait in line along with hundreds of other applicants, nowadays you simply fill up an online application form and set your passport appointment schedule in advance. No more waiting in line and no more stress and hassles!
Without further ado, let’s go through the steps of the Philippine passport online application process. Take note that these steps are applicable only to new or first-time passport applicants. If you want to renew your expired or expiring passport, check out this passport renewal guide.
First Step: Prepare Your Passport Requirements
Preparation is the key to success, so before you apply for a passport, make sure that you have your documentary requirements ready. It would be a disaster to have your appointment schedule tomorrow only to discover that you don’t have a copy of your birth certificate.
The following are the passport requirements you need to prepare before you apply for a passport (click each link below to learn more):
- Original copy of PSA birth certificate on security paper
- Valid ID (original and photocopy)
- Duly accomplished and printed application form
- Confirmed DFA passport appointment
- Personal appearance
- Supporting documents (if necessary)
1. PSA Birth Certificate
Prepare an original copy of your Philippine Statistics Authority (PSA) authenticated birth certificate on security paper. Here’s a short tutorial on how to get your PSA birth certificate online.
Married women who are using their spouse’s last name must submit an original copy of their PSA authenticated marriage contract on security paper or Report of Marriage. If a married woman opts to retain her middle name, a copy of her marriage contract is not required.
2. Valid ID (Original and Photocopy)
Bring at least one (1) valid ID. Here’s a list of valid IDs:
- SSS, GSIS or Unified Multi-Purpose Identification (UMID) card
- COMELEC Voter’s ID or Voter’s Certification from the election officer with dry seal
- LTO Driver’s License or Student Permit in card format
- Postal ID (issued on or after November 2016)
- Professional Regulatory Commission (PRC) ID
- Overseas Workers Welfare Administration (OWWA) E-Card
- Senior Citizen ID
- PNP Firearms License
- Airman License (issued on or after August 2016)
- School ID (if applicable)
Overseas applicants may use their host country’s government-issued IDs showing their Philippine citizenship (example: Residence Card).
Take note that the NBI clearance is not a valid ID.
3. Duly Accomplished Application Form
You will receive your accomplished application form via email after completing your online passport application and paying your passport application fee. Print it and bring it with you during your appointment.
If you’re not required to make a DFA passport appointment or if you avail of the courtesy lane, you may download the passport application form and print it on A4 size paper.
4. Confirmed DFA Passport Appointment
You will need to make an online passport appointment through the DFA Passport Appointment System website. The step-by-step process on how to secure your passport appointment is laid out below.
No online passport appointment is needed for the following applicants who may avail of the Courtesy Lane Facility:
- Senior citizens (60 years and older). A senior citizen must show proof of age, and is allowed one companion who must be an immediate family member and must show proof of relationship. If the companion is not an immediate family member, he or she must show proof of travel arrangements (such as a confirmed plane, ferry or hotel booking) with the senior citizen.
- Persons with disabilities (PWDs). A PWD must show proof of disability. He or she may be allowed one companion who must be an immediate family member and must show proof of relationship. Otherwise, the companion must provide proof of travel arrangements with the PWD.
- Minors 7 years old and below, as well as his or her parents and minor siblings.
- Pregnant women. If the woman’s pregnancy is not yet visible, she must show her medical certificate or record proving her pregnancy.
- Solo parent and his or her minor child. A valid solo parent card must be provided.
- Overseas Filipino workers, either land-based or sea-based. The OFW must present a valid proof of status such as a valid employment contract, iDOLE card, work visa, or Seaman’s Book (if a seafarer) stamped at an international border less than a year from the date of application.
5. Personal Appearance
All passport applicants must personally appear at the DFA consular office, with no exceptions. This applies even for applications coursed through travel agencies.
Applicants are reminded to wear decent attire, and to be at their chosen DFA consular office for at least 30 minutes before their passport appointment time to avoid any hassles.
6. Supporting Documents (If Needed)
The DFA may ask for additional documentation in the following cases:
- No birth certificate or report of birth.
- If the applicant was born after 1950, he or she must file for late registration with the local civil registrar or DFA consular office with jurisdiction over the applicant’s birthplace. The applicant should then submit the original copy of the PSA late registered birth certificate along with supporting documents and IDs obtained before the date of late registration.
- If the applicant was born on or before 1950, he or she must provide original copies of PSA authenticated Certificate of No Birth Record and Affidavit of Two Disinterested Persons attesting to the applicant’s identity.
- Late registered birth certificate.
- If the birth certificate was registered more than 10 years ago, no additional supporting documents are required.
- If the birth certificate was registered less than 10 years ago, the applicant must provide IDs obtained before the date of late registration. If the applicant cannot provide an ID that pre-dates the late registration, he or she must present a current, valid ID and an NBI clearance.
- Dissolved marriage or if the applicant wants to revert to her maiden name.
- The applicant must present an original copy of the annotated PSA marriage certificate or Report of Marriage stating the dissolution of marriage.
- If the marriage certificate or Report of Marriage is not available, the applicant must provide a certified true copy of the court order dissolving the marriage and a certificate of finality from said court.
- Lacking data in birth certificate or report of birth. The applicant must provide proof of filing of supplemental report or correction from the local civil registrar.
- Discrepancy in birth certificate or report of birth.
- If the discrepancy is found in the birth certificate, the applicant must submit a PSA authenticated and annotated birth certificate showing the corrected entry.
- If the discrepancy is found in other documents, the birth certificate will be followed.
- Applicant is a naturalized Filipino citizen. The applicant must present an Identification Certificate of Naturalization from the Bureau of Immigration.
- Applicant is a dual citizen. The applicant must submit an original PSA authenticated birth certificate or Report of Birth, an original Identification Certificate from the Philippine Foreign Service Post (FSP) or the Bureau of Immigration, and a photocopy.
- Applicant acquired citizenship by election. The applicant must provide an Affidavit of Election of Philippine Citizenship and an Identification Certificate of Election from the Bureau of Immigration.
- Applicant was granted Filipino citizenship by an act of legislation. The applicant must submit a certified true copy of the law granting the citizenship and a foreign birth certificate authenticated by the Philippine Foreign Service Post.
DFA Passport Appointment and Application Step-by-Step Guide (Updated for 2025)
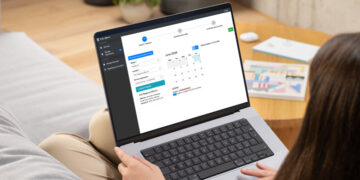
In 2008, the Department of Foreign Affairs launched the DFA passport appointment system which allows applicants to apply for new passports or renew their expired passports through the Internet. I have come up with a comprehensive tutorial on how to process your online passport appointment and application.
What you need is a desktop computer or laptop, a stable Internet connection and an Internet browser (such as Google Chrome or Mozilla Firefox).
Can the online passport application be done using a mobile device like a smartphone or tablet? Yes, you can use the DFA passport appointment system using a smartphone or tablet because the website is mobile-friendly or responsive. Just be ready to scroll down a lot though because some pages are quite long.
Just follow this step-by-step guide to schedule your passport appointment:
Step 1: Visit the DFA Passport Appointment Website
Go to the DFA Passport Appointment System website and click “Schedule an Appointment.”

You can also go straight to the passport appointment process by going to the Schedule an Appointment page.
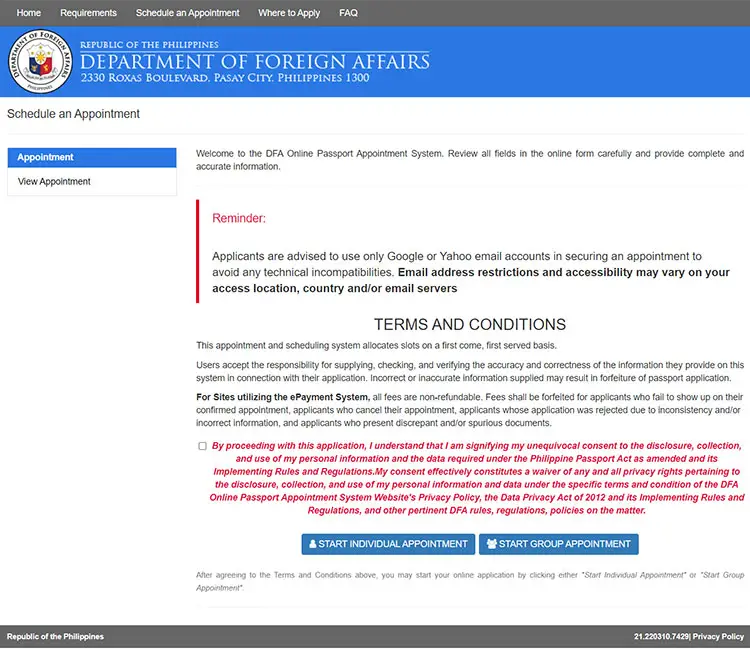
Step 2: Agree to the Terms and Conditions
Read the Terms and Conditions. Tick the checkbox that says, “By proceeding with this application, I understand that I am signifying my unequivocal consent to the disclosure…” and then click “START INDIVIDUAL APPOINTMENT.”
If you are making an online passport appointment for two or more family members, click “START GROUP APPOINTMENT” instead.
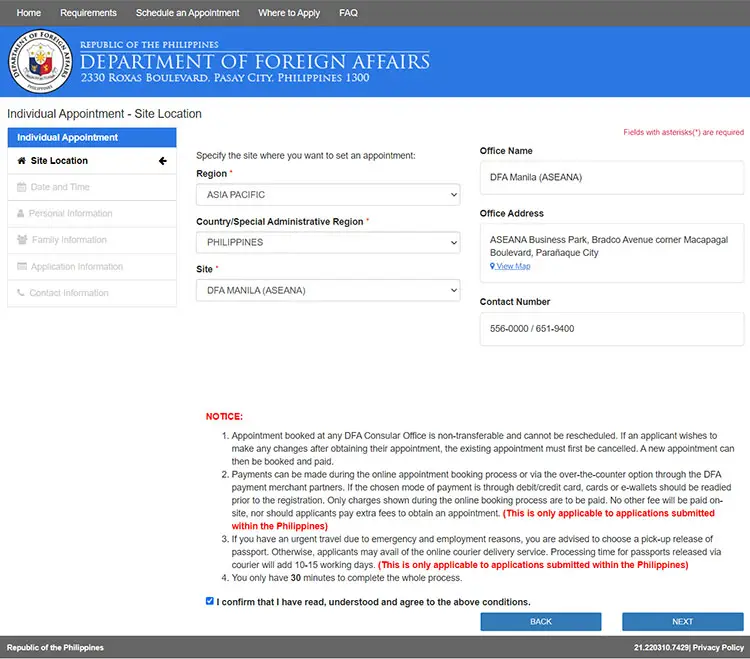
Step 3: Choose Site Location
Choose the site where you want to set your DFA passport appointment. For example: DFA Manila (Aseana). After choosing your passport appointment site, its office address and contact number will be shown.
Take the time to read the Notice and then tick the checkbox for “I confirm that I have read, understood and agree to the above conditions.” Click “NEXT” to proceed to the next step.
Step 4: Choose Date and Time of Appointment
Select the date and time when you wish to make your passport appointment. To do this, first click the date (available dates and times are highlighted in green) and then choose the time on the right-hand portion of the screen. Solve the captcha code (“I’m not a robot”) and click “NEXT.”
Take note that you have only 30 minutes to complete this step. Otherwise, your chosen time slot will be released for other applicants.
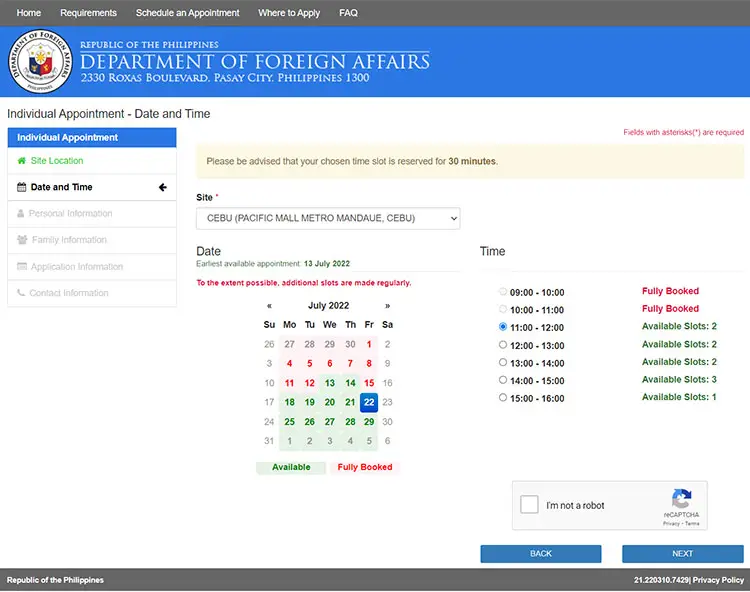
If you don’t see any available date or time slots, you can refresh the page from time to time, or you can select another site. Sites in the provinces tend to have more open slots than those in Metro Manila and other cities.
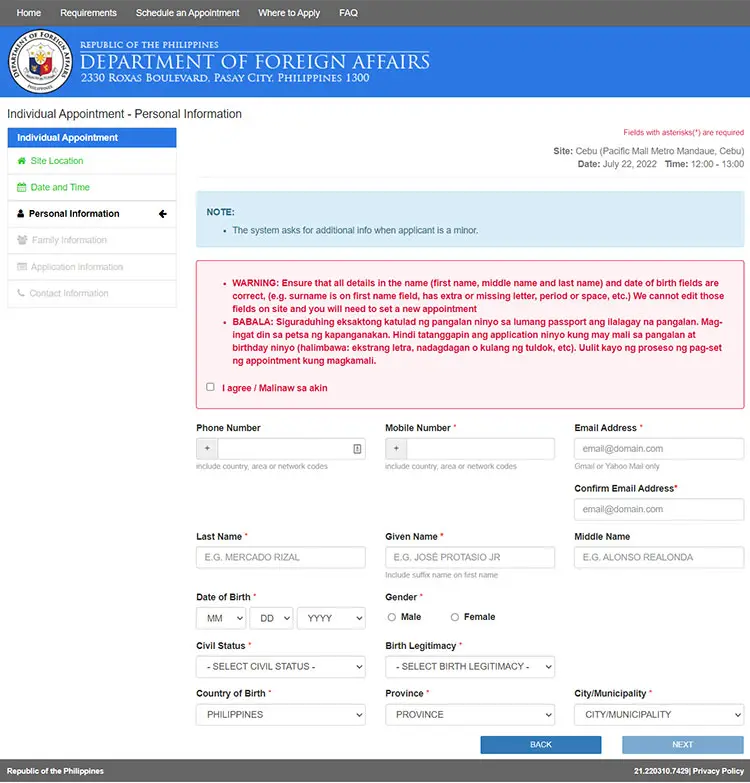
Step 5: Enter Your Personal Information
Provide all the required personal information such as your last name (surname), first name, date of birth, country of birth, gender, civil status, birth legitimacy, mobile number, and email address.
For the email address, I recommend a reliable email provider such as Gmail or Yahoo Mail. Make sure that you entered your email address correctly because this is where your confirmation and application form will be sent. If you submitted a wrong email address, you will have to redo the entire online application process.
Enter the following information in their respective fields:
- Phone Number (optional) – Enter your telephone number including the country code (63) and area code. This is optional.
- Mobile Number – Enter your mobile number including the country code prefix (63). For example, if your mobile number is 09123456789, enter 639123456789.
- Email Address – Provide your Gmail or Yahoo email address. Example: [email protected].
- Last Name – Enter your or the applicant’s surname or family name.
- First Name – Enter your or the applicant’s first name.
- Middle Name (optional)
- Date of Birth – Provide your date of birth in MM/DD/YYYY format.
- Gender – Choose either “Male” or “Female.”
- Civil Status – Choose from “Single,” “Married,” “Widowed,” “Separated,” or “Annulled.”
- Birth Legitimacy – Select “Legitimate” if you are born to parents who are legally married to each other.
- Country of Birth – Select the country where you were born. The default is “Philippines.”
- Province – Select the province where you were born.
- City/Municipality – Select the city or municipality where you were born.
Check that all your provided information are correct and accurate, then click “NEXT.”
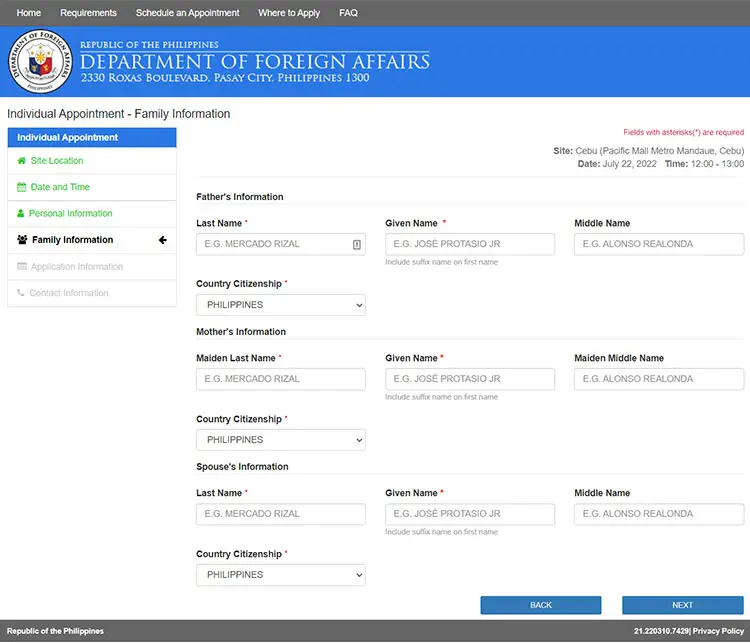
Step 6: Enter Your Family Information
Input your father’s complete name, mother’s maiden name, your parents’ citizenship, and your spouse’s (if any) information:
- Father’s Information
- Last Name
- First Name
- Middle Name
- Country Citizenship – If your father is not a Filipino citizen, select his country of citizenship.
- Mother’s Information
- Maiden Last Name – Enter your mother’s surname or family name before marriage.
- First Name
- Maiden Middle Name – Enter your mother’s middle name before marriage.
- Country Citizenship – If your mother is not a Filipino citizen, select her country of citizenship.
- Spouse’s Information – This section only appears if you selected “Married” as your civil status in the previous step.
- Last Name
- First Name
- Middle Name
- Country Citizenship – If your spouse is not a Filipino citizen, select his or her country of citizenship.
Click “NEXT” when you’re done.
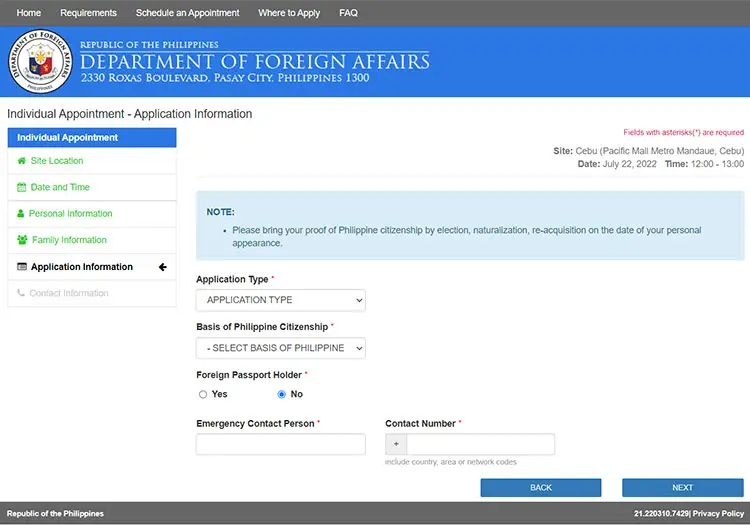
Step 7: Choose Application Type
Select the application type, whether it’s a new application or a renewal. Also choose the basis of your Philippine citizenship and whether you’re a foreign passport holder or not.
- Application Type
- New – Select this if you are a first-time applicant and you have not been issued a Philippine passport in the past.
- Renewal – Select this if you want to renew your passport.
- Old Passport Number – Enter your old passport number. For example: AB1234567.
- Date of Issue – Enter the date when your old passport was issued.
- Issuing Authority – Check your old passport for the issuing authority. For example: DFA Cebu.
- Lost – Select this if your passport was lost or stolen.
- Basis of Philippine Citizenship – Select “Birth” if you are natural-born Filipino citizen.
- Foreign Passport Holder – Select “Yes” if you hold a foreign passport.
- Emergency Contact Person – Provide the name of your emergency contact (the person to be contacted in case of emergency), such as your parent or sibling.
- Contact Number – Enter the mobile number of your emergency contact. Include the country code prefix (63).
Click “NEXT” to proceed to the next step.
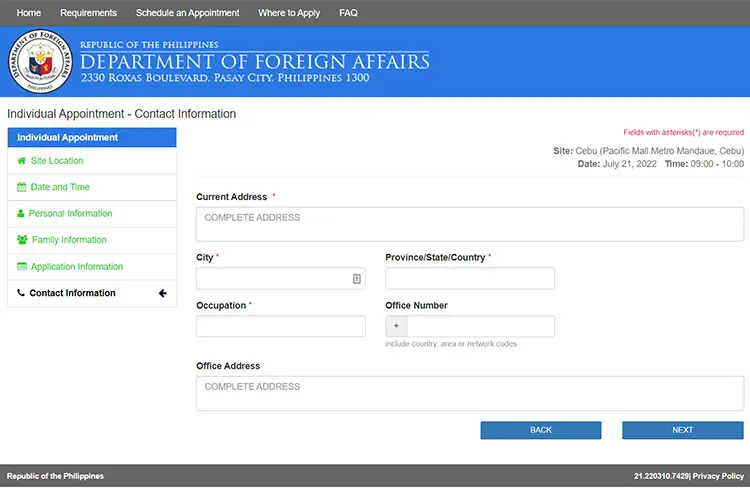
Step 8: Enter Your Contact Information
Input your contact information including your complete home address, city and province. Optionally, you may provide your office address and number.
- Complete Address – Enter your current home address not including city and province.
- City – Enter your city or municipality.
- Province – Enter your province.
- Occupation – Enter your job or occupation.
- Office Number (optional)
- Office Address (optional)
Click “NEXT” to proceed.
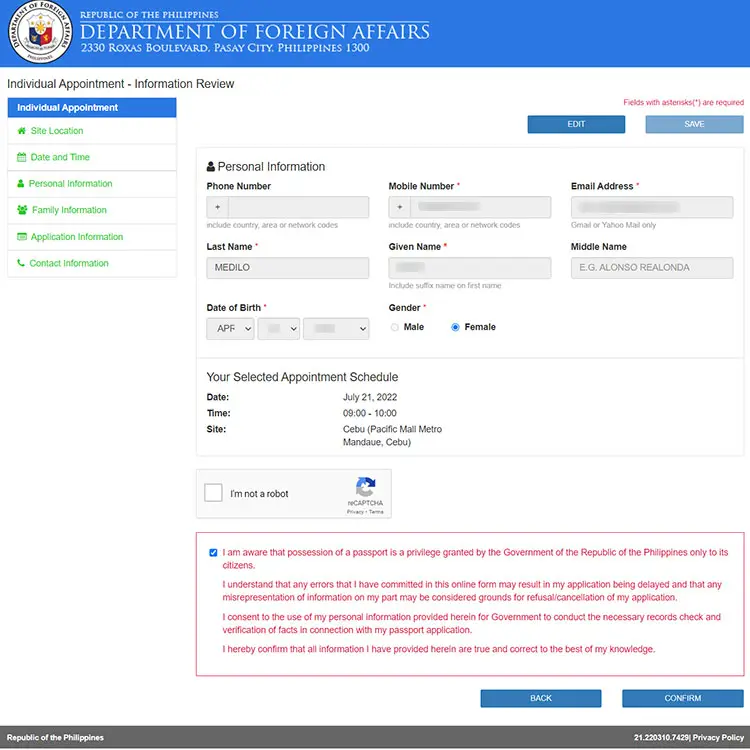
Step 9: Confirm Your Appointment Schedule
Review your passport application information and passport appointment schedule. If you want to make any changes, click the “BACK” button.
If everything is correct and accurate to the best of your knowledge, tick the checkbox next to “I am aware that possession of a passport is a privilege granted…”
Solve the captcha (“I’m not a robot”) and click “CONFIRM.”
Step 10: Choose Processing Type and Payment Method
If you’re in a real hurry, you can choose “Special Processing” to have your passport available in 6-7 working days. Otherwise, you may choose “Regular Processing” to receive your passport after 12 working days.
Regular processing costs ₱950 while special processing costs ₱1,200.
Next, choose any of the following payment methods:
- Over-the-Counter
- Credit/Debit Card (including GCash and PayMaya)
You can also request for delivery of your passport by checking “Courier.” You will be charged ₱150 for this service. Enter your delivery address and select the courier (Air21).
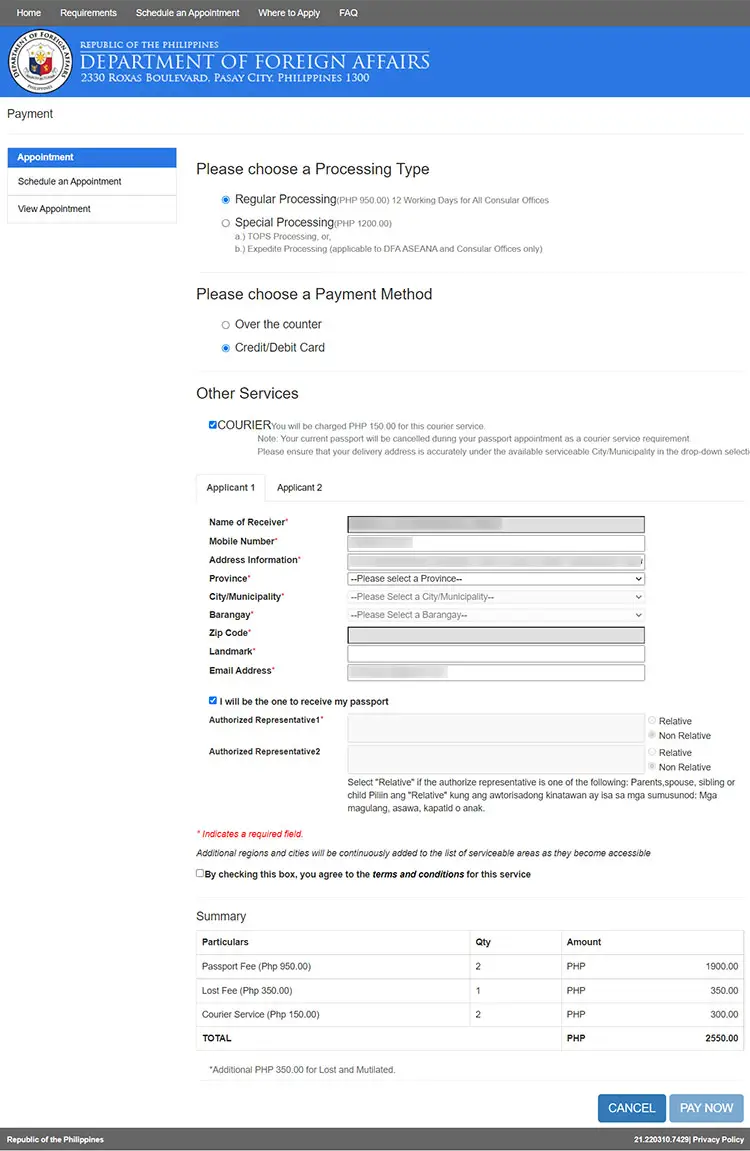
Review your payment summary and then click “PAY NOW” to proceed to payment.
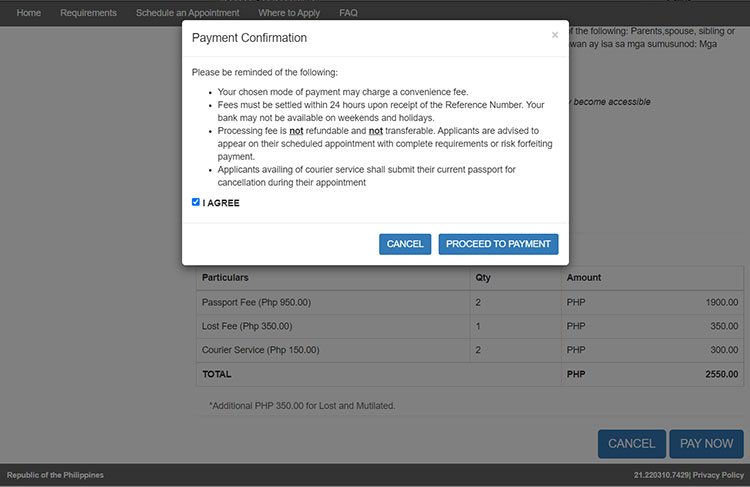
A payment confirmation pop-up will appear. Check the box for “I Agree” and click “PROCEED TO PAYMENT.”
Step 11: Complete Your Payment
Over-the-Counter Payment
If you selected “Over the Counter” as your payment method, you will receive an email from the DFA with the subject “DFA Passport Appointment System – Payment Reference.” Inside that email, you can see the reference number which you will use to pay for your application.
Go to the nearest payment center and pay the total amount due which is ₱1,000 for regular processing and ₱1,250 for express processing (inclusive of convenience fee). Pay only the exact amount or else your payment will be forfeited.
Use the reference number you received through email when making the payment. Only one reference number per transaction. If you gave the wrong reference number, don’t make another payment using the same reference number. Call the DFA hotline at (02) 8556-0000 should that happen.
Here are the payment centers where you can pay your passport processing fees:
- Bayad Center
- USSC (Western Union)
- 7-11
- ECPay
- Pera Hub
- Waltermart Department Store
- Robinson’s Business Center and Department Store
- TrueMoney
- Villarica Pawnshop
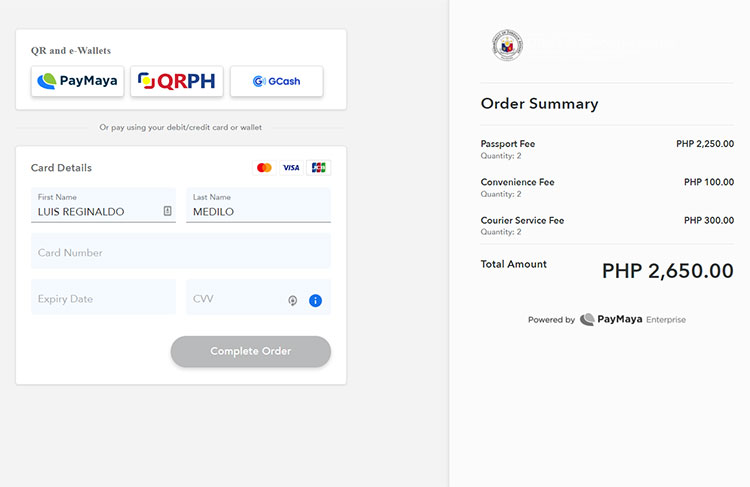
Credit/Debit Card Payment
If you selected “Credit/Debit Card” as your payment method, you will be redirected to the payment processing page, where you can choose any of these payment options:
- Credit or debit card (MasterCard, Visa or JCB)
- PayMaya
- QRPh
- GCash
If you wish to pay using your credit or debit card, enter your card details including card number, expiry date and CVV, and then click “Complete Order.”
If you want to pay using GCash or PayMaya e-wallet, click their corresponding logo in the “QR and e-Wallets” portion.
Take note of the total payable amount which includes the ₱50 convenience fee per application.
For GCash and PayMaya payments, you will have to enter the OTP sent to your mobile number as well as your MPIN or password. Make sure that your GCash or PayMaya wallet has enough balance to cover the transaction.
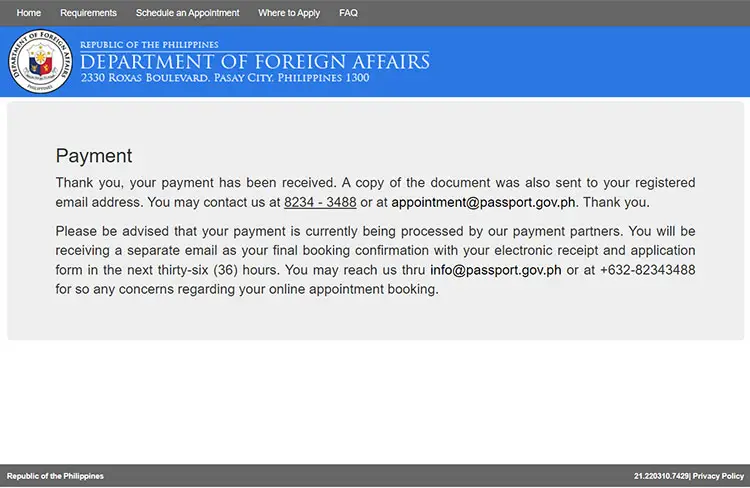
If payment is successful, you will be redirected to a page confirming the successful transaction along with the transaction number. Click “Back to Merchant” to return to the DFA passport appointment website.
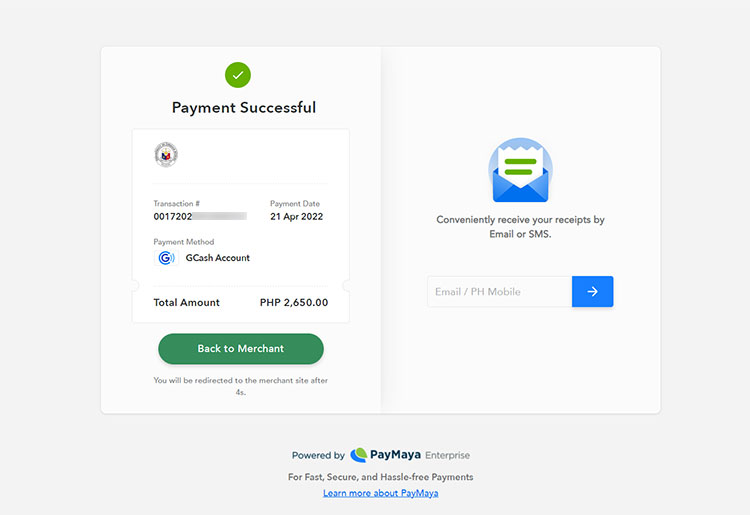
It will take up to 36 hours for your payment to be processed by the DFA’s payment partners. For online payments, you will receive the confirmation email in less than an hour.
If you haven’t received your final booking confirmation via email after 36 hours, you may call (02) 8234-3488 or email [email protected].
Step 12: Print the Passport Appointment Packet
After successful payment, you will receive another email with the subject “Confirmation Notification.” The email contains your confirmed appointment packet. Open and print the following:
- Checklist with schedule
- Confirmed and accomplished passport application form with the appointment reference number (ARN), electronic receipt number and bar code
- Two (2) copies of the electronic receipt
- Client feedback form
Bring these printed documents to your personal appearance along with your documentary requirements (PSA birth certificate, valid ID and supporting documents, if needed).
If you opted to have an authorized representative claim your passport, you will also receive a Letter of Authority and a Special Power of Attorney (SPA). Print and fill out these documents, and for the SPA, have it notarized. Give these documents to your authorized representative along with the original receipt issued by the DFA and the valid IDs (original and photocopies) of the passport applicant and the authorized representative.
Personal Appearance at the DFA
Now we’ve come to the crucial part – your personal appearance at the DFA consular office.
Make sure that you brought with you all your documentary requirements as well as your printed DFA passport appointment packet. Don’t forget to include photocopies of your documents to avoid any hassles and delays.
Dress up in proper, decent attire. It doesn’t mean that you have to wear a suit; a simple shirt will do. Don’t wear any of these clothing that show too much skin: sleeveless clothing, spaghetti tops, tube tops, see-through dresses, halters, sando, or clothes with plunging necklines. Jewelry items like necklaces and earrings are not allowed. You can wear contact lenses as long as they are not the colored ones.
Arrive at the DFA office at least 30 minutes before your appointment time. Don’t go too early either, like two hours before your schedule. Latecomers will not be entertained.
These are the steps you have to undergo during your personal appearance:
- Document verification – Go to the verification section to have your appointment verified. An officer will check if your passport appointment is valid and that you have all the required documents with you (duly accomplished application form, ID and e-receipt). Double-check that the verifier has stamped or signed your form before proceeding to the next step.
- Processing – Give your verified application form and required documents to the processor. The passport processor will check the information in your application form and make the necessary corrections. Double-check that the processor has signed your form before proceeding to the next step.
- Data encoding and biometrics – Proceed to the data capturing and encoding section. The information you provided in your application will be encoded, and you will be asked to check if every information is correct before signing the electronic confirmation page. Afterwards, your photograph, fingerprints and signature will be taken.
- Courier service (optional) – If you did not avail of the courier service during the DFA online appointment process and you would like to have your passport delivered to your chosen address, you may approach any of the courier providers inside the capture site. Your current passport will be cancelled as a requirement for courier delivery.
Claiming Your Passport
Go back to the DFA consular office (where you had your appointment) on or after the date of release. Give your receipt or claim stub to the Releasing window to claim your passport. Check that your passport is in good condition and that there are no errors in your personal information.
If you’re not physically able to claim your passport, you can have an immediate family member (sibling, parent, spouse or child) or an authorized representative to claim it for you.
Immediate family members are requested to bring an authorization letter, the original receipt, the applicant’s valid ID (original and photocopy), and the representative’s valid ID (original and photocopy). Representatives who are not immediate family members will have to present a Special Power of Attorney in lieu of the authorization letter.
If you opted for the courier service, you only have to wait for your passport to be delivered to your chosen address. You can track your passport through the DFA Passport Tracker page.
Frequently Asked Questions
How much does it cost to apply for a Philippine passport?
Passport processing fees are ₱950 for regular processing, ₱1,200 for express processing and $60 for foreign applications.
How long will the passport processing take?
For regular processing, you’ll be able to claim your passport in 12 working days. For express processing, it will take 6 working days for DFA Aseana and consular offices in Metro Manila, and 7 working days for DFA consular offices outside Metro Manila. This information is not set in stone, however. It might take longer for some applications to be processed. Some applicants have complained that it took them 2-3 weeks to claim their passports.
Is the NBI clearance considered a valid ID? How about PhilHealth, TIN and postal IDs?
The NBI clearance is not a valid ID. The same goes for the PhilHealth, TIN and postal ID. A list of acceptable valid IDs can be found here.
Can I apply in a distant city even if I don’t live there, for example, Cebu even if I’m from Davao?
Of course, you can apply for an appointment at any DFA passport site or location in the Philippines. It doesn’t matter how far you are from that site.
What if there are no available appointment slots?
Competition for DFA passport appointment slots can be quite fierce. If you see that all the slots are already taken, don’t lose hope. You can refresh the page to see if a slot will become available. Other applicants may have quit the application process which opens up a slot for you. Slots are made available at 12 noon and 9:00 PM so check for available slots during that time.
Is it legal to hire the services of fixers or passport appointment setters?
No. It’s a violation of the law to hire the services of fixers and violators may be penalized or banned from applying for a passport.
Can I apply as a walk-in applicant?
Yes, provided that you are eligible for the courtesy lane. More information can be found here.
What if I provided the wrong email address in my online application?
If you provided the wrong email address then you will not be able to complete the DFA passport appointment process in the first place. In that case, your appointment will be cancelled after 5 days. You can apply again after 5 days have lapsed.
Why haven’t I received any emails from the DFA?
Barring a technical issue with the DFA passport appointment system, you should receive their emails in less than an hour. You can check the Spam or Junk folder to see if their emails are routed there.
Can I change my appointment location or date?
Yes. Just go to this page and enter your appointment code and email address. Click Reschedule to change your appointment date or location. Rescheduling can only be done once.
Can I get a refund if I fail to show up for my appointment?
No, there are no refunds for failure to show up for scheduled appointments.
What if I made a mistake in my online application?
No worries. Even though you can’t change the information in your online application form after you’ve submitted it, you can still have it corrected during your appointment. Just inform the passport processor about it. Don’t forget to bring documents to support the correction.
My birth certificate has an error or discrepancy. Can I still apply for a passport?
Yes, you can still apply for a passport. You may need to show supporting documents though. More information can be found here.
What happens if I don’t show up for my appointment?
If you can’t make it to your passport appointment, you will be barred from making another appointment for 30 days. This is done to discourage “no shows.” You are free to reapply after one month.
What should I do if I notice an error in my passport?
Go to the DFA consular office or call (02) 8556-0000 as soon as possible.
I paid for delivery but I haven’t received my passport yet. What should I do?
In the rare instance that you haven’t received your passport on the promised delivery date, you can call the DFA delivery hotline at (02) 8567-1111.
Final Words
We hope that this DFA passport appointment and application guide will help you with your desire to get a Philippine passport. This article will be updated from time to time to reflect any major changes in the online passport application process.
If you have any questions or concerns about your Philippine passport or the application process, call the DFA hotline numbers (02) 8556-0000 or (02) 8834-4000.