
We’ve all been there. After typing an email and nonchalantly hitting the send button, you realize that you’ve made an embarrassing mistake. Now you want to rescind that email before the intended recipient reads it and thinks poorly of you. So the question is, can you recall an email that you have already sent in Microsoft Outlook?
The quick answer is yes, you can recall an email in Outlook. However, it is not as easy as it sounds. There are several limitations that should be considered before you try to recall your emails.
First, both you and your recipient must have a Microsoft Exchange or Microsoft 365 email account within the same organization. This means that you cannot recall messages sent to Gmail, Yahoo! and other non-Outlook email accounts, as well as to Outlook email accounts that are outside your organization.
Secondly, you (the sender) must be using the Outlook application for desktop computers. You cannot recall emails sent through Outlook on the web or the Outlook mobile app.
Thirdly, you cannot recall emails that have already been opened by the recipient. When you attempt a recall, the recipient will receive two emails: the original message, and the recall message notifying him that you want to delete the original email. Depending on the recipient’s tracking settings in Outlook, the original message will be automatically deleted from the email inbox as long as it was still unopened at the time of the recall attempt.
Aside from the ability to recall emails, you can also replace your original message with a new one, which is particularly useful if you only need to correct a small mistake in your email. Replacing the original message often makes more sense than completely deleting it, as it entails less time and effort than writing and sending a new one.
As previously mentioned, recalling an email only works if your recipient has an Outlook account in the same organization. So if you want to recall an email that was sent to a Gmail address, then you’re out of luck. However, you can delay delivery of your emails so that you have enough time to go back and review your messages before ultimately sending them to your recipients.
Whether you’ve sent an angry memo to a colleague or the wrong email to your boss, recalling your email gives you a chance to rectify your errors and save yourself from a potentially embarrassing situation. This article teaches you how to recall or unsend an email when using the Outlook desktop application in your PC or laptop.
How to Recall an Email in Microsoft Outlook
Follow this step-by-step guide to recall your email in Outlook. For this tutorial, it is assumed that you are using the Microsoft Outlook desktop application on your computer.
Go to your Sent Items folder and open the email that you want to recall.
Using the Outlook desktop application, navigate to the Sent Items folder and open the email you wish to recall by double-clicking it. This will open the email in a new message screen or window.
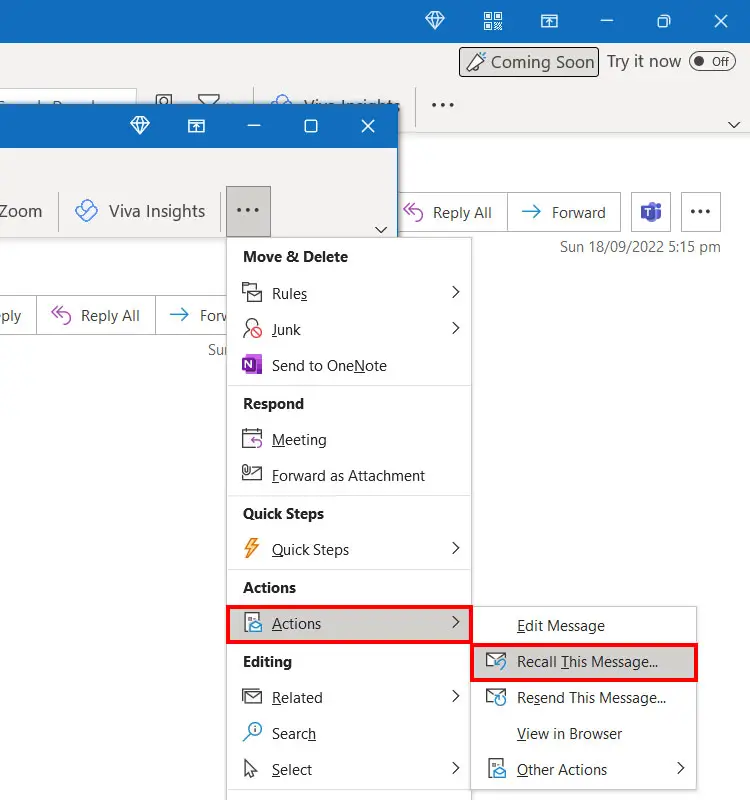
Click the icon with three horizontal dots on the right part of the message window.
The More Commands button is indicated by three horizontal dots. Click it and a dropdown menu will appear below it.
On the dropdown menu, navigate to “Actions” and click “Recall This Message.”
Choose whether to delete your message or replace it with a new one.
At this point, you have two options in recalling your email: “Delete unread copies of this message” or “Delete unread copies and replace with a new message”. Choose your preferred option and then click OK.
By default, the option for “Tell me if recall succeeds or fails for each recipient” is checked. You should leave this checked to be notified of the success or failure of your recall request.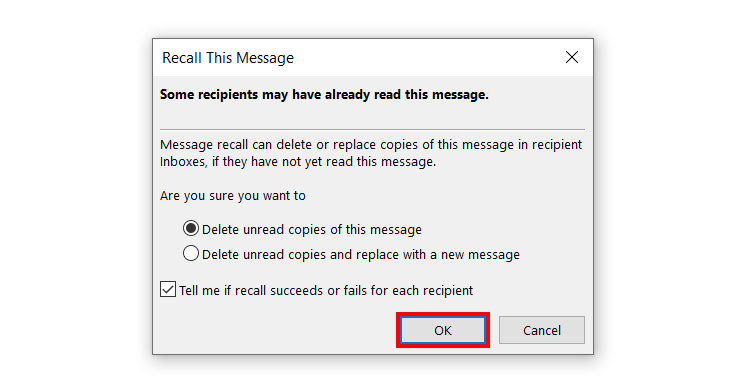
Write your new message.
If you selected “Delete unread copies and replace with a new message” in the previous step, Outlook will open a new screen that lets you compose a new message to replace the original one. After writing the new message, click Send.
Wait for the email to be recalled.
Your recipient will receive a message in Outlook informing them of the recall attempt. If the recipient has not yet opened the message at the time of the recall, the original message will be deleted or replaced with a new one.
Possible Scenarios When Recalling an Email in Outlook
Email recalls don’t always work in Outlook; there are several scenarios that may affect the outcome of your recall attempt. For example, if your recipient moved your email to another folder, your recall attempt will be unsuccessful. Here we present several scenarios and the possible outcomes associated with each.
- The original message is moved to another folder: If the original message, either by rule or by manual action, is moved out of the inbox to a different folder, the recall attempt fails and the recipient receives a message to that effect. This happens even if the original message is still unopened.
- Both the original and recall messages are moved to the same folder: If both the original and recall messages, either by rule or by manual action, are moved to the same folder, any of the following occurs:
- If the recipient opens the original message first, the recall attempt fails.
- If the recipient opens the recall message first, the recall is successful and the original message is deleted. The recipient is then notified that the sender has deleted the message.
- On the recipient’s Outlook account, “Automatically process requests and responses to meeting requests and polls” (under the Tracking section) is checked: If the recipient has this setting enabled (which can be done by going to File > Options > Mail), any of the following occurs:
- If the original message is still unopened, the original message is deleted and the recipient is notified that the sender has deleted the message.
- If the original message is only marked as read, the recipient is informed that the sender wants to delete the message. The message remains in the recipient’s inbox.
- On the recipient’s Outlook account, “Automatically process requests and responses to meeting requests and polls” (under the Tracking section) is unchecked: If the recipient has this setting disabled, any of the following occurs:
- If the recipient opens the original message first, the recall attempt fails. Both the original and recall messages remain in the recipient’s inbox.
- If the recipient opens the recall message first, the recall is successful and the original message is deleted. The recipient is then informed that the sender has deleted the message.
- If the original message is only marked as read, the recipient is informed that the sender wants to delete the message. However, the message remains in the recipient’s inbox.
How to Delay Delivery of Emails in Outlook
If you don’t want to deal with the hassles of recalling your messages, you can delay email delivery instead. Delaying the delivery of emails gives you enough time to review your messages for any mistakes before they are sent to the recipient. Emails that are scheduled for delivery are placed in the Outbox folder, where you can edit or modify them before sending.
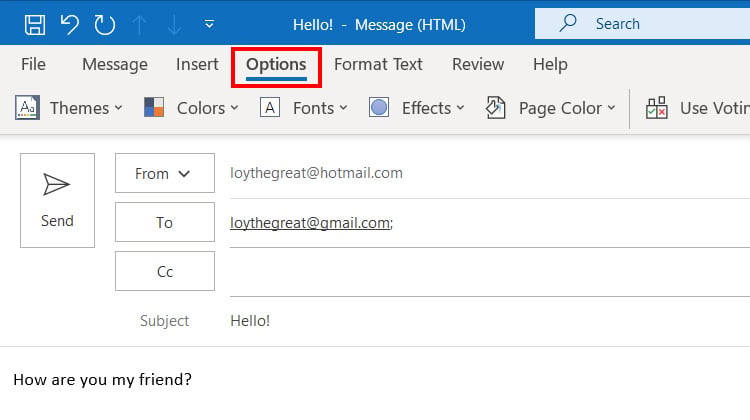
To delay email delivery, click Options on the toolbar of the New Message window where you are composing your email.
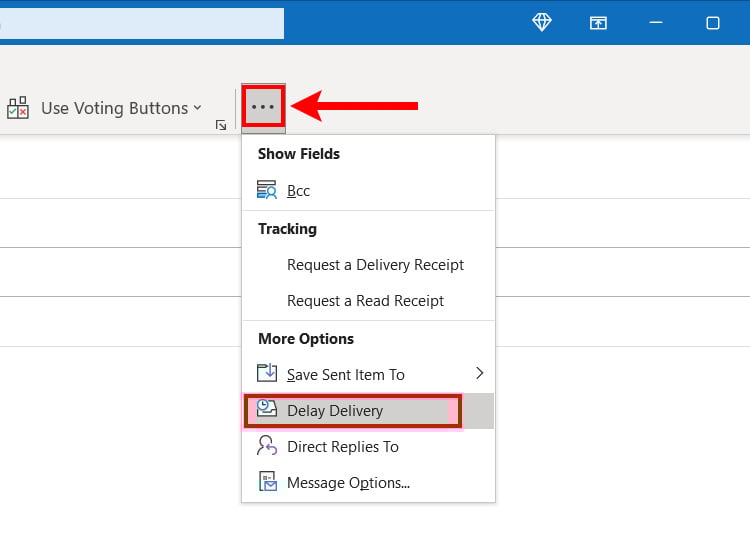
On the right part of the message window, click the button with three horizontal dots as shown on the screenshot below. A dropdown menu will appear, so click Delay Delivery.
The Properties dialog will pop up. Under the Delivery options section, make sure that the “Do not deliver before” option is checked, and then set the date and time of the delivery.
Click Close when you are done.

Finally, click the Send button to schedule delivery of your email. You can go to the Outbox folder to review or rewrite your message before it’s eventually sent to the recipient. You can also delete the email to cancel the delivery.
Key Takeaways
It’s nice to know that you can recall your emails in Outlook, which can be extremely useful in case you accidently sent the wrong email. The technique, however, is not foolproof, and there are a few limitations that must be considered before attempting a recall. Still, it doesn’t hurt to try recalling an email especially if your recipient is in the same company or organization as you.
If recalling your email is not possible, you can simply write an apologetic email to the recipient and explain your mistake. Most people will readily accept your apologies and simply ignore your error as if it never happened. Everyone makes mistakes, after all.