With SIM registration in full swing around the country, DITO subscribers are busy registering their SIM cards to comply with the new law. If you’re a subscriber and you don’t know how to register your SIM yet, you’re in luck because we’ve prepared a complete, step-by-step guide for you. We will teach you how to fill out the DITO SIM registration form, upload your ID, and successfully register your SIM in the quickest possible manner.
If you didn’t know already, the SIM Registration Act came into effect on December 2022. The law aims to reduce, if not eliminate, all forms of crimes and fraudulent activities that are committed through the use of Subscriber Identity Module (SIM) cards. The SIM Registration Act also makes it easier for authorities to monitor and track down fugitives from the law. Although the new law definitely has noble objectives, some are worried about its implications on privacy and human rights. But that’s a story for another day.
The law provides a 180-day period for the initial registration of existing SIM cards, so you have until April 26, 2023 (extended to July 25, 2023) to register your DITO SIM to avoid permanent deactivation. You still have plenty of time to register your SIM card, but it’s better to do it now when the idea is still fresh in your mind. Many of us have the tendency to procrastinate and put things off, only to realize that the deadline is near or has already passed. So don’t waste any time and register your SIM today!
Registering your DITO SIM is incredibly easy and takes no more than an hour as long as you have your ID cards ready. We’ve prepared a step-by-step tutorial just in case you don’t know where to start, or if you’re having problems and difficulties with SIM registration. We’ll also touch on the basics of the SIM Registration Act and its implementing rules and regulations.
DITO SIM Online Registration Step-by-Step Guide
New DITO subscribers can register their SIMs through the SMS link that was sent after SIM insertion, while existing subscribers can register via the DITO mobile app. If you don’t have the app installed yet, you can download it from Google Play (Android) or the App Store (iOS).
For the purpose of this article, let’s just assume that you’re an existing subscriber and not a new one. You can register your SIM either by clicking the banner on the DITO app, or by opening the SIM registration link at https://register.dito.ph using your mobile phone. We don’t recommend using a desktop computer or laptop to register your SIM, as the online registration form is designed for mobile users and you may encounter difficulties in filling out the form (although it’s doable).
Step 1: Open the DITO mobile app
Launch the DITO app on your phone and once logged in, tap the “Register Your SIM Card Now” banner as indicated by the screenshot image below.

Alternatively, if you don’t have the app, you can just go straight to SIM registration website at https://register.dito.ph using your mobile phone’s browser.
Step 2: Fill out the DITO SIM registration form
The next step is to fill out the SIM registration form. This is where you’ll provide your personal information, upload your ID card, and verify your mobile number.
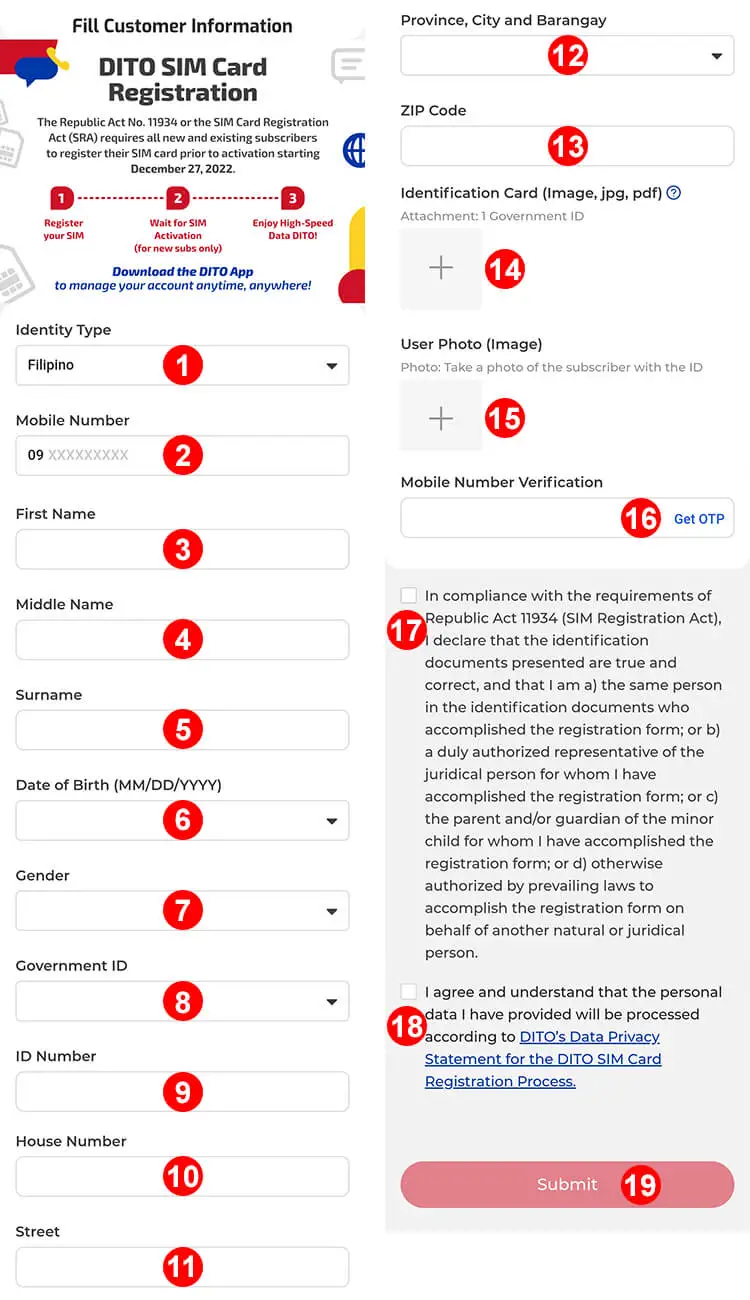
Enter the following information into their corresponding fields (refer to the screenshot photo above). Note: For dropdown fields, you will have to select the correct option first and then click “OK” on the upper-right portion.
- Identity Type – Choose your identity type based on any of the following criteria:
- Filipino – This is the default selection for Filipino citizens of legal age. Don’t change this unless you are registering on behalf of a minor or a juridical entity, or you are a foreign national.
- Filipino-Dependent – Select this option if you’re registering the SIM on behalf of a minor or dependent as his/her parent or legal guardian.
- Juridical Entity – Choose this option if you’re a representative of a juridical entity (e.g. corporation, non-government organization) and is authorized to register a SIM on its behalf.
- Foreigner with Tourist Visa – If you’re a foreign national visiting the Philippines using a temporary visitor’s visa, select this option.
- Foreigner with Other Visa – If you’re a foreign national staying in the Philippines using other types of visa (such as a work visa or a student visa), choose this option.
- Mobile Number – Enter your 11-digit DITO number (e.g. 09123456789). The first two digits (09) are already provided, so just type the last 9 digits of your number.
- First Name – Write your first name or given name.
- Middle Name – Leave this field blank if you don’t have a middle name.
- Surname – Write your family name.
- Date of Birth – Indicate your date of birth in MM/DD/YYYY format. For example, if your birthday is on May 15, 1999, enter 05/15/1999. Note: The form picker uses the YYYY/MM/DD format but it will show as MM/DD/YYYY after final selection.
- Gender – Indicate your sex or gender, whether male, female, or non-binary (neither man nor woman).
- Government ID – Click this dropdown field and then choose from a list of government-issued ID cards. For example: “Unified Multi-purpose Identification Card.” Click here to see the list of acceptable ID cards.
- ID Number – Enter your ID card number which is usually located on the front of the ID.
- House Number – If your house or residence has a house number, enter it here.
- Street – Write the name of the street where you’re currently residing.
- Province, City and Barangay – Click this field to select your province, city (or municipality), and barangay, in that order.
- ZIP Code – Enter your ZIP code or postal code. If you don’t know your ZIP code, find it on this list.
- Identification Card – Take or upload a photo of your valid government-issued ID. Note: The maximum file size is 5MB. If your photo exceeds the file size limit, you can use this image compression tool to reduce its size without compromising quality.
- User Photo – Take or upload a selfie photo of yourself holding your ID card. Note: The maximum file size is 5MB. If your selfie photo is larger than 5MB, you can use this image compression tool to reduce its size.
- Mobile Number Verification – Click “Get OTP” to generate a one-time password (OTP) code that will be sent to your DITO number. Upon receiving the text message containing the OTP, enter the authentication code into the provided field on the left.
- Declaration – Read the attestation or declaration (“In compliance with the requirements of Republic Act 11934 (SIM Registration Act), I declare that the identification documents presented are true and correct…”) and then tick the corresponding checkbox.
- Data Privacy Statement – Tick this checkbox to indicate that you agree to the Data Privacy Statement.
Review all the information that you’ve provided, making sure that everything are correct and accurate. You will not be able to review and modify your registration details once you’ve submitted the form, so take the time to spot any mistakes and correct them accordingly.
Finally, click the “Submit” button to submit the DITO SIM registration form and complete your registration.
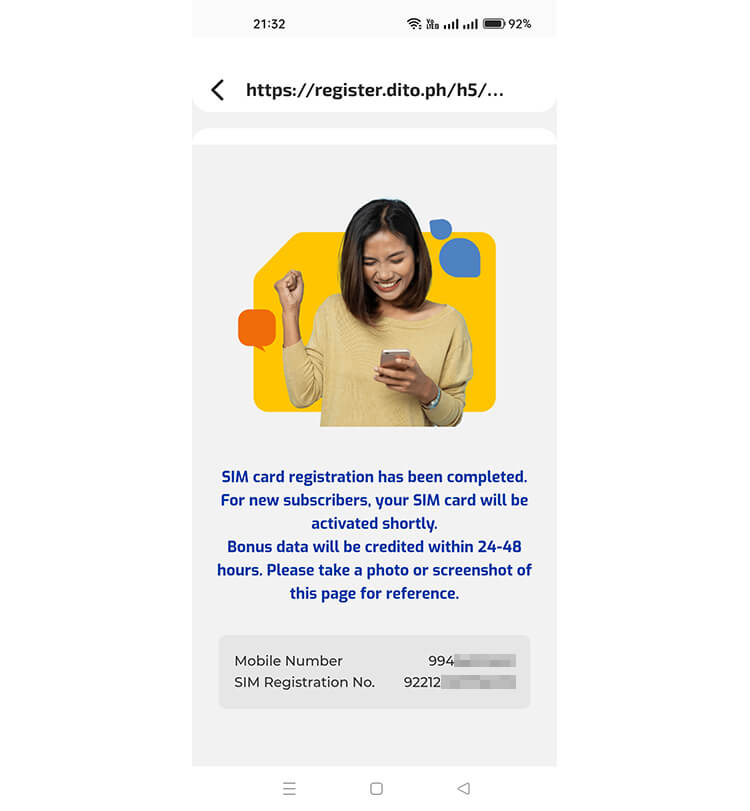
Step 3: You’ve successfully registered your DITO SIM
Congratulations! Your DITO SIM registration is successful. Take a photo or screenshot of the page as your proof of registration. You can also save or copy your SIM registration number for future reference.
As a reward for registering your SIM, you will receive 2GB of all-access data that is valid for 7 days. You will receive a text message from DITO when the reward has been added to your account.
What is the SIM Registration Act?
Republic Act No. 11934 or the SIM Registration Act was enacted on September 28, 2022 by the 19th Congress of the Philippines and signed into law by President Ferdinand Marcos, Jr. on October 10, 2022. The law requires mobile subscribers to register their SIM cards with their respective public telecommunications entities (PTE) within 180 days from its effectivity.
After the end of the 180-day SIM registration period, all unregistered SIMs will be automatically deactivated. However, deactivated SIMs can be reactivated upon subsequent registration in accordance with the SIM Registration Act and for a limited time only. The Department of Information and Communications Technology (DICT) has the option to extend the registration period for an additional 120 days.
The law imposes stiff penalties on individuals and organizations who willingly violate its provisions, namely:
- Failure or refusal of the PTE to register a SIM:
- First offense: A fine of ₱100,000 to ₱300,000;
- Second offense: A fine of ₱300,000 to ₱500,000; and
- Third and subsequent offenses: A fine of ₱500,000 to ₱1,000,000.
- Sale of stolen SIMs: Imprisonment of 6 months to 2 years, or a fine of ₱100,000 to ₱300,000, or both.
- Providing false information during SIM registration: Imprisonment of 6 months to 2 years, or a fine of ₱100,000 to ₱300,000, or both.
- Spoofing of registered SIM: Imprisonment of no less than 6 years, or a fine of ₱200,000, or both.
What are the SIM Registration Requirements?
Based on the Implementing Rules and Regulations issued by the National Telecommunications Commission (NTC), the following are the SIM registration requirements for individuals, foreign nationals, and juridical entities (corporations and organizations):
Requirements for Individuals
Individual end-users (natural persons) are required to provide the following information during SIM registration:
- Full name;
- Date of birth;
- Sex;
- Present or official address;
- Type of ID presented;
- ID number; and
- Mobile number with serial number.
Furthermore, individuals will need to present a valid government-issued ID card or any form of identification with photograph, such as:
- Social Security System (SSS) ID;
- Postal ID;
- Driver’s license;
- National Bureau of Investigation (NBI) clearance;
- Tax identification number (TIN) ID;
- Firearms License to Own and Possess ID;
- Philippine Identification System ID (National ID);
- Passport;
- Persons with disabilities card;
- Senior citizen’s card;
- Government Service Insurance System (GSIS) ID;
- Police clearance;
- PhilHealth ID;
- Integrated Bar of the Philippines (IBP) ID;
- Bureau of Internal Revenue (BIR) ID;
- Overseas Workers Welfare Administration (OWWA) ID;
- Unified Multi-Purpose ID (UMID);
- Professional Regulation Commission (PRC) ID;
- Voter’s ID; or
- Other valid government-issued ID with photo.
For minors, SIM registration will be under the name
- Any valid government-issued ID; and
- Consent of the minor’s parent or legal guardian to register the SIM.
Requirements for Foreign Nationals
Foreign nationals residing in the Philippines and tourists visiting the country will need to submit the following details when registering their SIMs:
- Full name;
- Nationality;
- Date of birth;
- Passport;
- Address in the Philippines;
- ID number or number of document presented; and
- Mobile number with serial number.
Foreign tourists with temporary visitor’s visa under Section 9(a) of the Commonwealth Act No. 613, as amended, must submit the following documents:
- Passport with a copy of the bio page or pages where the temporary visitor’s visa is stamped or shown;
- Proof of address in the Philippines, such as booking or reservation in a hotel or any type of accommodation, or in its absence, an affidavit or letter from the owner of the house or residence where the tourist is staying; and
- Return ticket to the tourist’s country of origin, or any ticket showing the date and time of departure from the Philippines.
Aside from the documents stated above, foreign nationals staying in the Philippines using other types of visa (such as work visa or student visa) are required to submit any of the following:
- Alien Certificate of Registration (ACR) identification card issued by the Bureau of Immigration or other official ID issued by any visa-issuing agency;
- Alien Employment Permit issued by the Department of Labor and Employment (DOLE);
- School registration and ID for students; or
- For Persons of Concern (e.g. refugee), a travel or admission document issued by the Department of Justice.
Requirements for Juridical Entities
Juridical entities such as corporations and non-government organizations will need to provide the following information when registering their SIM cards:
- Business name;
- Business address; and
- Full name of authorized signatory.
In addition, juridical entities are required to submit any of these documents during SIM registration:
- Certificate of Registration;
- Duly adopted resolution designating the authorized representative (for corporations); and
- Special Power of Attorney (for other juridical entities).
Frequently Asked Questions
What happens if I don’t register my DITO SIM?
According to the SIM Registration Act, failure to register your SIM within the specified 180-day registration period will subject it to deactivation.
When is the deadline for DITO SIM registration?
The deadline for the registration of existing SIMs is on April 26, 2023. However, the DICT can extend the registration period for a maximum of 120 additional days. Note: The deadline has been extended to July 25, 2023.
How many DITO SIM cards can I register?
There is no limit as to how many SIM cards that you can register under your name.
Can I still reactivate a DITO SIM that has been deactivated?
You can request reactivation of a deactivated SIM within the grace period set by DITO Telecommunity.
What happens to my load and data balance if my DITO SIM gets deactivated?
If your SIM gets deactivated, any remaining load and data balance will be automatically forfeited.
Can I register my DITO SIM without a valid ID?
It’s not possible to register your SIM without a valid government-issued ID as it’s mandated by the SIM Registration Act.
What should I do if I lost my SIM?
In case of loss or theft of your SIM, you may report the incident to the nearest DITO Telecommunity store. By law, telcos are required to deactivate lost or stolen SIM cards within 24 hours from submission of the report.
Are tourists required to register their DITO SIM cards?
Yes, foreign nationals staying in the Philippines or visiting as tourists are required to register their DITO SIM, if they have one.
Is my personal information safe?
Telcos are expected to comply with the minimum data safety and security standards set by the Data Privacy Act of 2012. All data and information gathered during SIM registration are considered confidential and cannot be disclosed to anyone, except in compliance with a court order or subpoena.
Final Words
As you can see, registering your DITO SIM is not that hard. We hope that you were able to register your SIM with the help of our step-by-step guide. Feel free to share this article with your friends who might be interested to know how to register their SIM cards online.
Should you have any questions and concerns about SIM registration, you may call the hotline number 185 or email [email protected].