



Ever wondered how to add a signature to your emails, just like the professionals do? If you’re an Outlook user, you might be interested to know how to add an email signature that will provide a personal touch to your messages. Adding or changing your email signature in Outlook is actually very easy – even a child could do it!
Why would you add a signature to your emails, anyway? For one, an email signature makes you look more professional and trustworthy. It gives the recipient some sort of assurance that they are dealing with the right person, especially if your photo and contact details are included.
You don’t need to manually add a signature each and every time you’re sending an email. It’s tiring and time-consuming. Instead, just save your signature in Outlook and it will be automatically appended to your outgoing emails. Write your emails like you normally would and Outlook will take care of the rest.
If you don’t have an email signature in Outlook yet, we’ll teach you how to add one that will enhance the professionalism of your emails. Take note that you will only learn how to add or change your email signature, not how to create it. But don’t worry if you don’t know to design your own signature, because you can use a free signature generator such as Mail Signatures.
How to Add a Signature in Outlook on the Web
The best way to add an email signature in Outlook is through your web browser. This is because Outlook on the Web has a built-in rich text editor that allows you to freely design your signature by uploading photos, selecting fonts, changing font colors, inserting links, and more. You can even copy-and-paste a signature from Microsoft Word or from an online signature generator.
Step 1: Open Outlook on the Web on your web browser and sign in to your account if you haven’t done it yet.
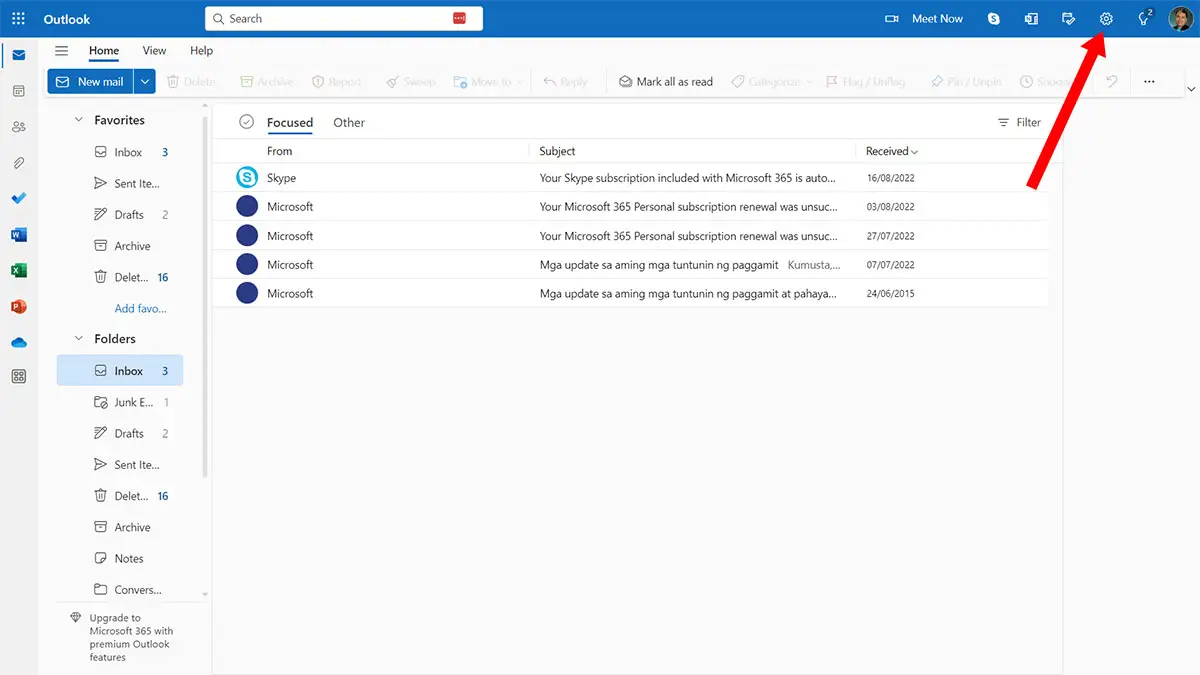
Navigate to the settings by clicking the gear icon near the top-right corner (refer to the screenshot image below for its location).
Step 2: In the Settings window, select Mail and then click Compose and Reply.
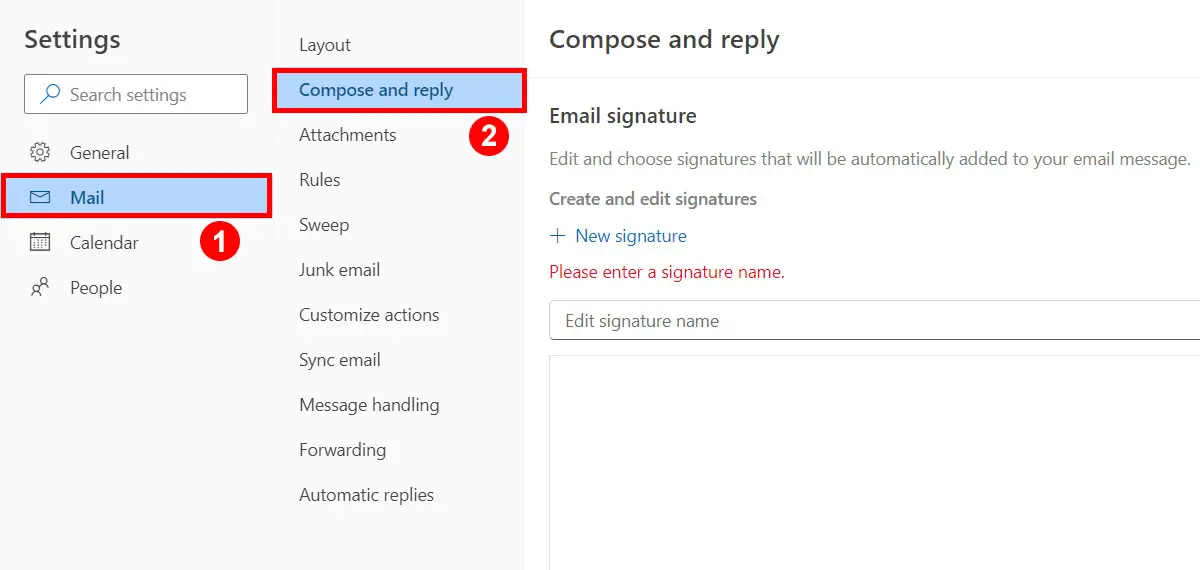
Step 3: You can now add your signature to Outlook. First, click the “Edit signature name” field and type the name of your new signature.
If you want to add a new signature to replace an existing one, just click “New signature” and type the name of the signature below it.
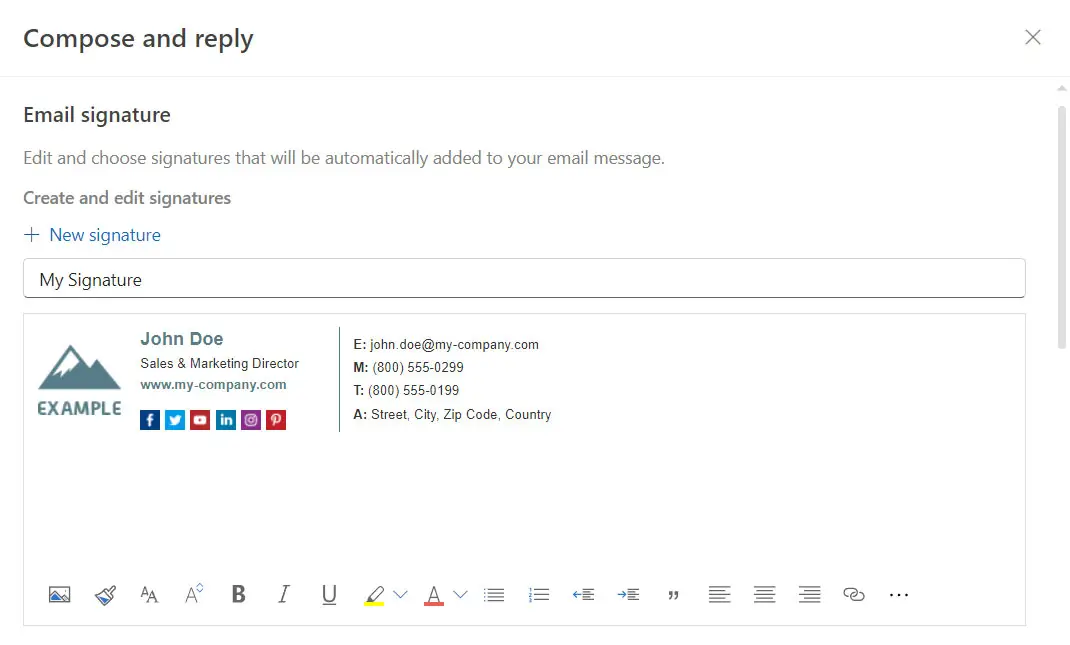
You can design your signature yourself using the built-in text editor or you can take advantage of free email signature generators such as Mail Signatures.
If you decide to create your signature yourself, the rich text editor gives you plenty of freedom to design it even if you don’t know HTML. You can do any of the following:
- Upload and insert images,
- Change the font to Arial, Times New Roman, or any other preferred font,
- Make the font size bigger or smaller,
- Change the font color or highlight the text,
- Insert bullets, quotes, links, and tables.
Be sure to click the Save button after creating your signature.
Step 4: After saving your signature, select the default signatures for new messages and for replies/forwards. Finally, click Save.
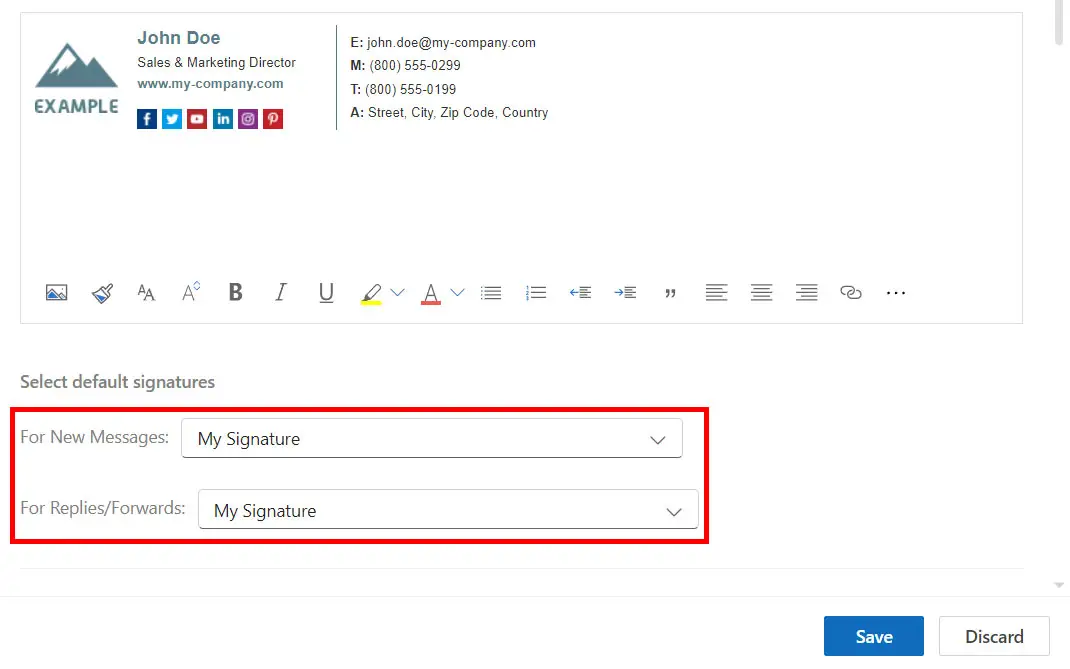
That’s it! You have added a new email signature in Outlook. Each time you compose a new email, your signature will be automatically added to the body of the message. You can delete or remove that signature anytime you wish.
Take note that any signatures added to Outlook on the Web will not be available in the Outlook desktop app, and vice versa. You may need to add your signature manually in the Outlook desktop client if you use this application.
How to Add a Signature in the Outlook Desktop App
If you’re using the Outlook desktop application to access your emails, you’ll be happy to know that you can add your own email signature. Just like Outlook on the Web, you can customize your signature with your own photos and text, and even insert your business card.
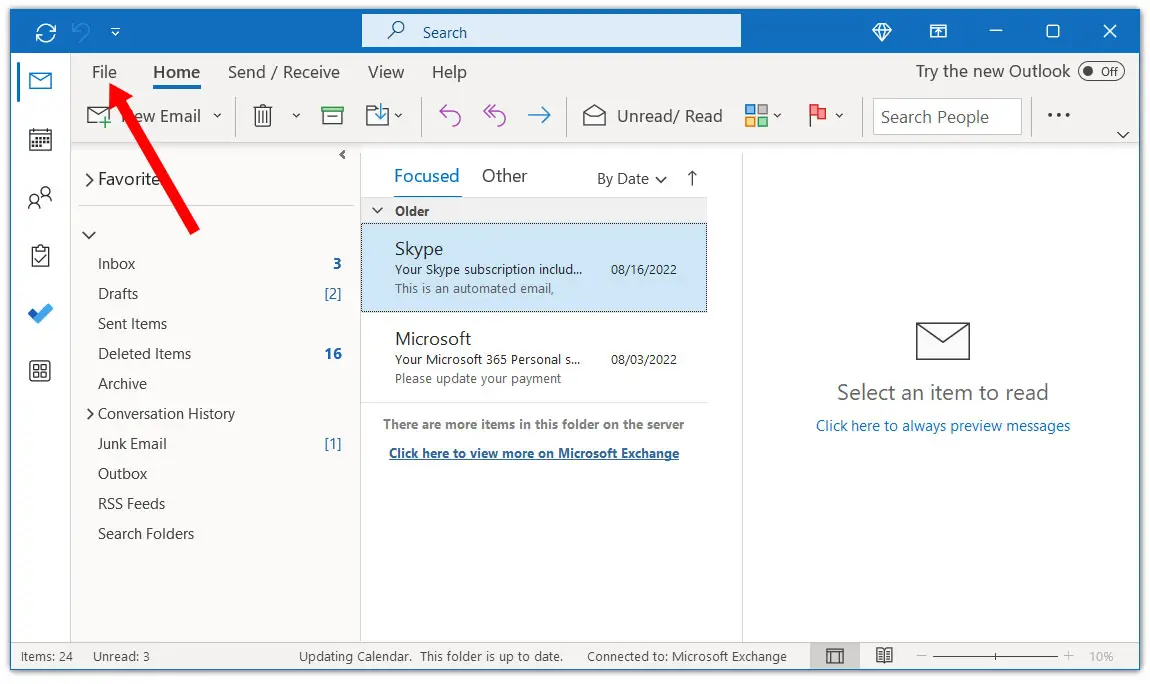
Step 1: Launch the Outlook desktop app and click File on the menu bar.
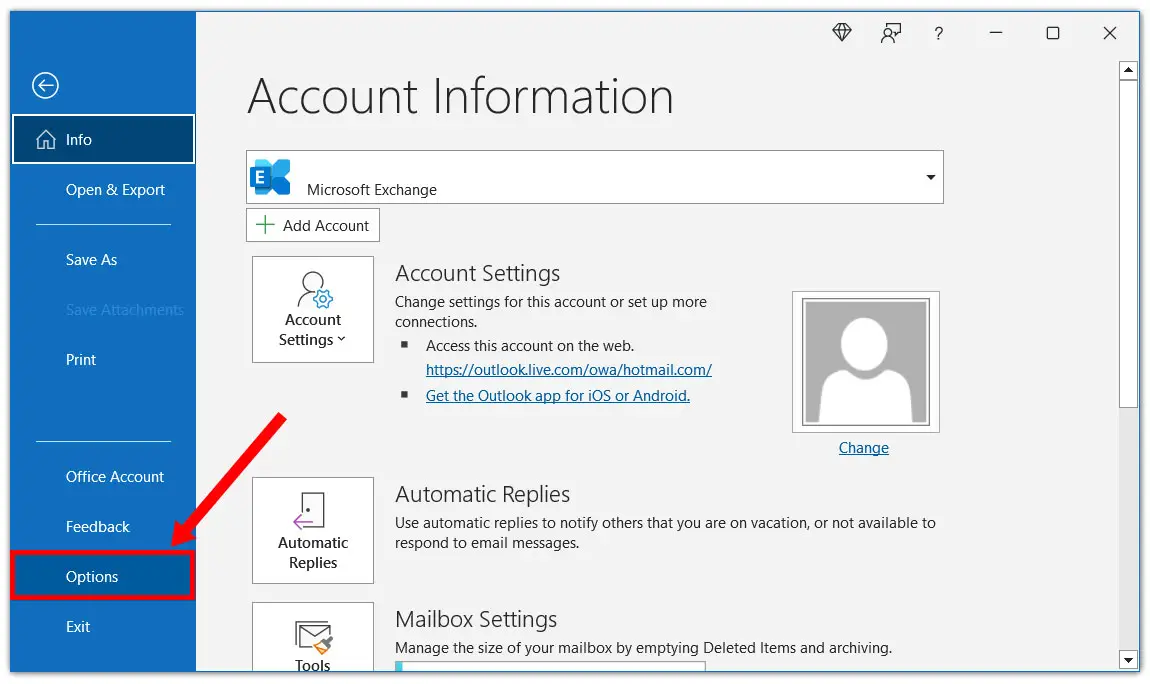
Step 2: Select Options on the left panel.
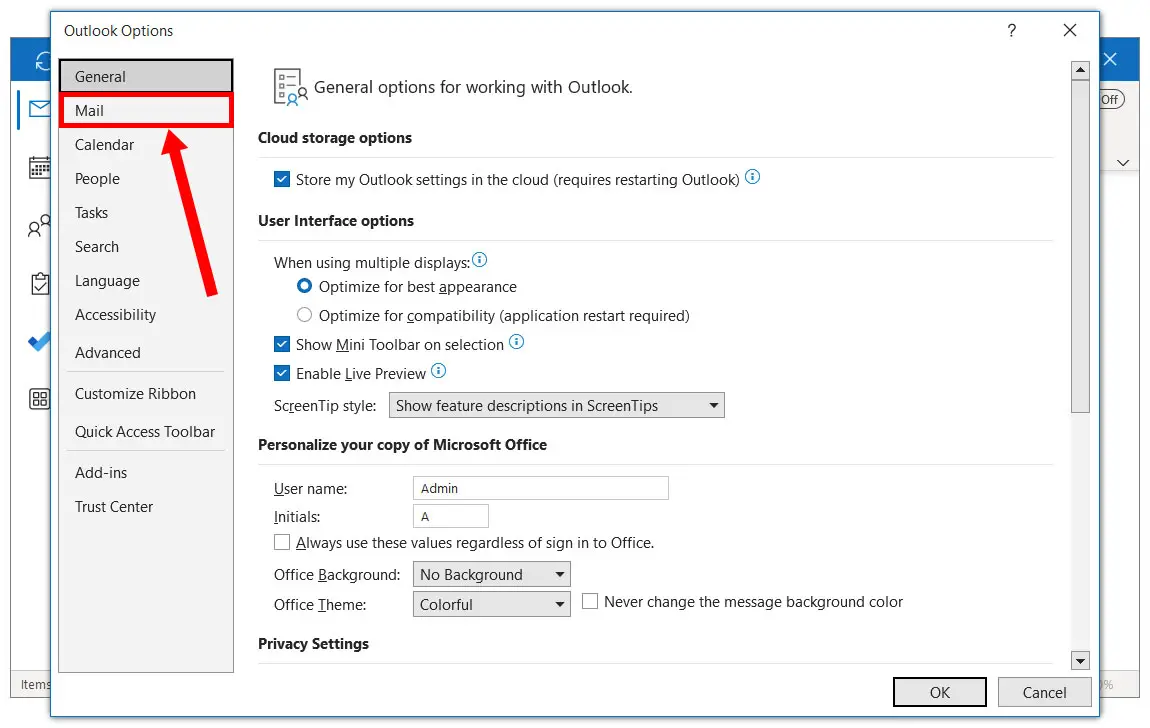
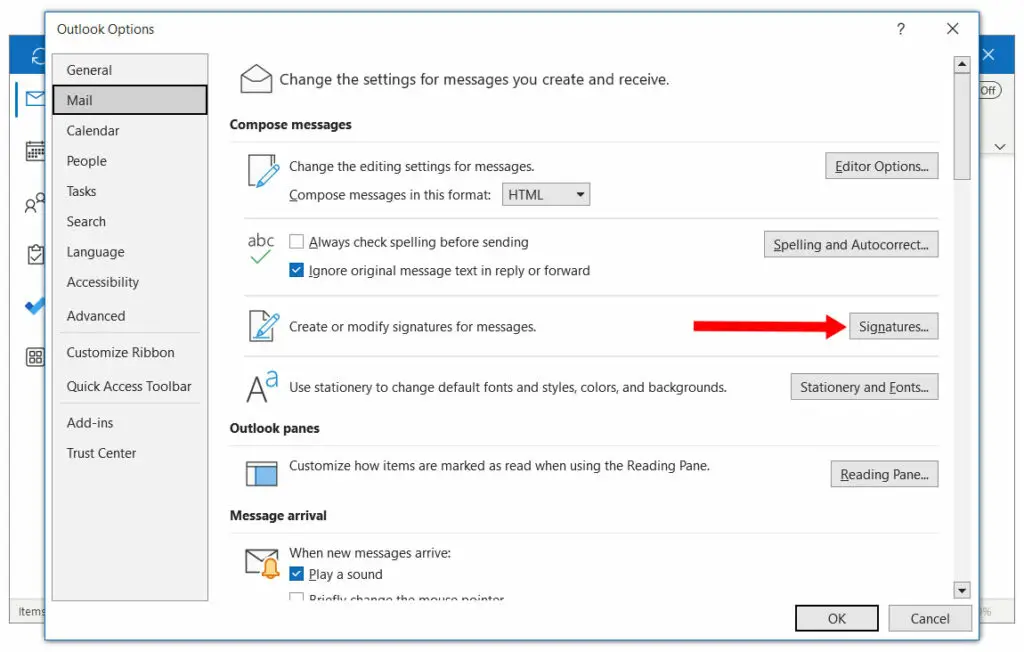
Step 3: The Outlook Options window will appear. Choose Mail on the left sidebar menu.
Step 4: Under the “Compose messages” section, there’s an option named “Create or modify signatures for messages.” Click the Signatures button to the right of it.
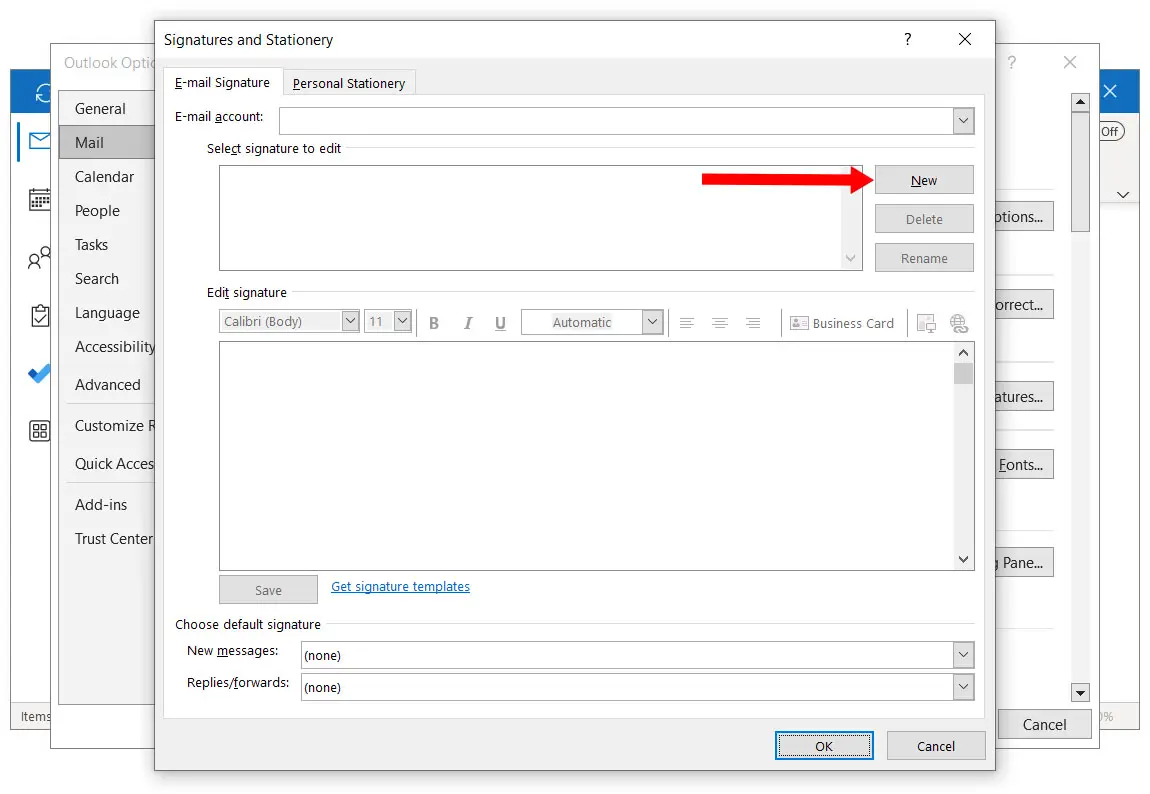
Step 5: This is where you can add, edit and delete your email signatures in Outlook. Click the New button to start creating your email signature in Outlook.
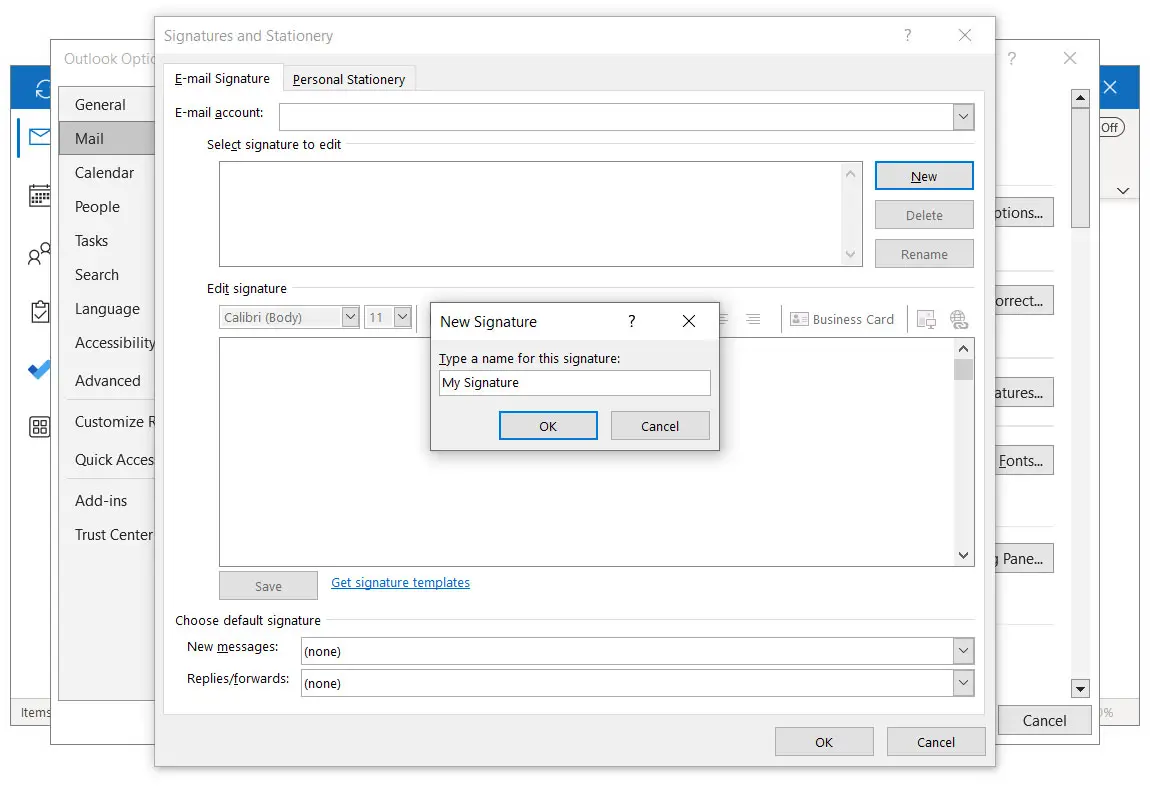
Step 6: Enter the name of your signature and then click OK.
Step 7: Start designing your signature in the text box under “Edit signature.” If you created your signature using an online generator, just paste it into this box.
The Outlook desktop app provides several tools for creating your email signature. These are just a few things you can do:
- Increase or decrease the font size,
- Change the font to Arial, Times New Roman, or any other supported font,
- Turn text into bold, italics or underlined,
- Change the font color,
- Insert a picture,
- Insert a business card,
- Add or edit links.
Don’t know how to design your own signature? Just click “Get signature templates” to download the email signature gallery template from the Microsoft website. You can then personalize your signature by adding your own details and changing the photo.
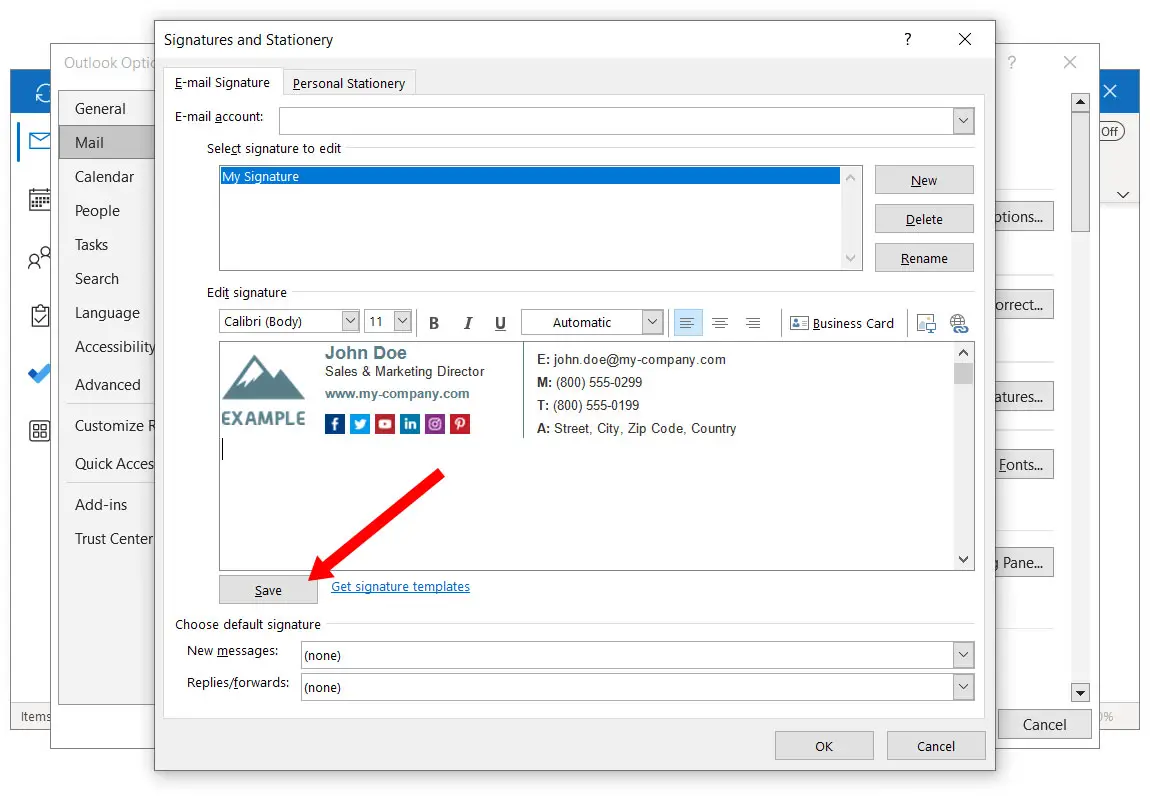
When you’re satisfied with your signature, save it to Outlook by clicking the Save button. It will be automatically assigned as the default signature for new messages.
If you want to set it as the default signature for replies and forwarded messages as well, just click the “Replies/forwards” dropdown box and select your signature.
Finally, click OK to finish things up.
How to Add a Signature in the Outlook Mobile App
Prefer to use the Outlook mobile app instead? The Outlook app allows you to add an email signature, too. The caveat is that it’s quite limited compared to the web and desktop versions, since you can’t select a different font, change the font color, or add links.
Still, it’s a pretty decent option for those who primarily use their mobile phones to read and send emails. You can only make simple signatures containing photos and text, however.
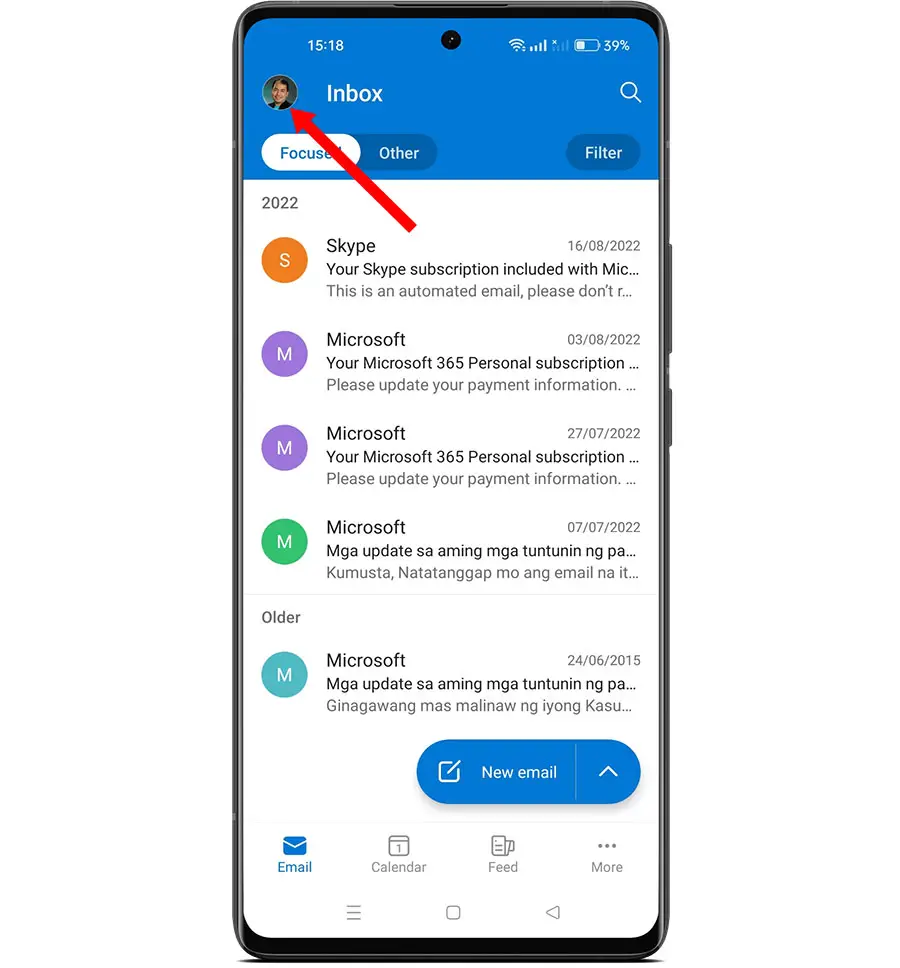
Step 1: Open the Outlook mobile app and tap the profile photo on the top-left corner.
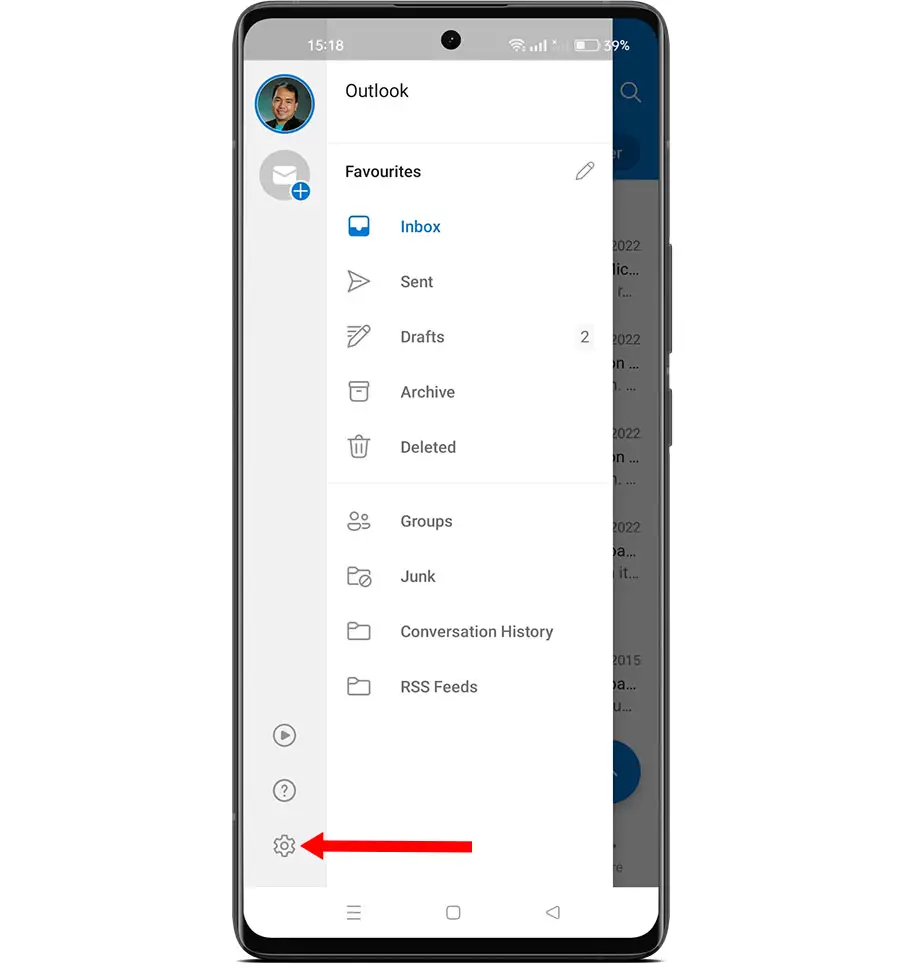
Step 2: Go to the settings by tapping the gear icon on the sliding menu.
Step 3: In the settings screen, go to the “Email” section and select “Signature.”
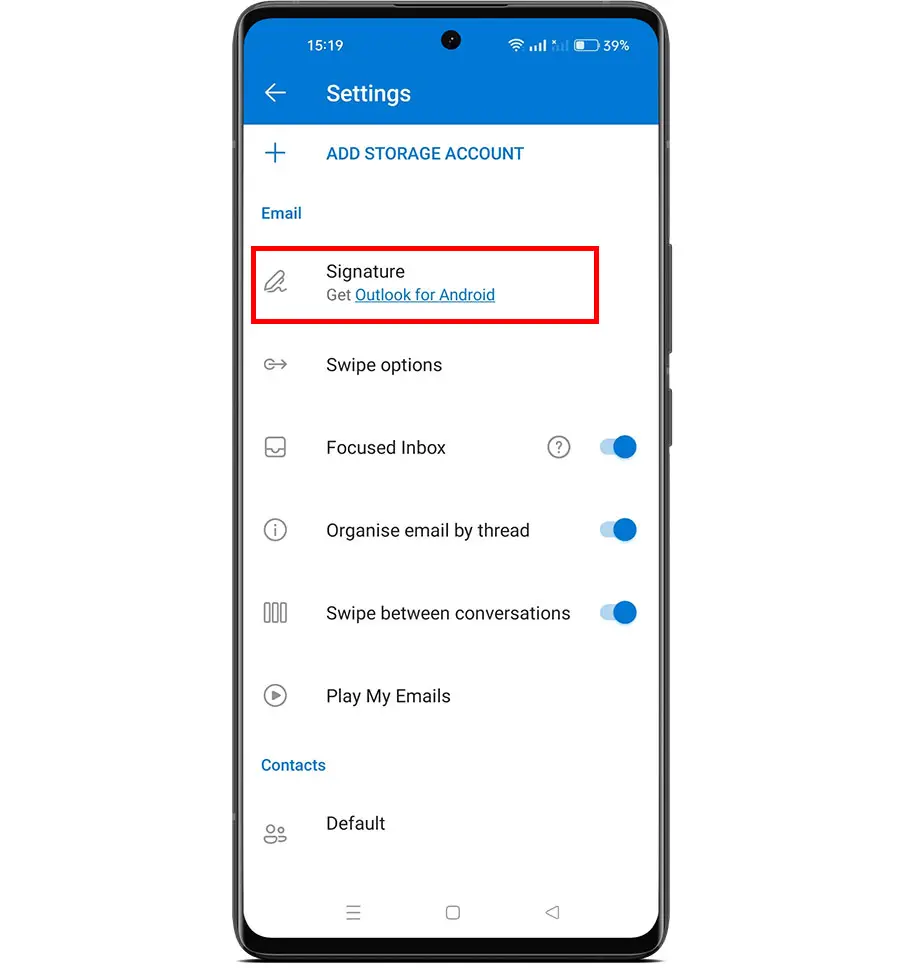
Step 4: Now you can replace the default signature (which is “Get Outlook for Android” for Android devices) with your own. You can insert photos, turn text into bold or italics, and add bulleted or numbered lists.
When you’re done creating your email signature in the Outlook app, tap the check icon on the top-right corner to save your signature.
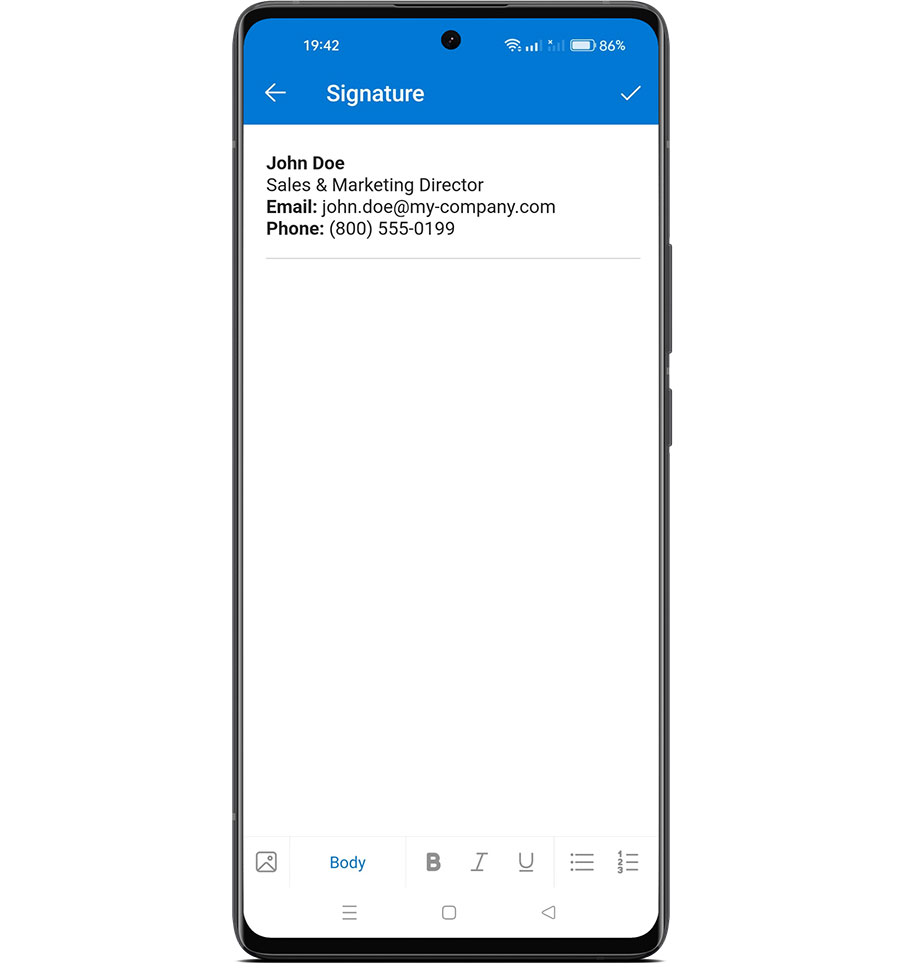
That’s about it on how to add a signature in the Outlook app. Every time you compose a new email in the app, your signature will be automatically added to the message. Feel free to edit or delete this signature when the situation calls for it.
Closing Thoughts
First impressions last, and a good email signature will leave a lasting positive impression on your clients and colleagues. Adding an email signature in Outlook only takes a few minutes, but the benefits, especially in terms of professionalism and trustworthiness, are countless.