If you’re applying for the civil service exam this year and your region uses CSC eServe, this is the only guide you need. The civil service application is the gateway to almost every government job in the Philippines, since most plantilla positions require civil service eligibility, and you earn that eligibility by passing the Career Service Examination (a.k.a. the civil service exam). Before you can take the test, however, you need to submit your civil service online application via CSC eServe.
A lot of first-timers don’t realize that the Civil Service Commission (CSC) runs two different online filing systems. Some regions use OCSEAS, while others use CSC eServe. They have a few differences especially in how you book your slot. CSC eServe is appointment-based from the very start, which means that you pick your exact date and time when you apply, whereas with OCSEAS, the appointment scheduling comes last.
Based on my experience, CSC eServe is easier and more straightforward than OCSEAS; eServe has fewer steps and doesn’t require you to upload documents unlike OCSEAS. However, you cannot simply choose which platform to use, since your location determines whether you use the eServe system or the OCSEAS one.
If you’ve determined that you must use CSC eServe for your civil service exam online application, then continue reading. I’ve come up with this step-by-step guide to help you file your civil service exam application via CSC eServe. If OCSEAS is the one for you, just proceed to this article for the complete walkthrough. Let’s get started!
Table of Contents
Civil Service Exam Application Requirements
Please prepare the following documents for your civil service exam online application:
- Printed application form (you will download this after application submission)
- Four (4) identical passport-size ID pictures (with a hand-held name tag showing your signature over your printed full name)
- Original and photocopy of valid government-issued ID
- Original and photocopy of PSA or Local Civil Registry birth certificate (for applicants without date of birth in their ID)
- Original and photocopy of Identification Certificate (IC) issued by the Bureau of Immigration (for applicants with dual citizenship)
Also, don’t forget to bring the ₱500 application fee for the CSE-PPT, which will be paid in cash at the CSC office during your appointment. You don’t pay anything online through eServe.
Who Uses CSC eServe for the Civil Service Exam Application?
CSC eServe is not the system everyone uses. According to the official Examination Announcement No. 03, s. 2026 from the Civil Service Commission, eServe is the designated filing system for these regions:
- Region II (Cagayan Valley)
- Region III (Central Luzon)
- Region V (Bicol Region)
- Region VI (Western Visayas)
- Region VIII (Eastern Visayas)
- Region IX (Zamboanga Peninsula)
- Region XI (Davao Region)
- National Capital Region (NCR)
- BARMM (Bangsamoro)
If your region is on this list, this guide is for you. If it isn’t, your region likely uses OCSEAS instead (Regions I, IV, VII, X, XII, and CAR). Since the NCR assignment has shifted between systems across exam cycles, Metro Manila applicants should first confirm the current setup by checking the latest announcement at the CSC website.
How to Create Your CSC eServe Account
The civil service exam online application through CSC eServe happens in two stages. First, you create and validate your account, and then you file the actual application. Let’s start with the account creation.
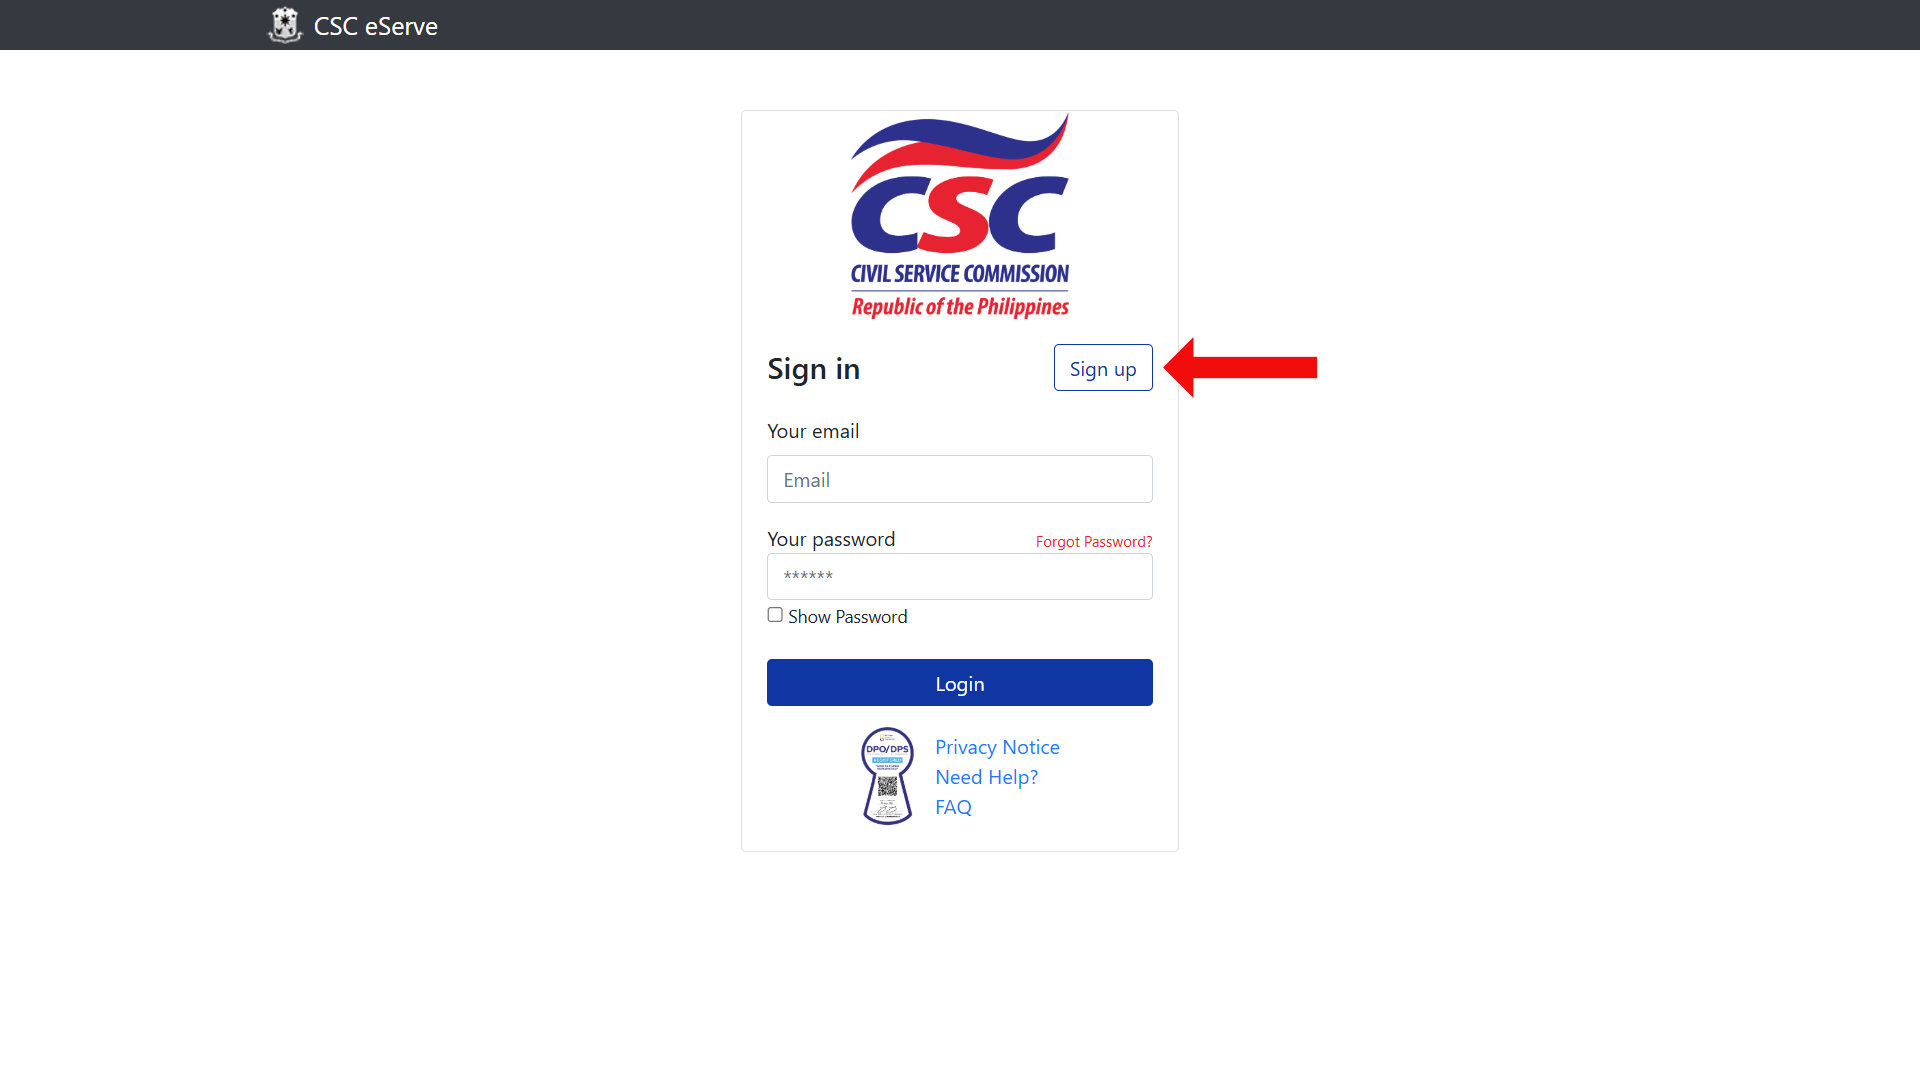
- Open your browser and visit the CSC eServe website at https://services.csc.gov.ph.
- Sign in to your account if you already have one. If this is your first time, click the Sign Up button to register for free.
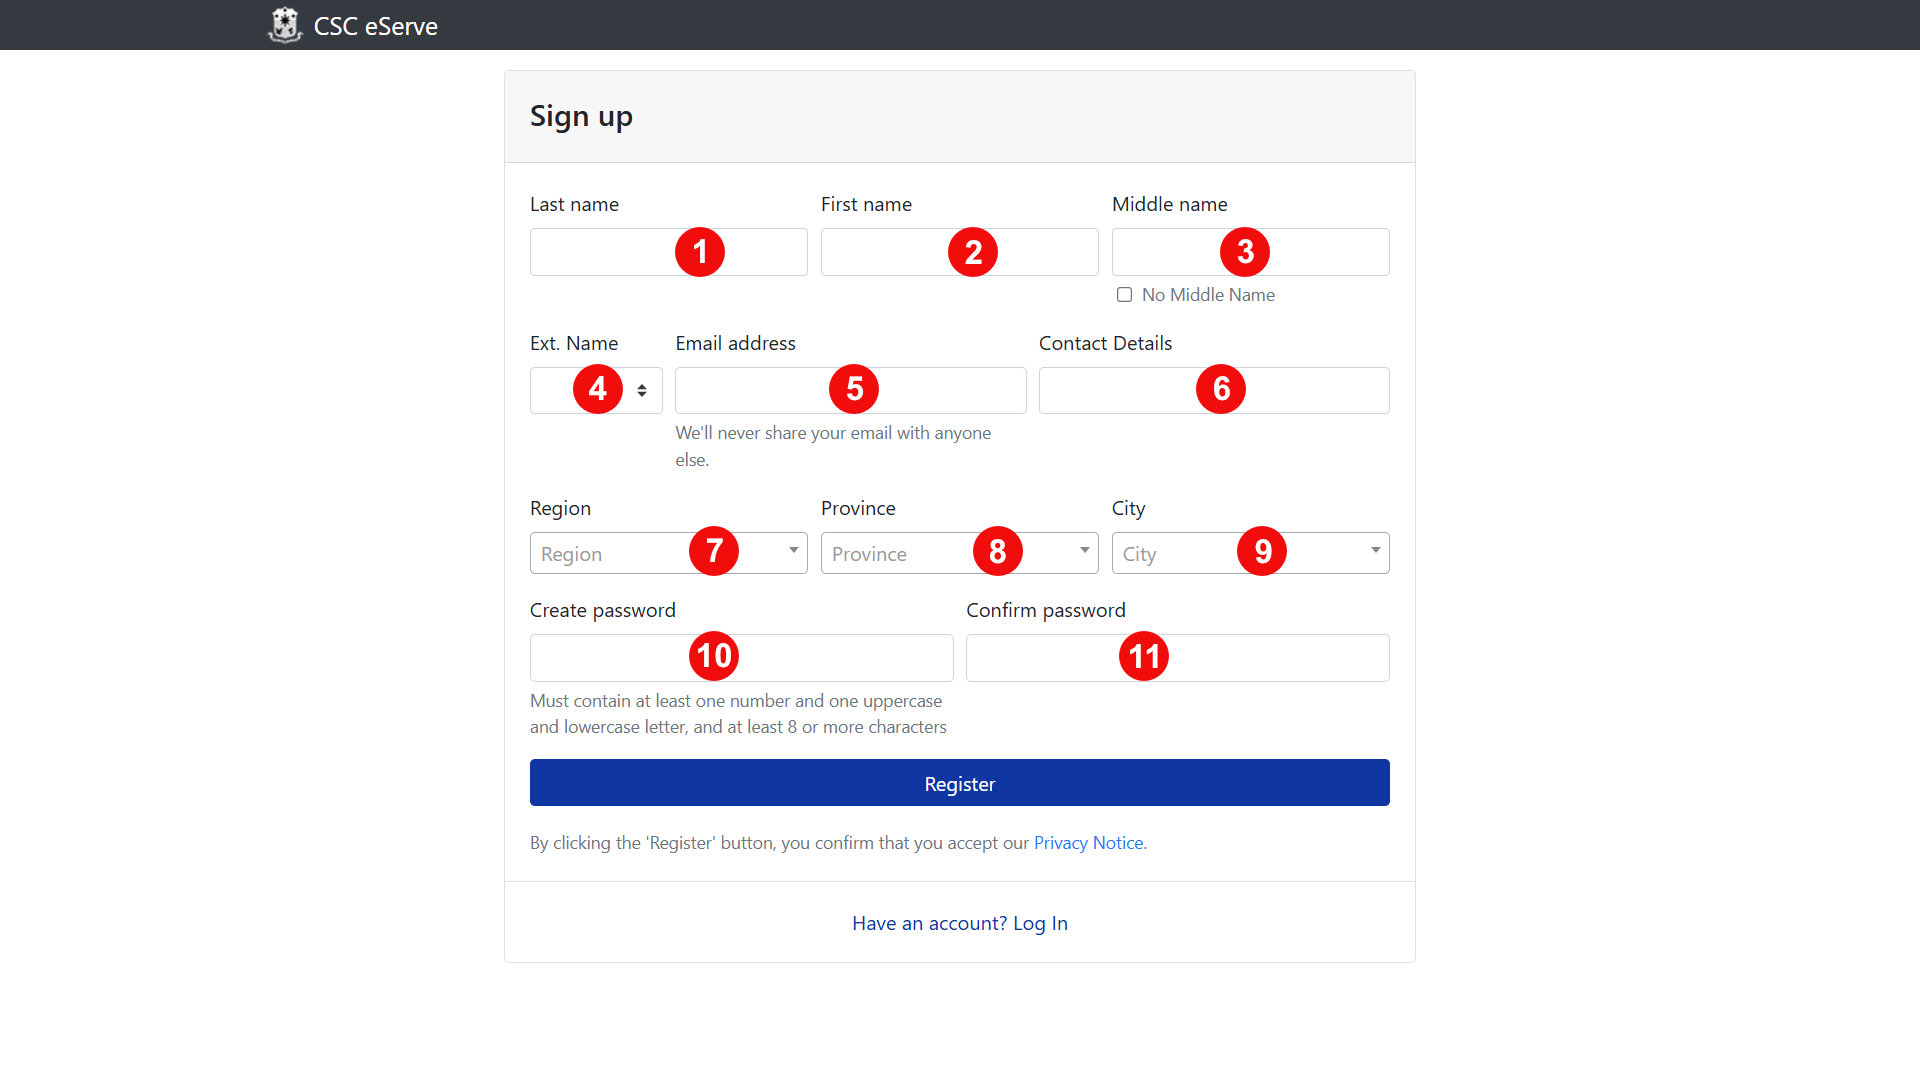
- Enter your account details, including your name, email address, home address, and a password. Type your name exactly as it appears on your valid ID, since a mismatch could cause problems later. When everything is filled out, click Register to create your account.
- Wait for the validation email from CSC eServe to arrive in your email inbox. Open the email and click the validation link to activate your account. If it isn’t there within a few minutes, check your spam folder.

If the validation email never arrives, the usual culprit is a typo in your email address during registration. Log back in and check the email address on file, or contact your regional CSC office via email or phone.
Avoid creating a second account to get around the problem, since duplicate registrations under the same name could flag your application during manual review. Stick to one account and recover it if needed.
How to File Your Civil Service Application Form on eServe
Once your account is successfully validated, the next step to take is to file your civil service exam application. This is where eServe differs most from OCSEAS, so follow closely.
- Return to https://services.csc.gov.ph and sign in to your account using your email and password. If you forgot your account password, just click the “Forgot password?” link and follow the instructions to set a new password.
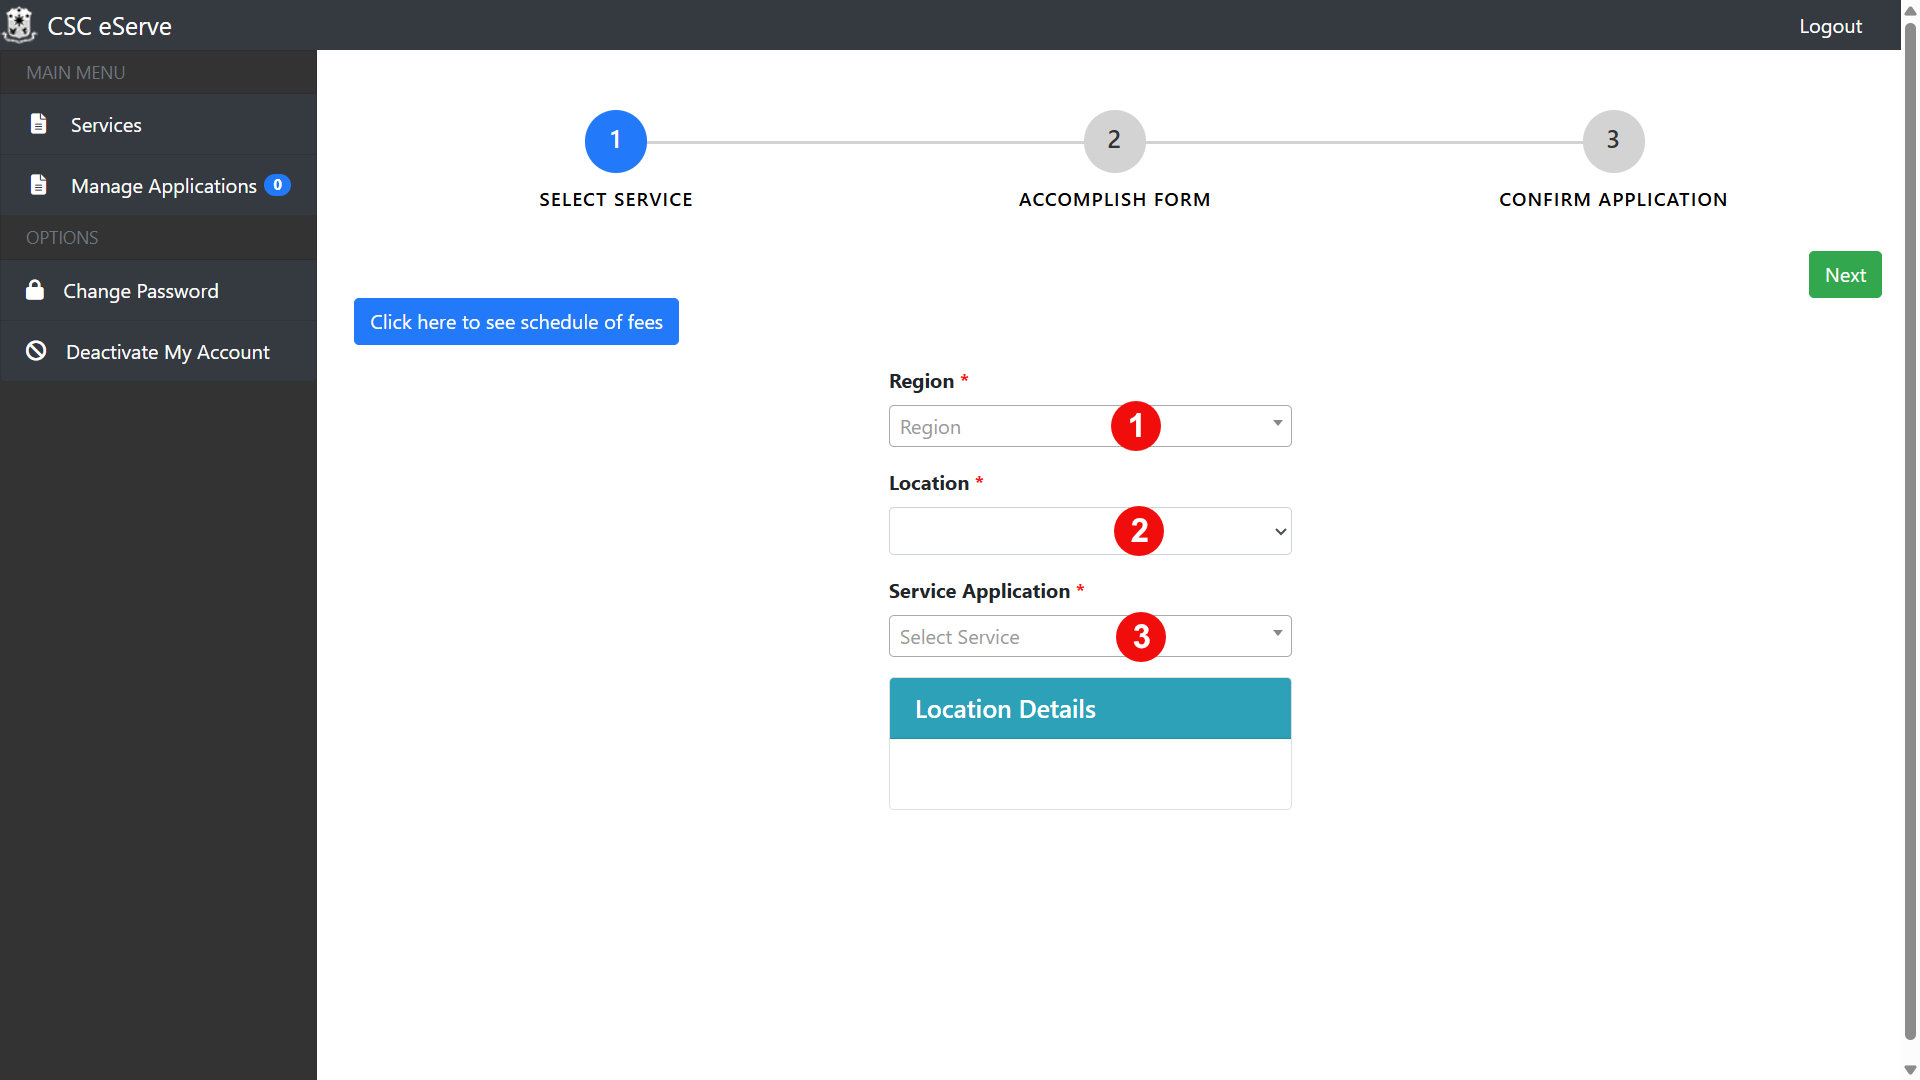
- Once you’re logged in to your CSC eServe account, select your Region, your Location (the specific CSC office or testing center), and your Service Application. For the Service Application, choose either Career Service – Professional or Career Service – Sub-Professional, depending on which eligibility you want. After making your selections, the location details of the CSC office will appear on screen.
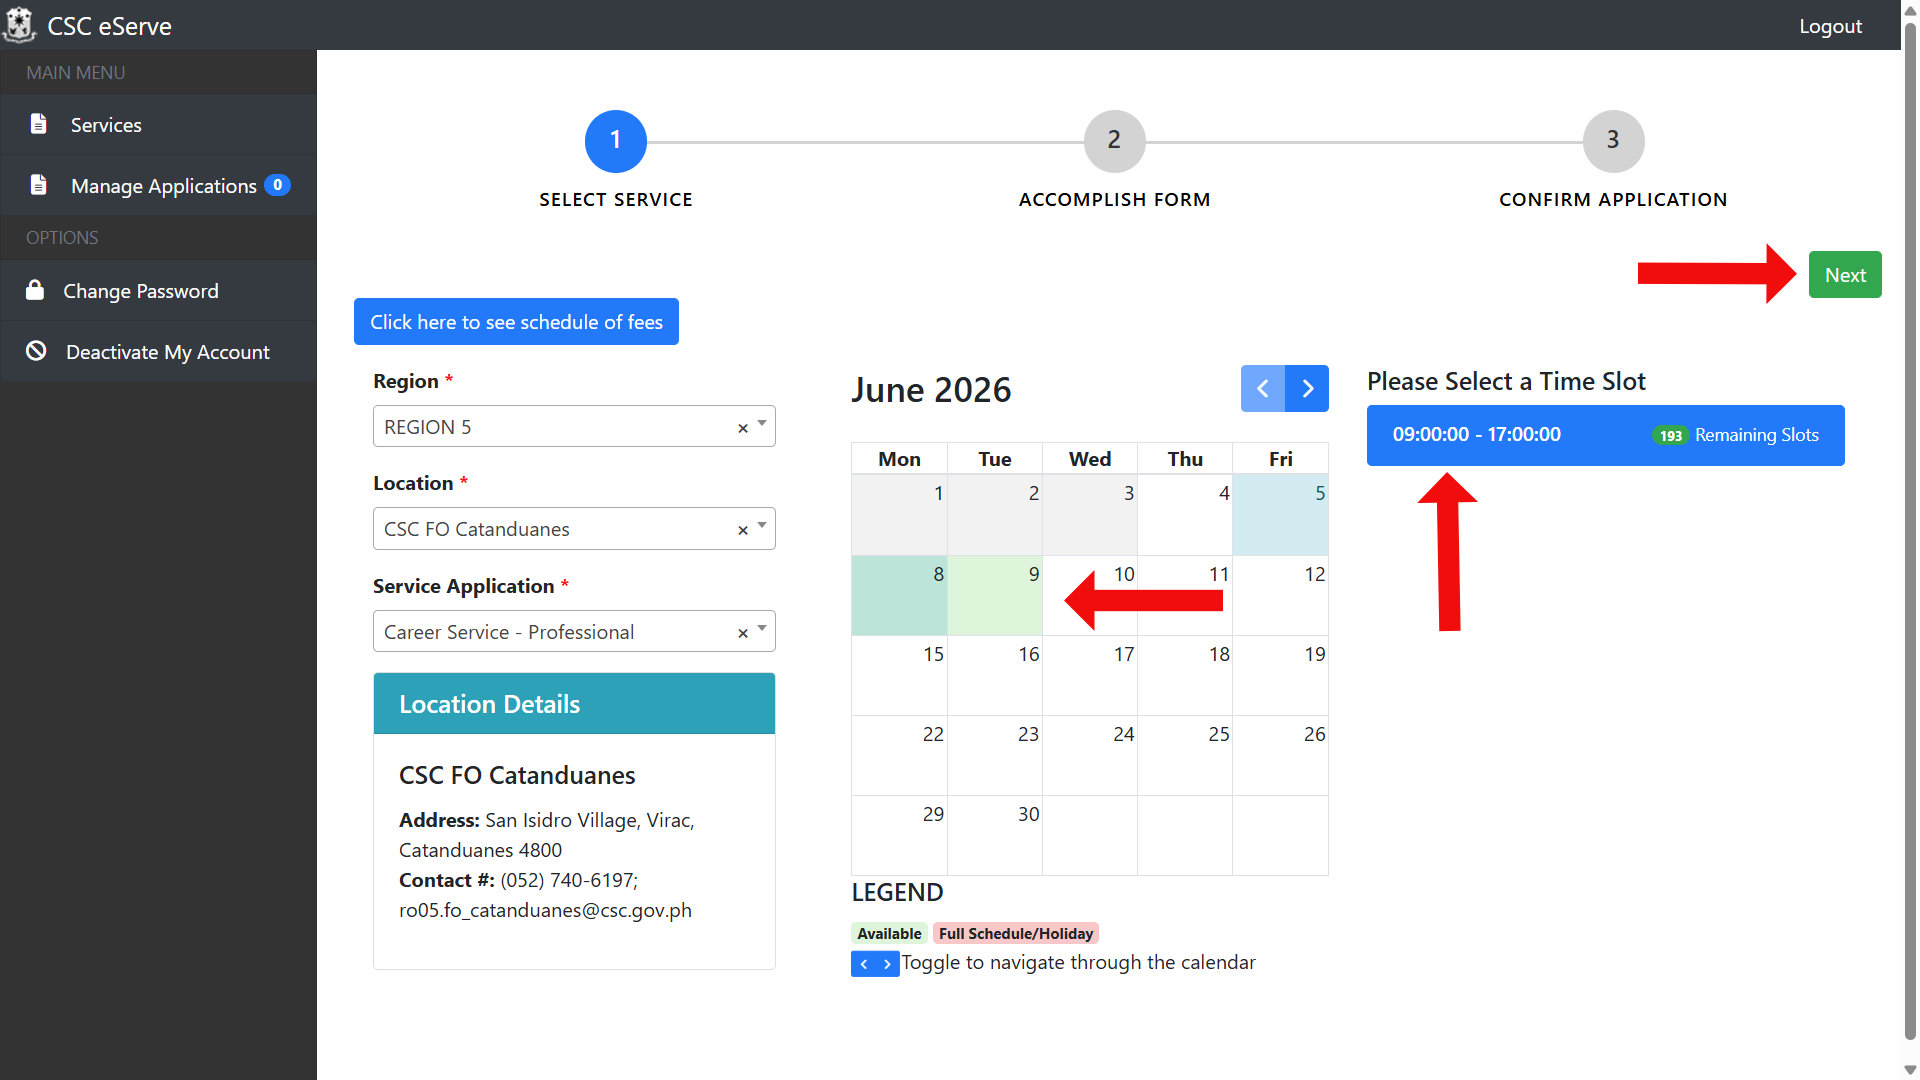
- Choose your appointment date on the calendar, and then pick an available time slot. Slots fill on a first-come, first-served basis, which means that in-demand dates and busy testing centers can run out fast. If you see a slot that works for you, reserve it immediately. When you’ve chosen your appointment schedule, click Next to continue.
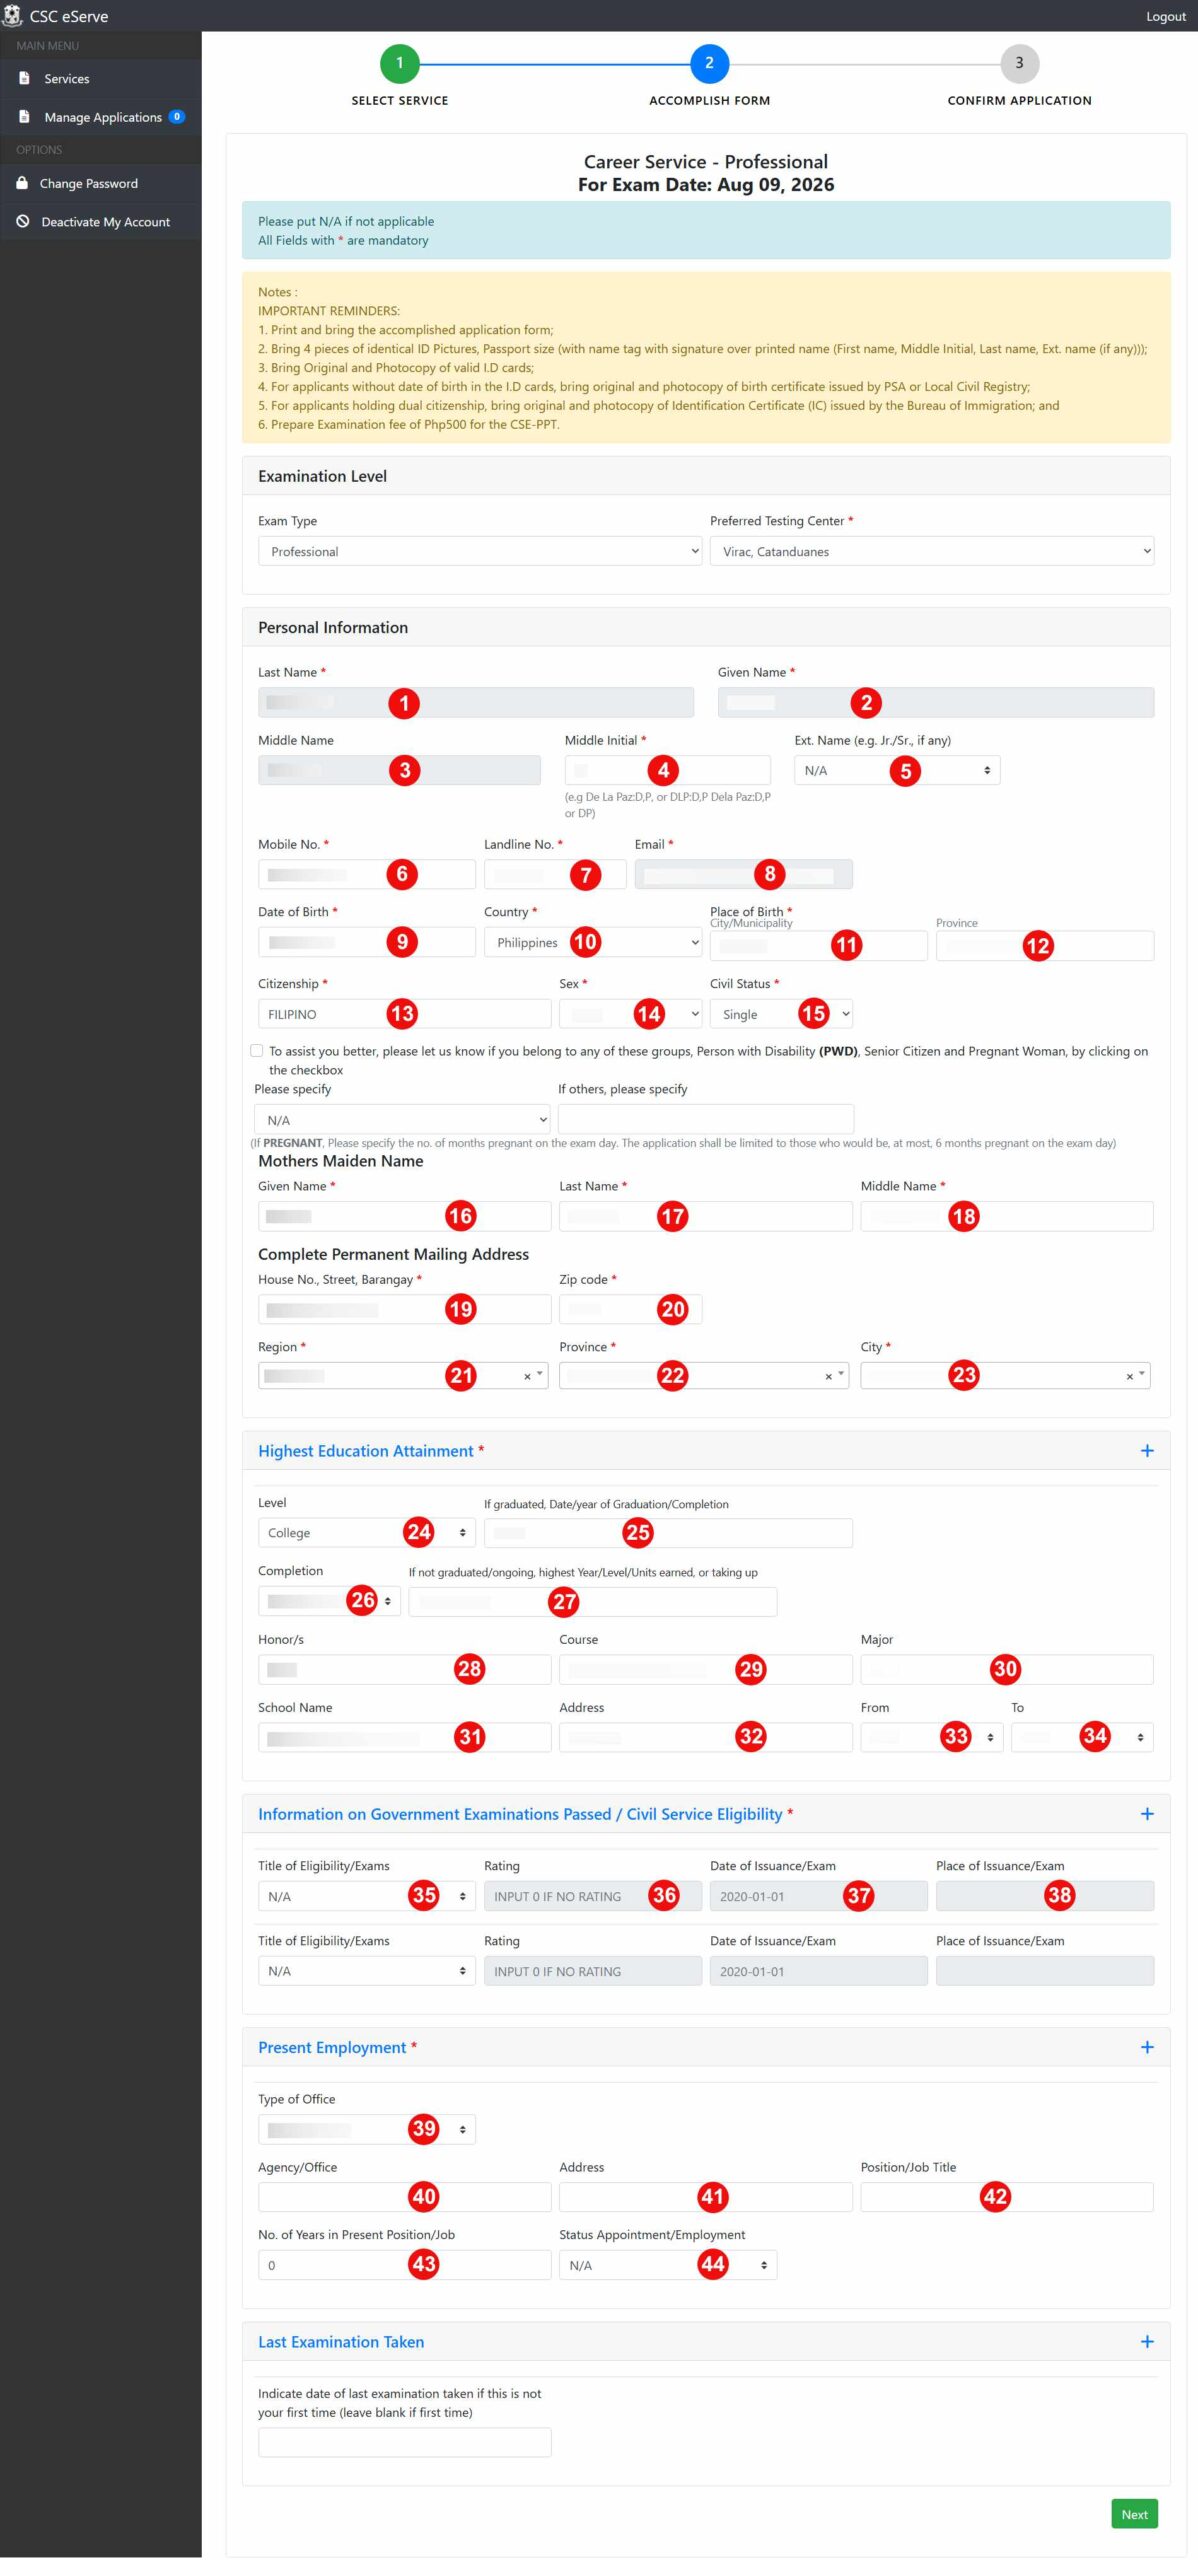
- Fill out the application form completely and accurately. Required fields are marked with a red asterisk (*). When you’re done, click the Next button.
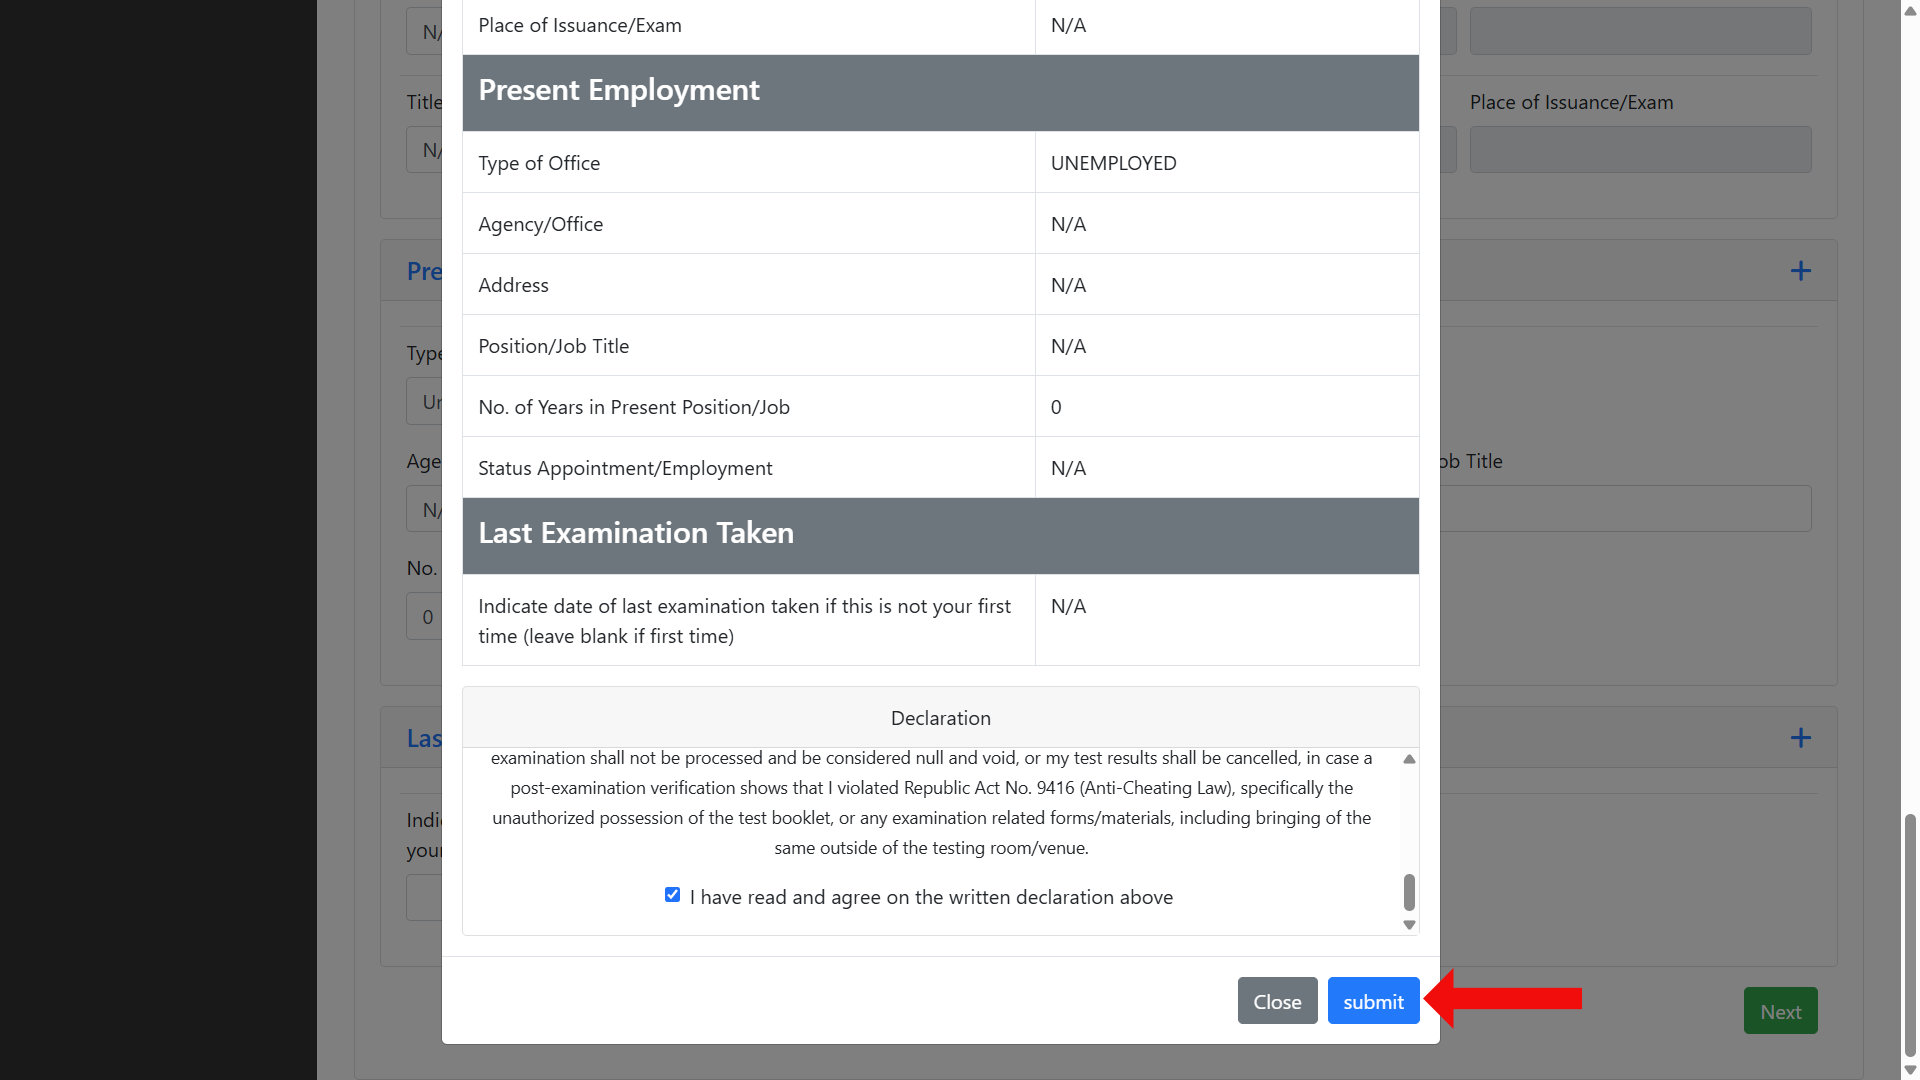
- Review your application form details carefully on the summary dialog. At the bottom of the dialog, you’ll find the Declaration. Read it, scroll all the way down to the end, and check the box that says “I have read and agree on the written declaration above.” Finally, click Submit.
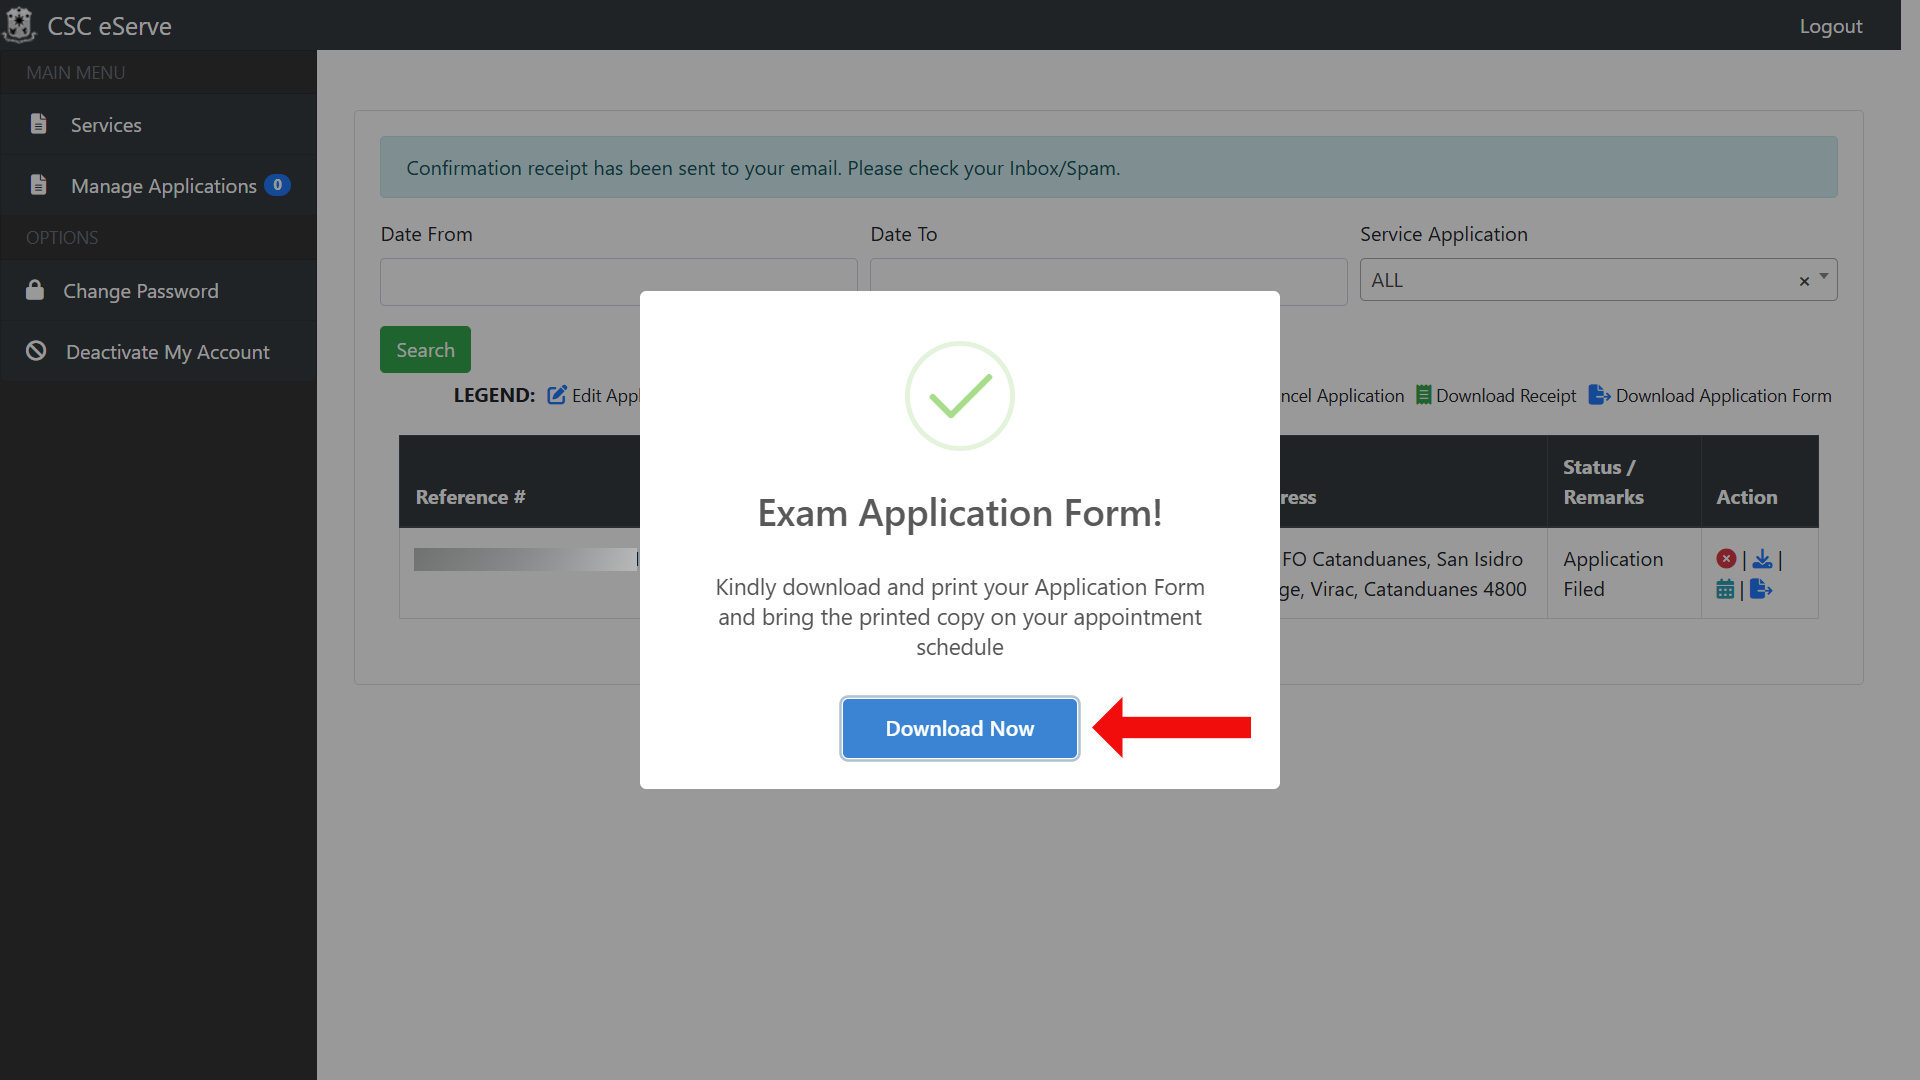
- Your application is now submitted. Click the Download Now button to save your application form, then print it. Bring the printed copy with you on your scheduled appointment date.
You can manage your application anytime by logging in to CSC eServe and clicking Manage Applications on the main menu. You can edit your application, view the application timeline, download the application form, and even cancel your application by clicking the corresponding icons (just refer to the accompanying legend on the page).
What to Bring on Your Appointment Date
On your scheduled appointment date, proceed to your selected CSC office and bring the following:
- The printed application form you downloaded from CSC eServe
- Four pieces of your identical passport-size ID pictures with the hand-held name tag
- The original and a photocopy of your valid government-issued ID
- A PSA or Local Civil Registry birth certificate (only if your date of birth isn’t on your ID)
- ₱500 in cash for the examination fee
Important reminder: CSC offices have a dress code. Sleeveless shirts and blouses, shorts and short pants, and slippers are not allowed at the CSC office.
Frequently Asked Questions
How much does the civil service exam application cost on eServe?
The CSE-PPT costs ₱500, which will be paid in cash at the CSC office on your appointment day. CSC eServe does not collect any payment online. The fee is identical for both the Professional and Sub-Professional levels.
Do I pick my exam schedule during the eServe application?
Yes. CSC eServe is appointment-based, so you get to choose your appointment date and time slot before filling out and submitting your application. This differs from OCSEAS, where you schedule your appearance only after your application is approved.
What documents do I need for the eServe civil service application?
You need a printed application form (downloaded after submission), four identical passport-size ID pictures with a hand-held name tag, and the original plus a photocopy of a valid government-issued ID. Bring a PSA birth certificate only if your date of birth isn’t printed on your ID, along with the ₱500 fee.
Which regions use CSC eServe instead of OCSEAS?
Per the official 2026 CSC examination announcement, eServe covers Regions II, III, V, VI, VIII, IX, XI, NCR, and BARMM. OCSEAS covers Regions I, IV, VII, X, XII, and CAR, while Caraga uses the Lingkod Bayani Kiosk. Always confirm against the current announcement, since NCR has switched systems between exam cycles.
Can I edit my application form after submitting it on eServe?
Yes, you can edit your CSC eServe application. Simply login to your eServe account, click Manage Applications on the main menu, and click the Edit Application icon (blue pencil).
Can I cancel my CSC eServe application?
Yes, you can cancel your eServe application anytime before your scheduled appointment. Just login to your eServe account, click Manage Applications on the main menu, and click the Cancel Application icon (red cross mark)
Final Thoughts
The Internet has really made it easier to apply for the civil service exam. Before I passed (and topped) the civil service exam in 2006, I had to spend the whole day at the CSC office, filling out paperwork and submitting them. Nowadays, applicants can use either CSC eServe or OCSEAS to apply for the civil service exam online, only going to the CSC office to submit their requirements and pay the application fee.
I last verified this guide in June 2026, based on the CSC eServe process and the ₱500 CSE-PPT fee in effect for the current exam cycle. Filing periods, slot availability, and even the system assigned to your region can change between batches, so always cross-check the latest CSC examination announcement for your exact details.
I hope this makes your civil service exam application stress-free. Bookmark this page (press Ctrl + D) so you can return to it on filing day. And if any step looks different on your screen or your region’s process doesn’t match what I described here, feel free to leave a comment below and I’ll help you figure it out. Good luck on your exam!